

Emerald glitter and soft sage can look like two different manicures until they share a hand. Green Christmas nails cover that whole range, from dark cat-eye velvet to pale mint peppermint swirls. White, silver, and cream keep the accents calm, so snowflakes, trees, plaid grids, and pinecones stand out. Shapes vary just as much. Short squares suit sage knit trees, ovals suit scattered stars, and long almonds or stilettos give swirls and filigree more room. Chrome, matte, and glossy finishes change the mood of green holiday nails again. Each design also notes how to describe it to a nail tech, which makes an emerald manicure easier to book.
Emerald Glitter With White Snowflakes and Candy Stripes
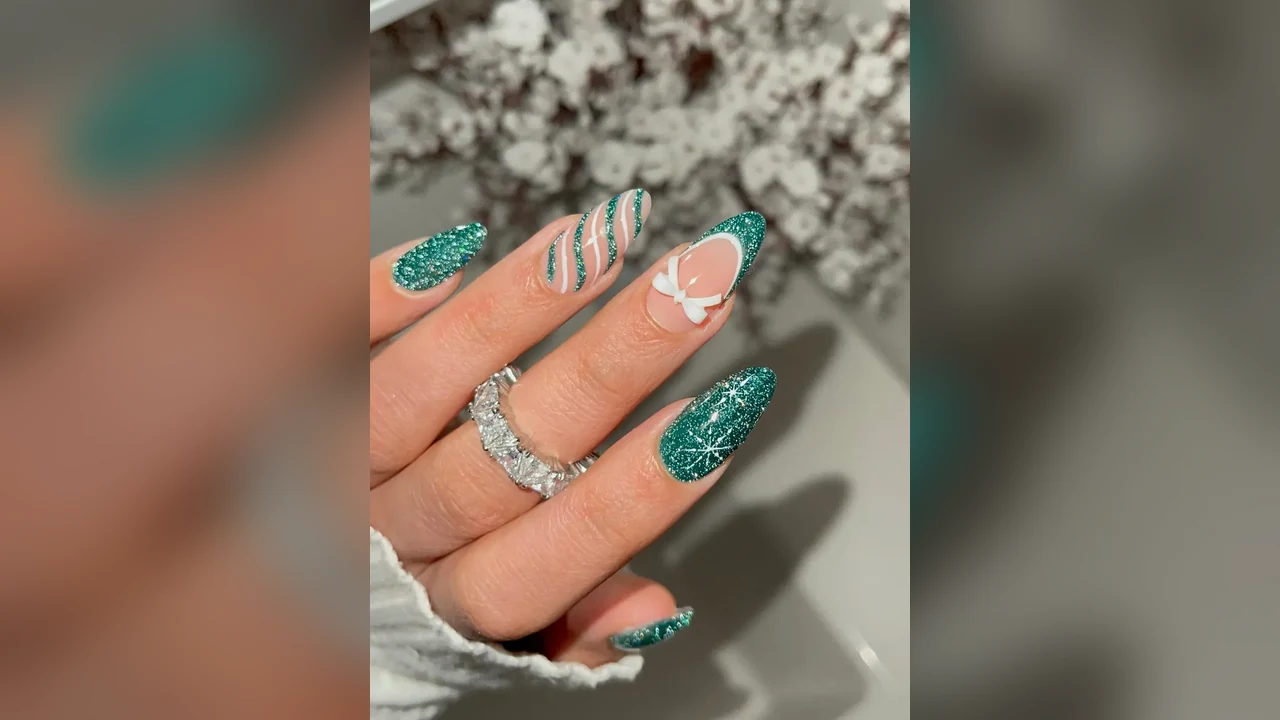
Glitter covers most fingers on long almond nails. One nail shows a large white snowflake on the same glitter base. Green and white candy stripes run down a middle nail. Small white bow sits on one pale tip nail. Glitter catches light from every side. Snowflake lines stay fine and even, and length ends just past the fingertip, with a smooth tapered point.
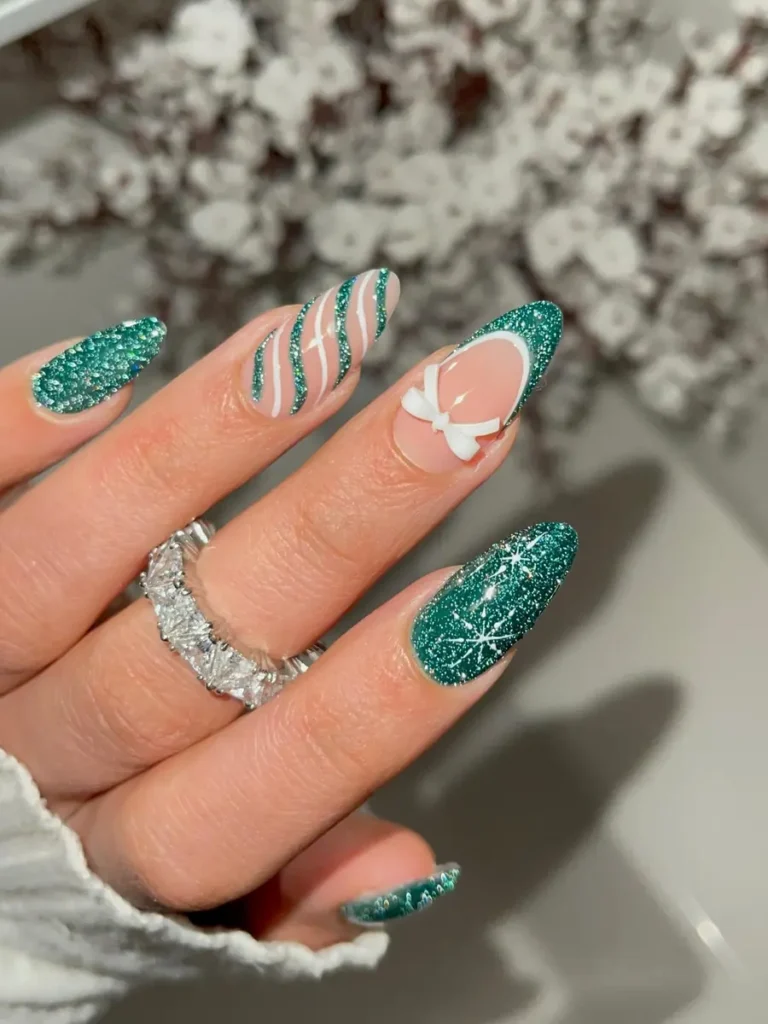
Request almond shape with emerald glitter gel and hand-painted white art. Glitter gel needs two thin coats for even cover. Thick coats can pool near the cuticle, so keep layers light. Keep the snowflake simple, since fine lines blur when polish runs thick. Top coat, a clear seal over colour, locks the bow in place. Gloves help for washing up, because water and soap can lift glitter edges fast.
Metallic Green Swirls Beside Matte Pine Trees
Swirls of metallic green and white glitter curve across long almond nails. Matte green trees sit on other nails, with one fine sweater pattern. Swirls bend like candy cane stripes, and matte and metallic finishes sit side by side. Light changes the look as the hand moves. Length ends past the fingertip, with a smooth almond taper. White glitter lines stay thin inside the green swirls.
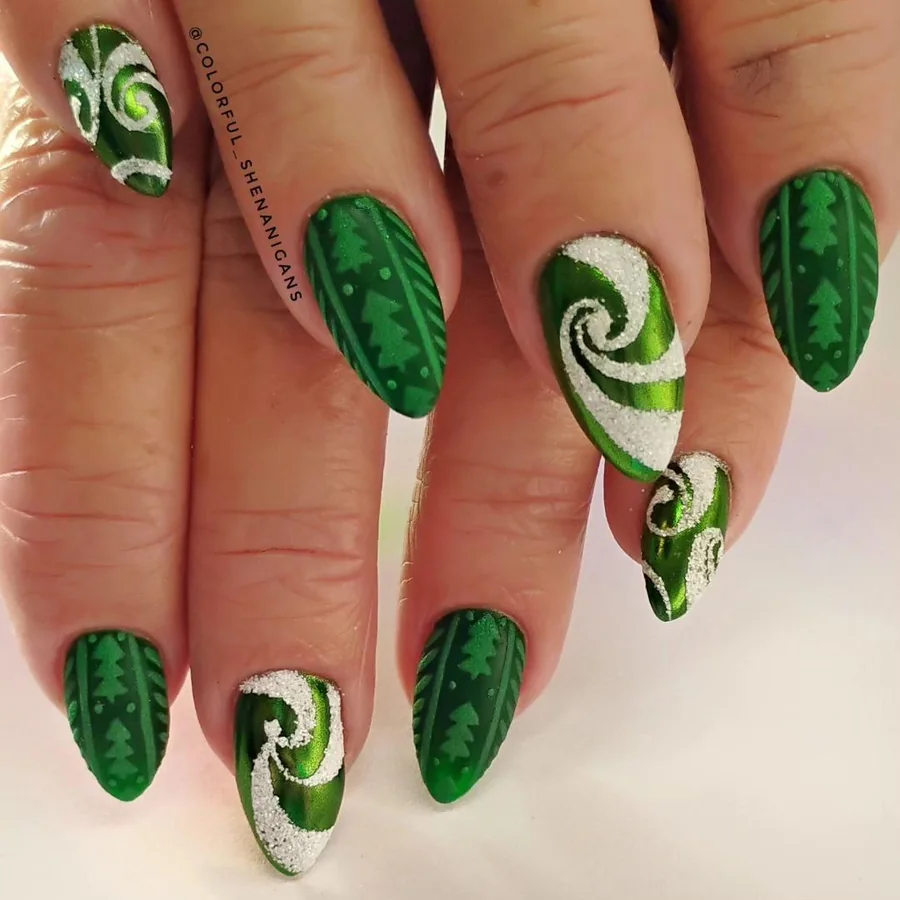
Mix metallic swirls and matte trees on a dry base. Wet metallic polish can bleed into white lines, so let each layer set. Use matte top coat only on the tree nails, and keep the two finishes apart. Draw sweater lines with a fine brush in short strokes. Short strokes keep the lines even. Shorten the almond point a little for daily wear, since sharp points chip faster.
Short Emerald Velvet With a Soft Shimmer
Deep emerald velvet covers short square nails, with a cat-eye finish that shifts light in a soft band. No art sits on the nails. Colour stays even from cuticle to tip. Light moves across the surface as the hand turns, which gives plain colour depth. Length ends right at the fingertip. Square corners stay gentle, and a soft shine sits under the velvet effect.
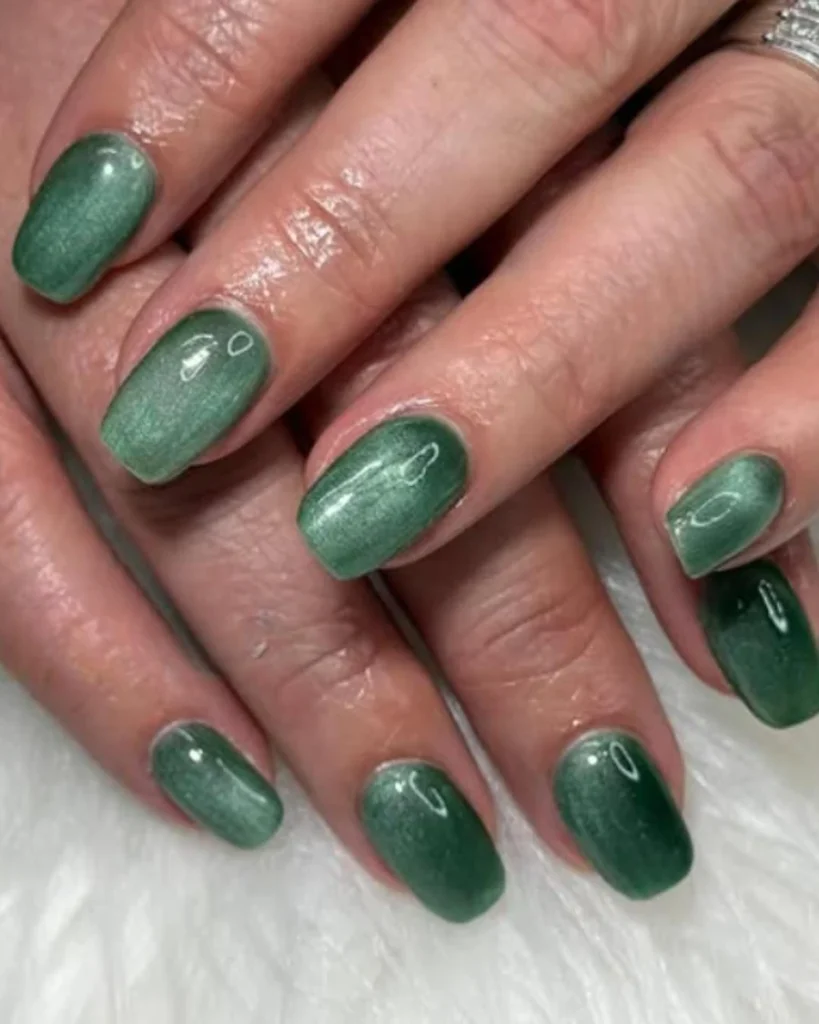
Hold a magnet near wet polish to shape the velvet band. Keep it still for a few seconds per nail, because movement can blur the band. Use two thin coats for even colour, and cap the free edge to stop chips. Short lengths suit this finish well. Band reads clearly on a small surface. Cuticle oil, a light oil for skin around nails, keeps the edges neat between fills.
Bright Green Glitter Ombre With Snowflake Tips
Sheer nude base fades into bright green glitter at the tips on medium almond nails. Ombre means a soft fade from one shade to another. White snowflakes sit on the green ends. Small starbursts and bauble shapes decorate two accent nails. Glitter grows denser toward the tips, and the nude base stays clear. Length ends a short way past the fingertip, with a smooth almond curve.
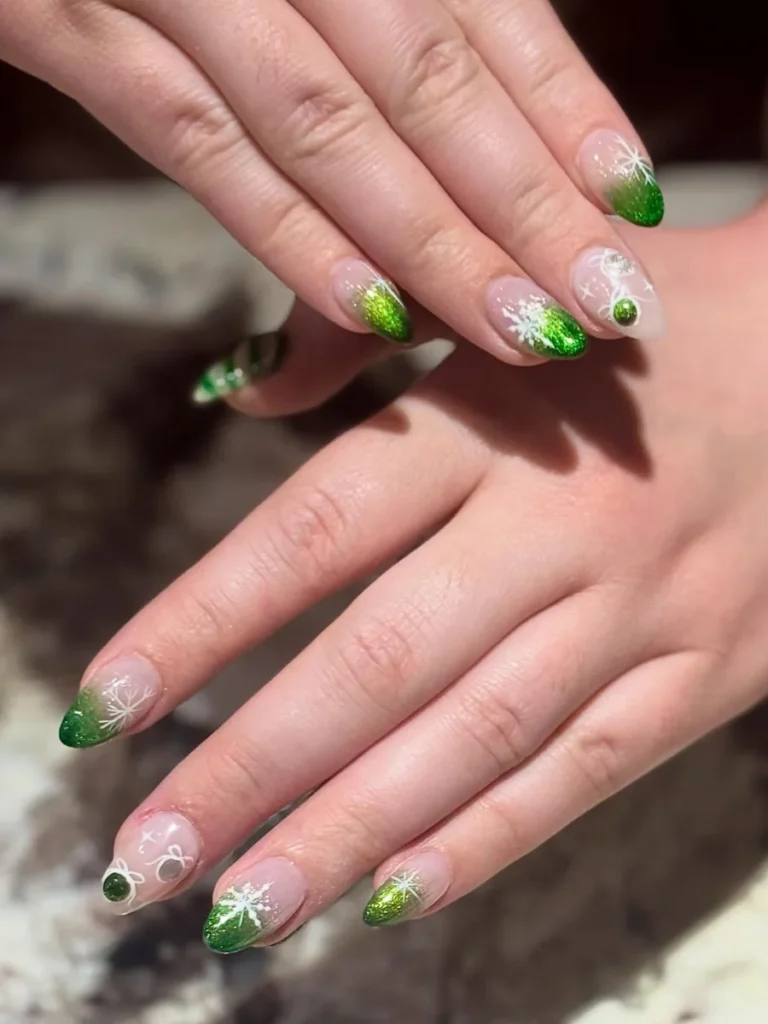
Sponge green glitter on in thin layers over a nude base. One thick layer can look patchy, so build the fade slowly. Dab lightly to blend the fade, and stop the glitter short of the cuticle for a clean grow-out. Let the glitter set before adding snowflakes. Dry base keeps white lines crisp. Smooth the glitter with top coat for shine and hold.
Sage Green With White Sweater Trees
Soft sage green covers short square nails with a low gloss. Ring fingers carry white sweater trees. Tree lines look like knit stitches, with tiny branches stacked in a neat row. Sage covers the other nails in one even coat. White art stays thin and clean across the set. Length ends right at the fingertip, with straight sides and soft corners.
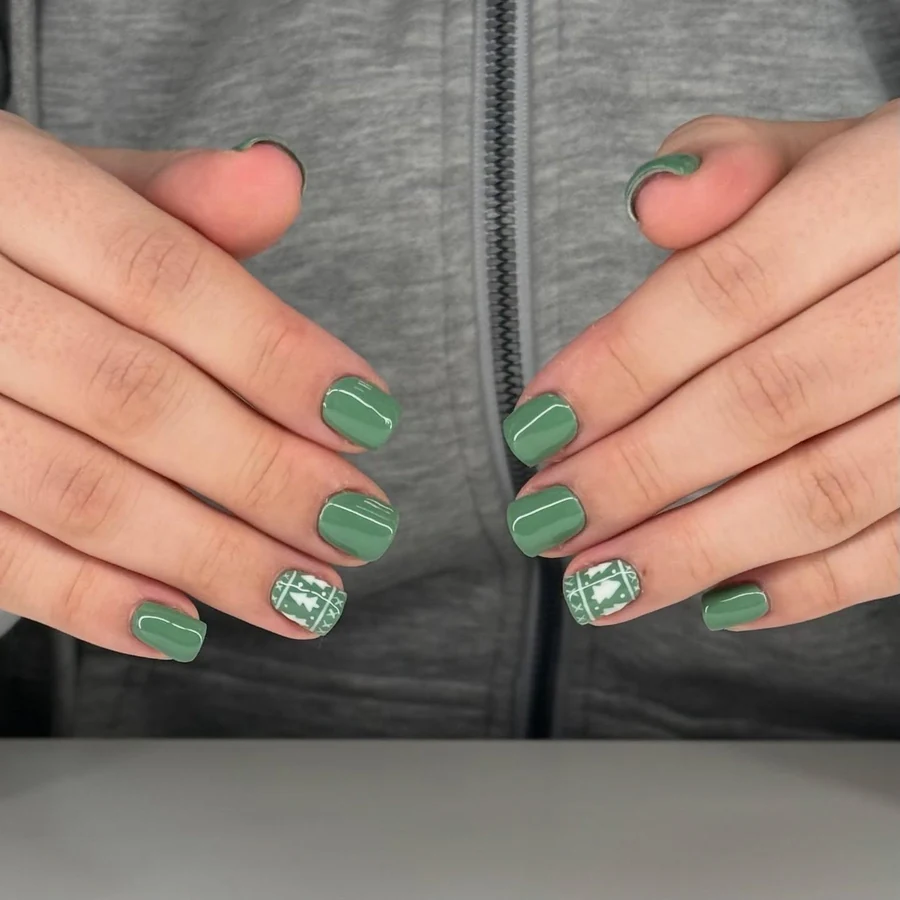
Paint the knit trees with a fine brush for clean stitch lines. Thick brushes can flood the small tree shape, so keep the tool thin. Keep trees to one or two nails. Too many white trees can crowd a short nail. Sage shows chips less than dark green, which means grow-out looks softer. Add top coat every few days to keep the white lines bright.
Emerald Shimmer With White Stars and Snowflakes
Stars and snowflakes scatter across medium oval nails in shimmery emerald. Some stars have four points, and some snowflakes have six fine arms. Silver dust sits inside a few stars, which adds a faint sparkle. Length ends a short way past the fingertip, with a rounded oval curve. Shimmer moves softly as the hand turns, and white art stays thin against the green.
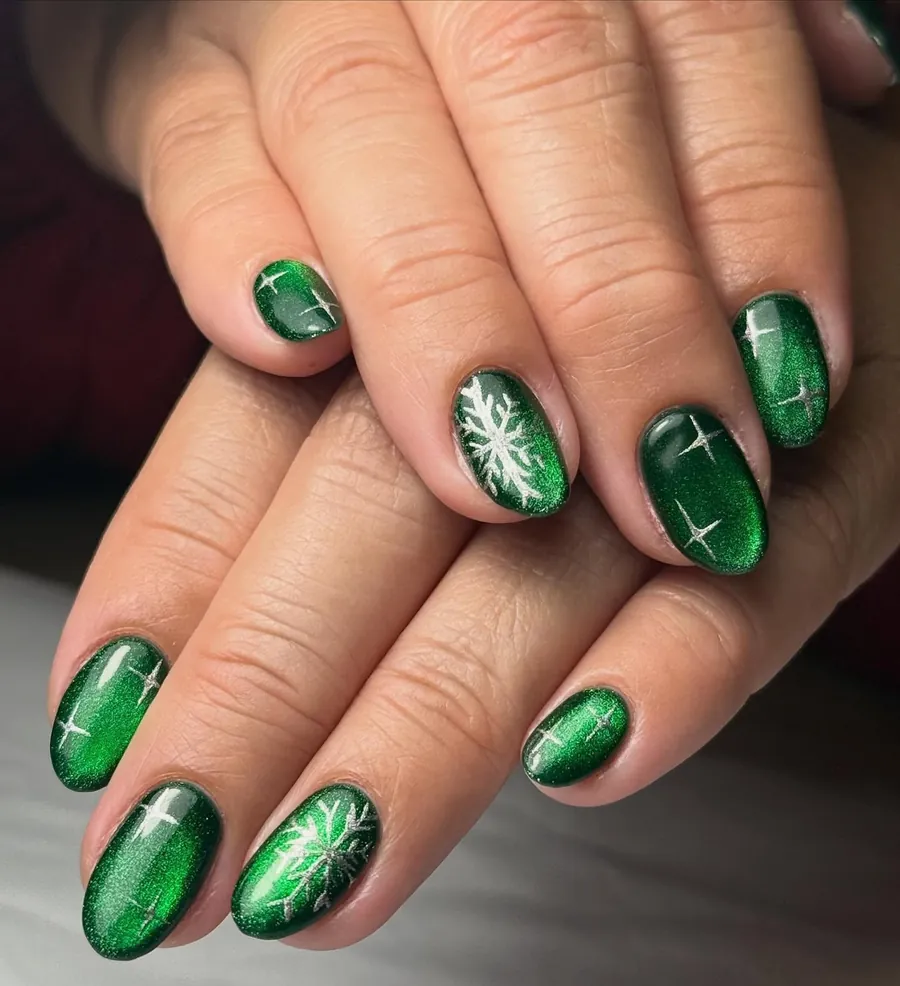
Scatter small stars across the set, since large stars can crowd an oval nail. Use a dotting tool for neat star centres, and a fine brush for the arms. Oval nails suit scatter art well. Round shape gives each motif room. Add top coat to stop the white lines from wearing. Fix a chipped star with a tiny brush and fresh top coat.
Glossy Emerald Stilettos With White Snowflake Filigree
Gloss covers long stiletto nails in bright emerald green. Two accent nails carry white snowflake filigree, with fine branches and small dots. Other nails stay plain, with a high shine that reflects light. Length ends well past the fingertip, with sides tapering to sharp points. White art stays thin against the green, and the filigree lines curve in a neat pattern.
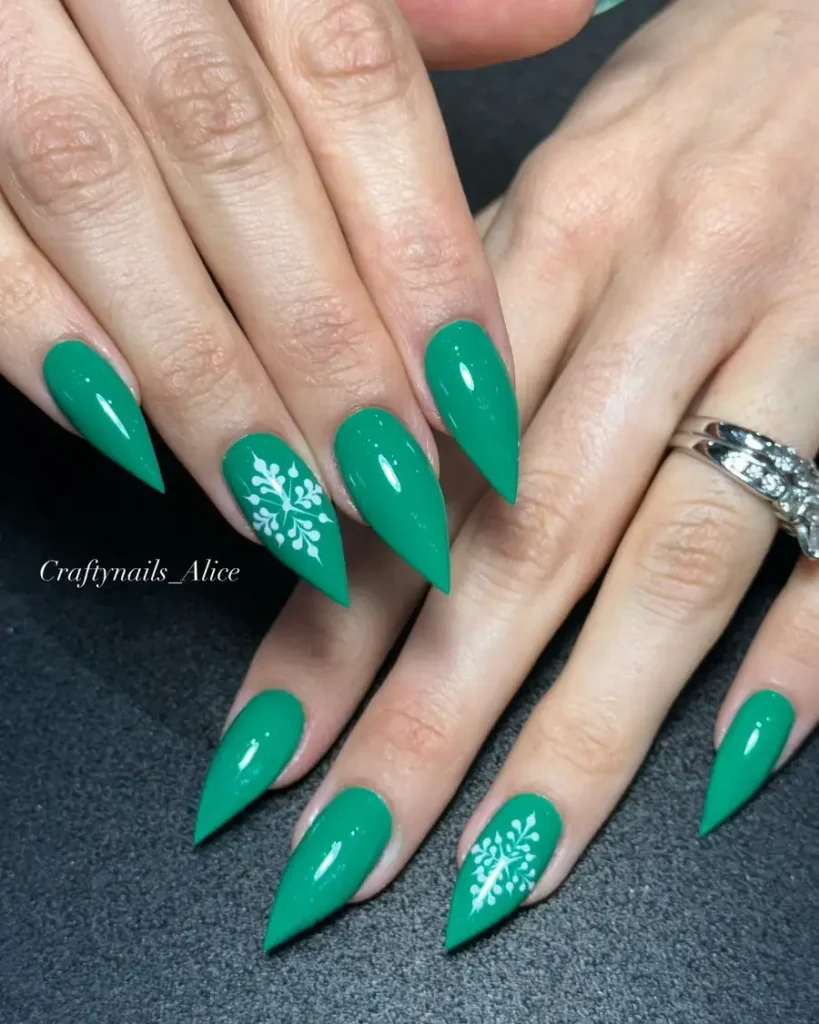
Build long stilettos on a strong base for lasting wear. Builder gel, a thick gel that adds strength, helps stop breaks. Keep filigree lines fine, because thick white lines can blur on a pointed nail. Ask for one or two art nails per hand. Shorten the point slightly if daily tasks feel awkward, since a blunter tip lasts longer. Seal with top coat to lock the white art in place.
Green Plaid With White Bows on Almond Nails
Plaid pattern in mint, emerald and olive crosses medium almond nails. Thin white lines cut the squares into a neat grid. Small white bows sit on two accent nails. Gloss runs smooth over the pattern, with no raised lines where colours cross. Length ends a short way past the fingertip. Almond curve stays soft, and white lines keep the mix of greens easy to read.
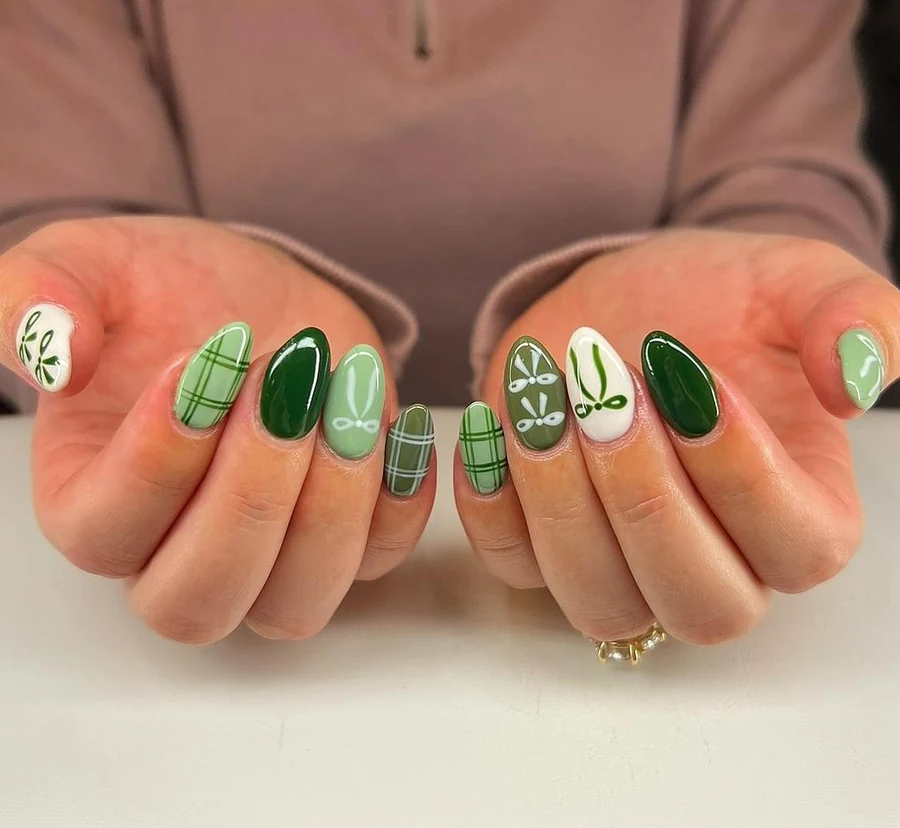
Work from a dry green base before adding plaid lines. Wet layers drag and blur the grid, so let each coat set first. Use a fine brush or striping tape for straight white lines. Short almond length holds the pattern well. Long nails can stretch the squares out of shape. Seal bows with top coat for extra hold on the edges.
Emerald Glitter French Tips With Snowflake Corners
Nude base shows under emerald glitter French tips on medium square nails. French tips mean colour on only the free edge. White snowflakes sit near the corners of the green tips. Striped accents appear on two nails. Length ends a short way past the fingertip, with straight sides and soft corners. Glitter packs dense at the tips. Nude base keeps the set light, while green tips carry the colour.
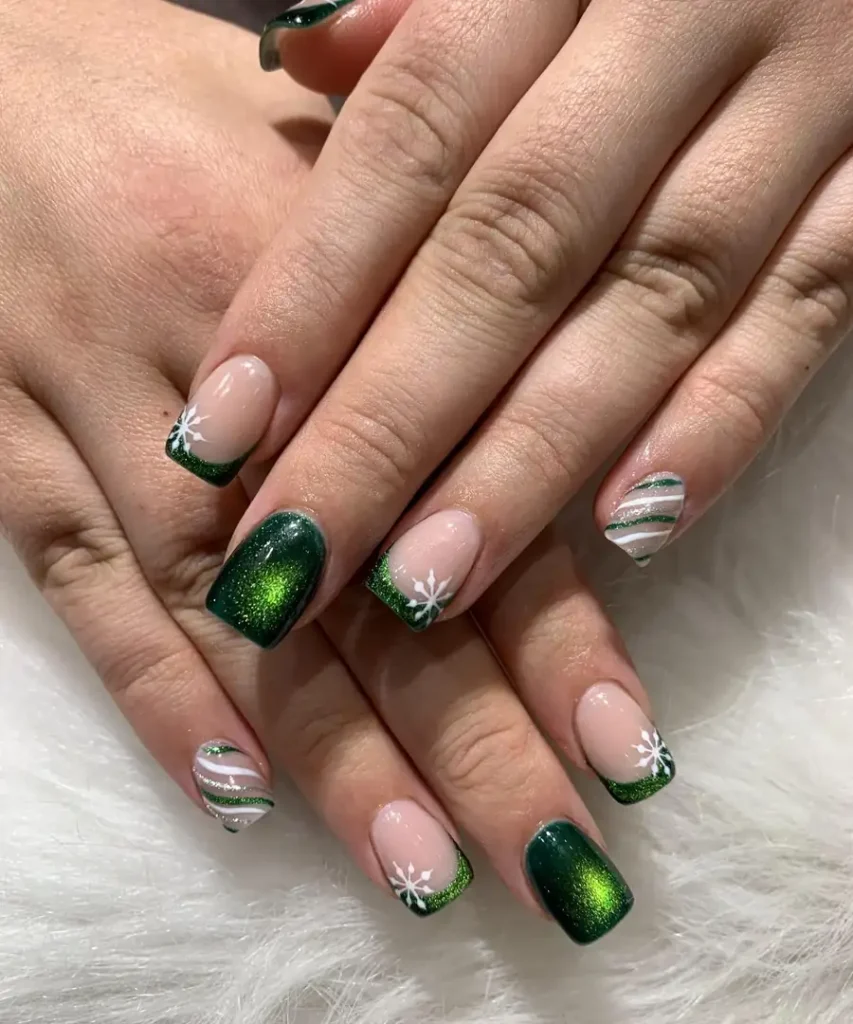
Line the tips with a thin brush and a steady smile line. Uneven lines show fast on square nails, so work slowly. Add snowflakes after the glitter sets, so white lines stay crisp. Square nails suit French tips well. Straight edge gives a clean line. Seal with top coat, and reapply it after a few days to stop the tips from wearing.
Dark Green and White Trees, Bows and Dots
Zigzag trees, small bows and polka dots sit on white nails beside solid dark green. Long almond nails mix the two colours across the set. White snowflakes appear on a few green nails, and the art stays small and neat. Length ends well past the fingertip, with a smooth almond taper. Gloss gives the green a deep shine, and white motifs read clearly against it.
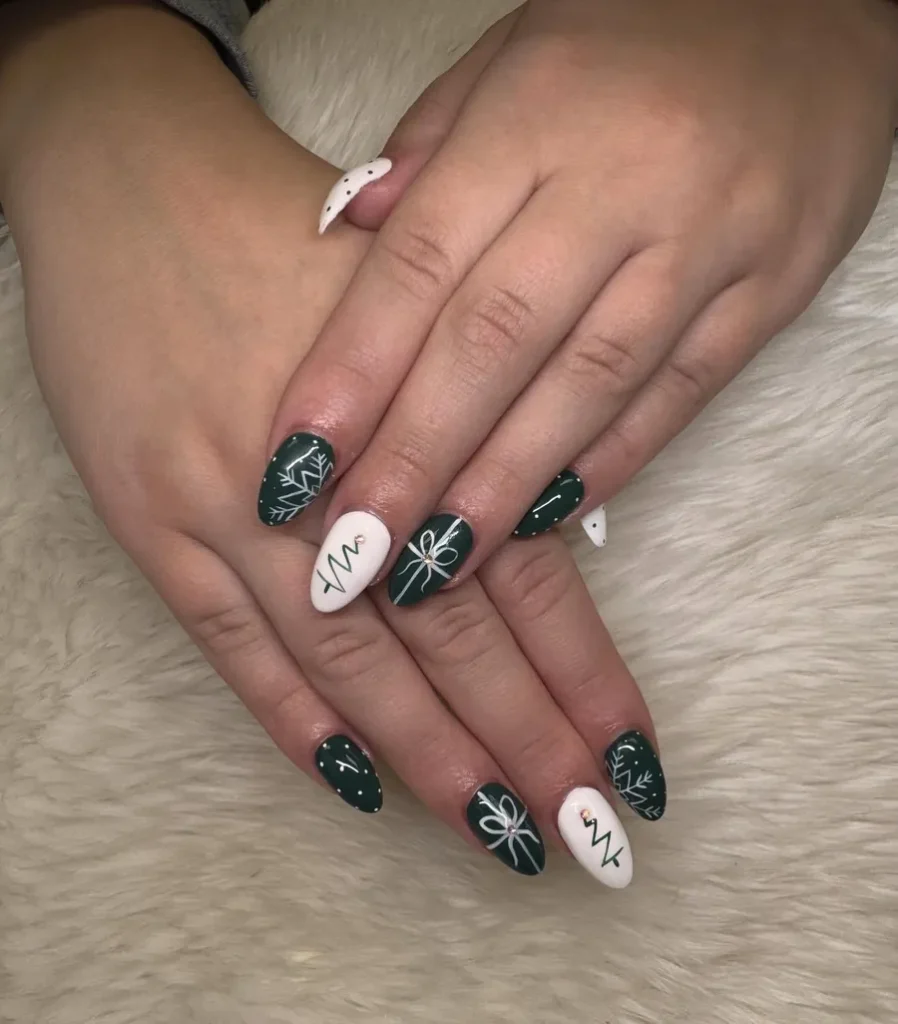
Keep each motif small, because several large motifs can fight for space on one nail. Paint zigzag trees with a thin brush, and use a dotting tool for even dots. Long nails give the art room, so ask for two or three art nails per hand. Seal with top coat, and check bow edges daily, since raised art can lift. File a snagged corner smooth right away.
Deep Emerald Cat-Eye Fading to Glitter Tips
Cat-eye bands run down long almond nails in deep emerald. Glitter gathers near the tips and fades back toward the cuticle. Ends look brighter than the base, and no other art sits on the nails. Colour stays dark and even. Length ends well past the fingertip, with a smooth almond curve. Light moves in a soft line across the surface as the hand turns.
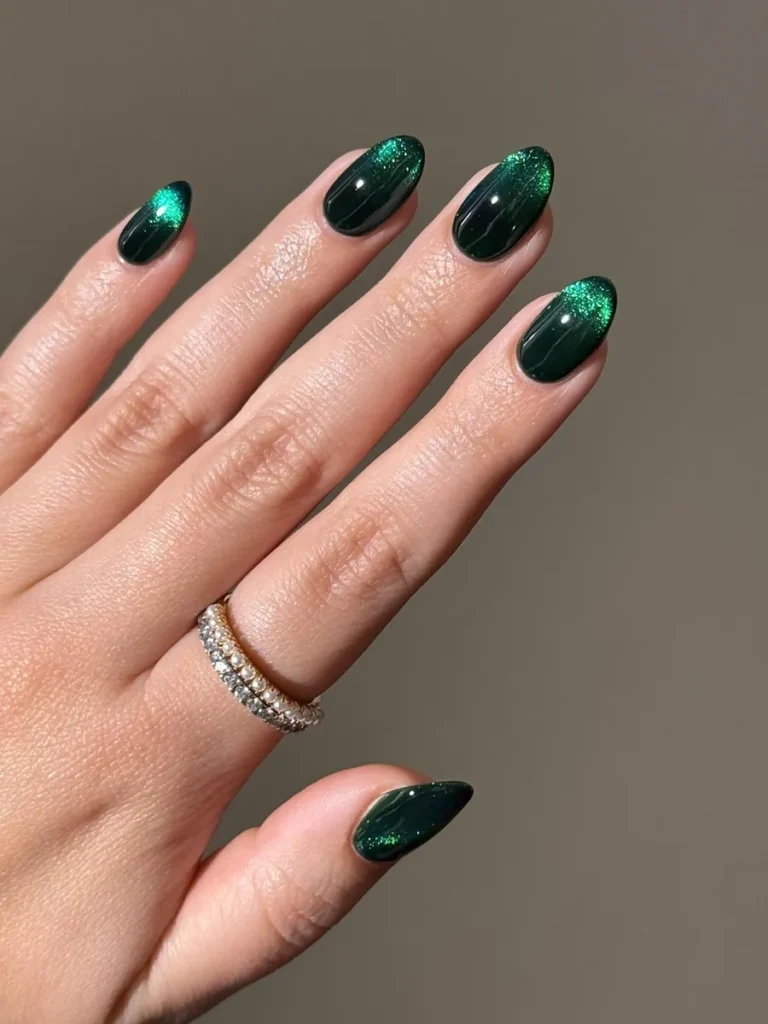
Blend glitter in from the tips after shaping the cat-eye band. Shape the band with a magnet first, then sponge glitter on while gel stays tacky. Dab the glitter edge lightly, because a hard line can look like a stripe. Long almond nails suit the fade well. Length gives the glitter room to soften. Cap the free edge with top coat to stop tip wear.
Mint Glitter With White Peppermint Swirls
Peppermint swirls and stripes in white curl across mint glitter on medium almond nails. Swirls bend in tight spirals, and stripes run diagonal across the nail. Mint glitter covers the other nails in a dense sparkle. White art stays crisp. Length ends a short way past the fingertip, with a smooth almond curve. Light catches the glitter from every side, while white swirls stay soft and clean.
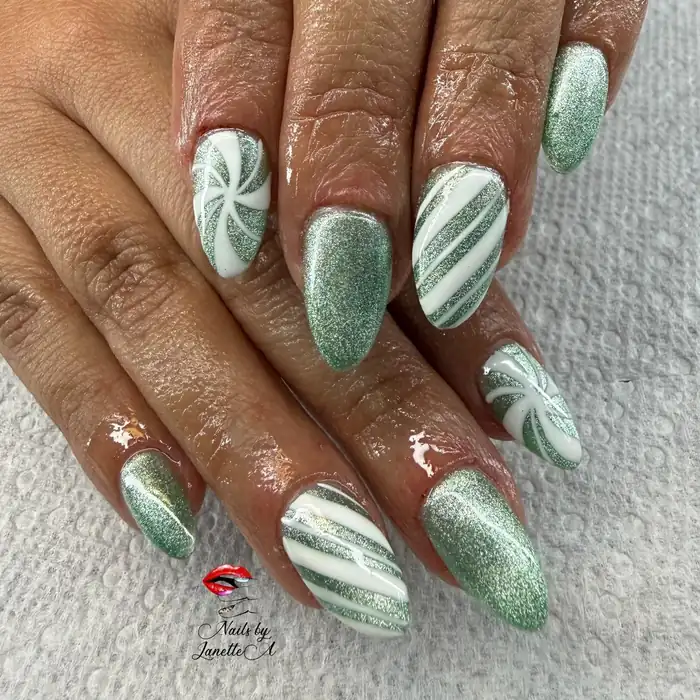
Curl white swirls with a fine brush on a dry glitter base. Wet glitter can pull white lines out of shape, so let the base set first. Keep spirals tight, since loose swirls can look like plain stripes. Mint glitter needs two coats for full cover. Smooth the sparkle with top coat. Wear gloves for dishes, because water can lift glitter edges fast.
White Nails With Brown Pinecones and Green Needles
Brown pinecones sit on white nails, with green pine needles fanning out beside them. Metallic green glitter covers the other short square nails. White nails stay plain apart from the art. Glitter nails carry a dense green sparkle. Length ends right at the fingertip, with straight sides and soft corners. Only four fingers show in the photo, and each nail holds one clear motif.
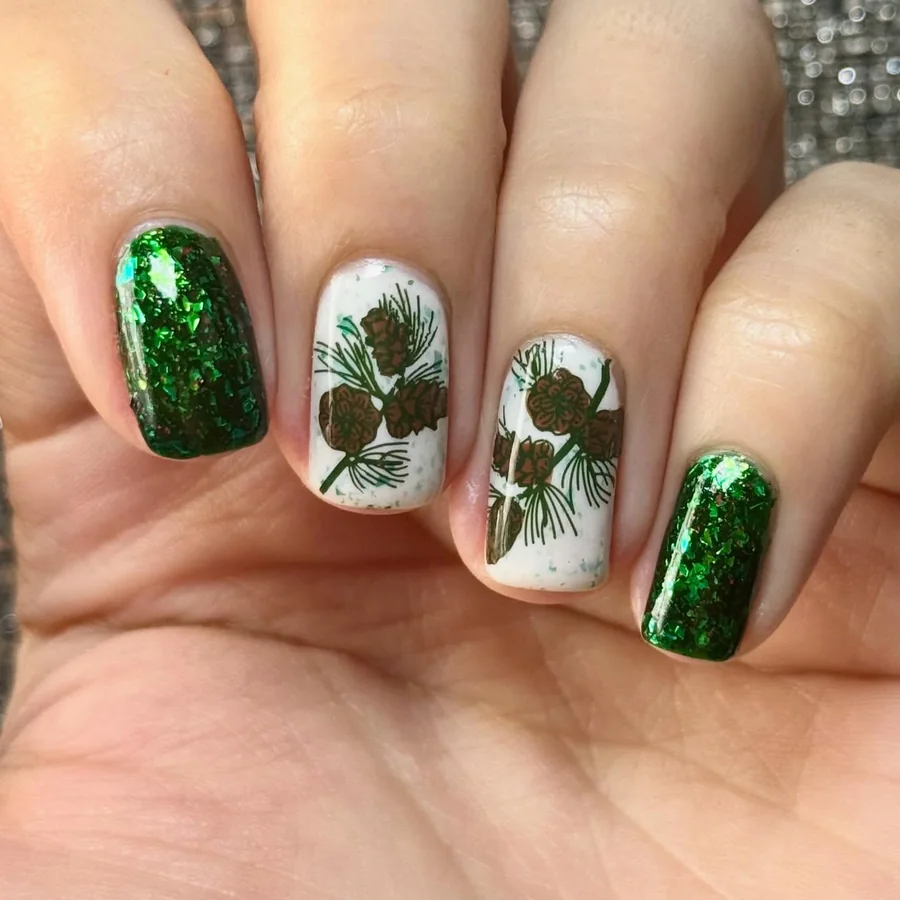
Draw pinecones with a fine brush in two brown shades. One flat brown can look muddy, so layer a light shade over a dark one. Keep needles thin and spaced, since crowded lines can hide the cone shape. Glitter nails need two coats for full cover. Smooth the sparkle with top coat. Wear gloves for cleaning, because glitter edges can lift with harsh soap.
Emerald Glitter With Fine White Snowflakes
Fine white snowflakes scatter across medium oval nails in emerald glitter. Each snowflake has six thin arms, and glitter shows through the gaps. No other art sits on the nails. Colour stays even from cuticle to tip. Length ends a short way past the fingertip, with a rounded oval curve. Light moves across the glitter as the hand turns, and white flakes stay crisp.
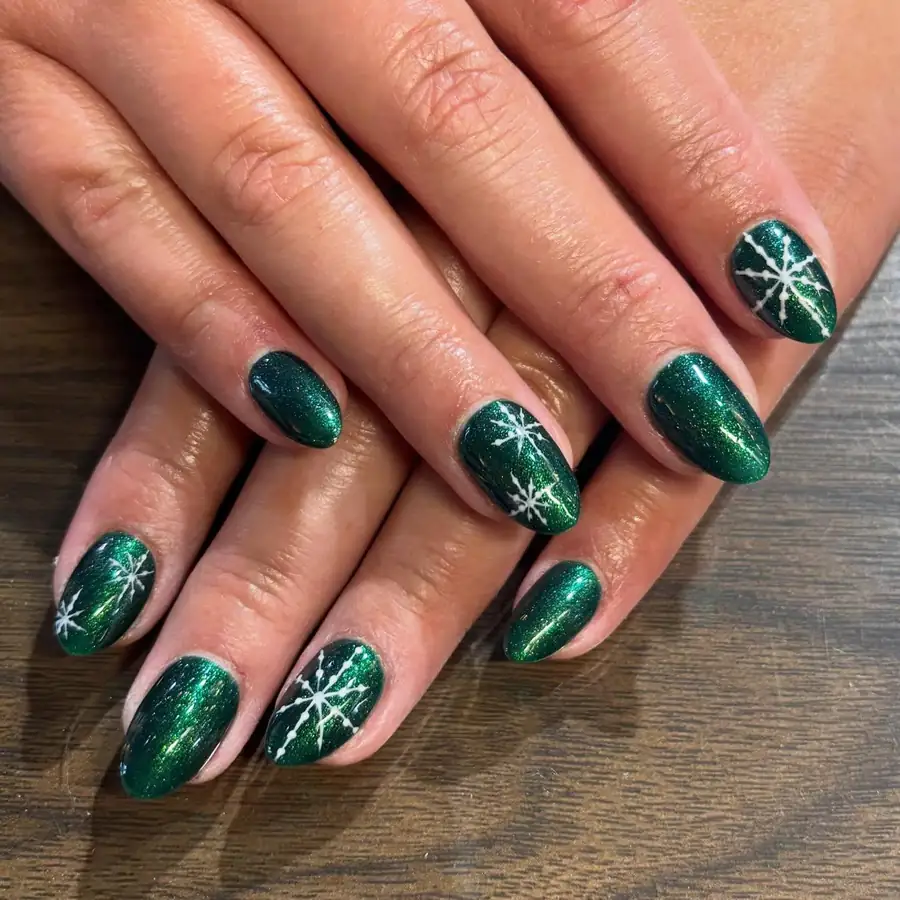
Dot each snowflake centre before drawing the arms. Fine brush draws the arms best, and a dotting tool marks the centres. Keep flakes small, because large flakes can overwhelm an oval nail. Oval nails suit scatter art well. Round shape gives each flake room to show clearly. Glitter needs two coats for even cover, and top coat smooths the sparkle.
Emerald Glitter French Tips on a Pale Pink Base
Pale pink base shows under metallic emerald glitter French tips on short square nails. French tips mean colour on only the free edge. One ring finger carries a wavy green line in the same glitter. Tips stay crisp and even, with a sharp smile line. Length ends right at the fingertip, with straight sides and soft corners. Glitter packs dense at the tips, and the pink base keeps the set light.
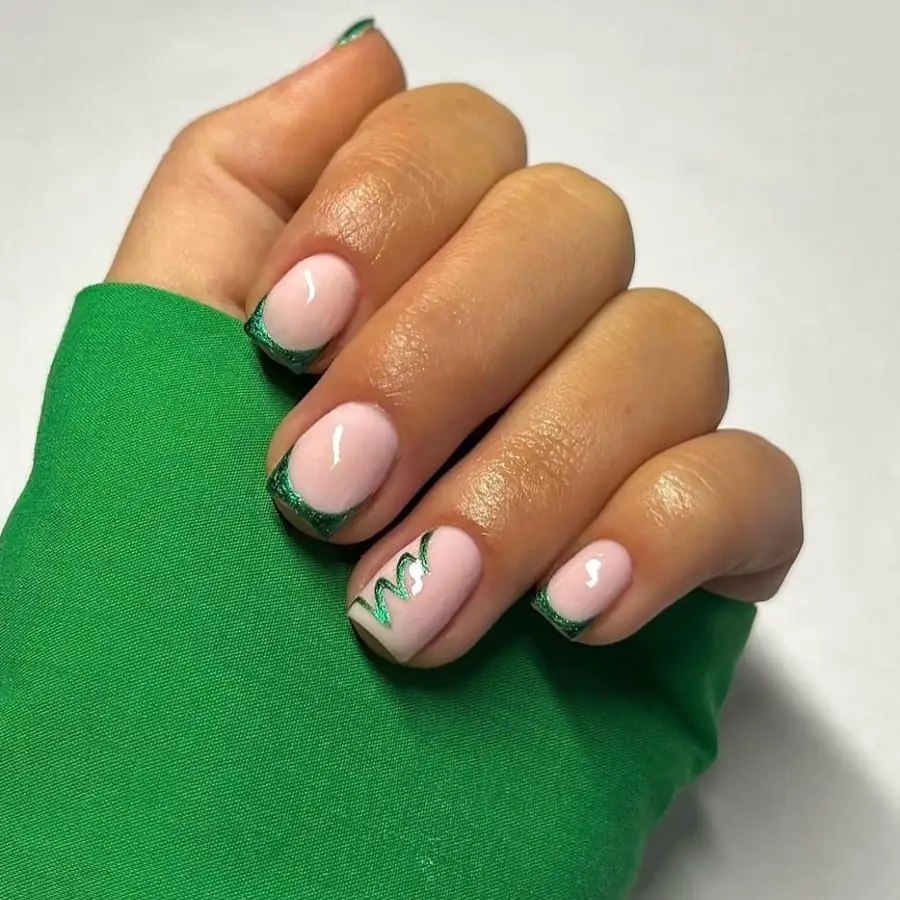
Draw the tips with a thin brush and a steady smile line. Uneven lines show fast on square nails, so work slowly. Paint the wavy accent after the tips set, so the green line stays crisp. Short square nails suit French tips well. Straight edge gives a clean line. Seal with top coat, and reapply it after a few days to stop the tips from wearing.
Emerald Glitter Beside Sheer Nails With White Snowflakes
Sheer nude nails sit beside emerald glitter on long almond nails. White snowflakes sit on the nude nails, and glitter nails stay plain apart from their sparkle. Length ends well past the fingertip, with a smooth almond taper. Nude nails look light and clear, while green nails carry a dense glitter. White flakes stay fine and even, and the two finishes sit side by side without clashing.
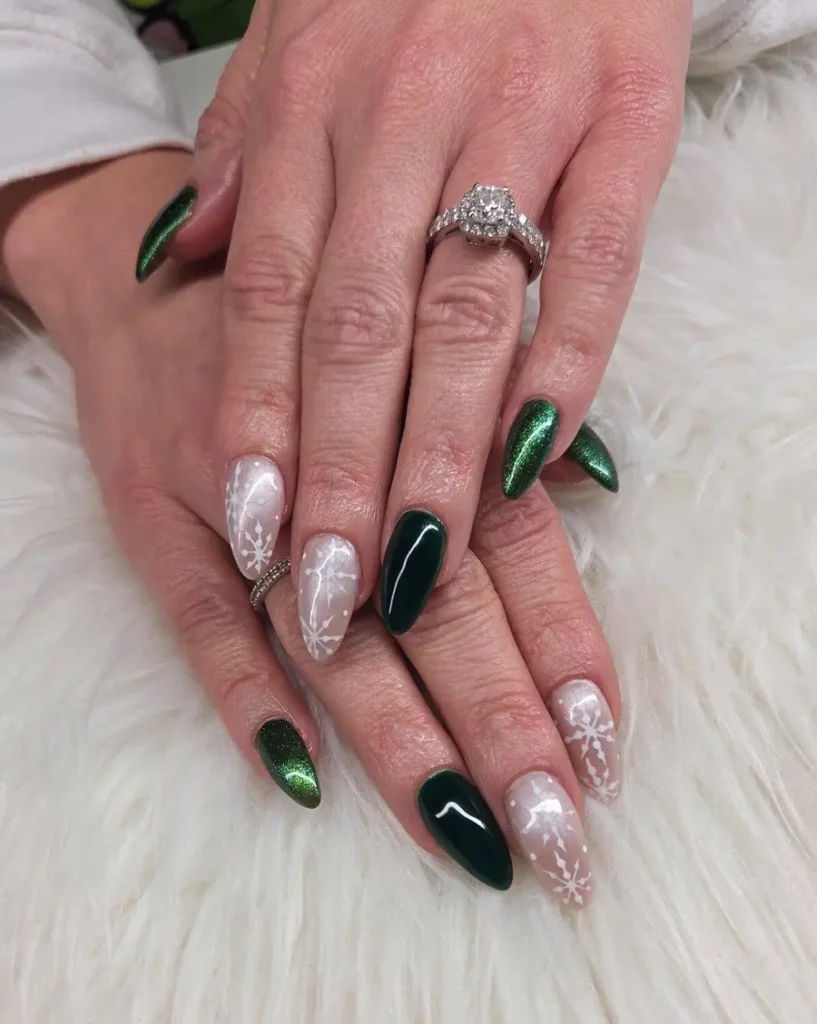
Alternate glitter and nude nails, because a clear pattern keeps the set balanced. Paint snowflakes on a dry nude base, so white lines stay sharp. Long almond nails suit this mix well. Length shows both finishes clearly. Seal with top coat, and reapply it midweek to keep the glitter smooth. Fix a dull flake with a tiny brush and fresh top coat.
Mirror Emerald Chrome and One Small White Star
Chrome covers medium almond nails in metallic emerald, with no art on most fingers. One nail carries a single small white starburst near the cuticle. Fine rays spread out from the star. Length ends a short way past the fingertip, with a smooth almond curve. Chrome reflects light in a bright band down each nail, and the single star adds a quiet accent.
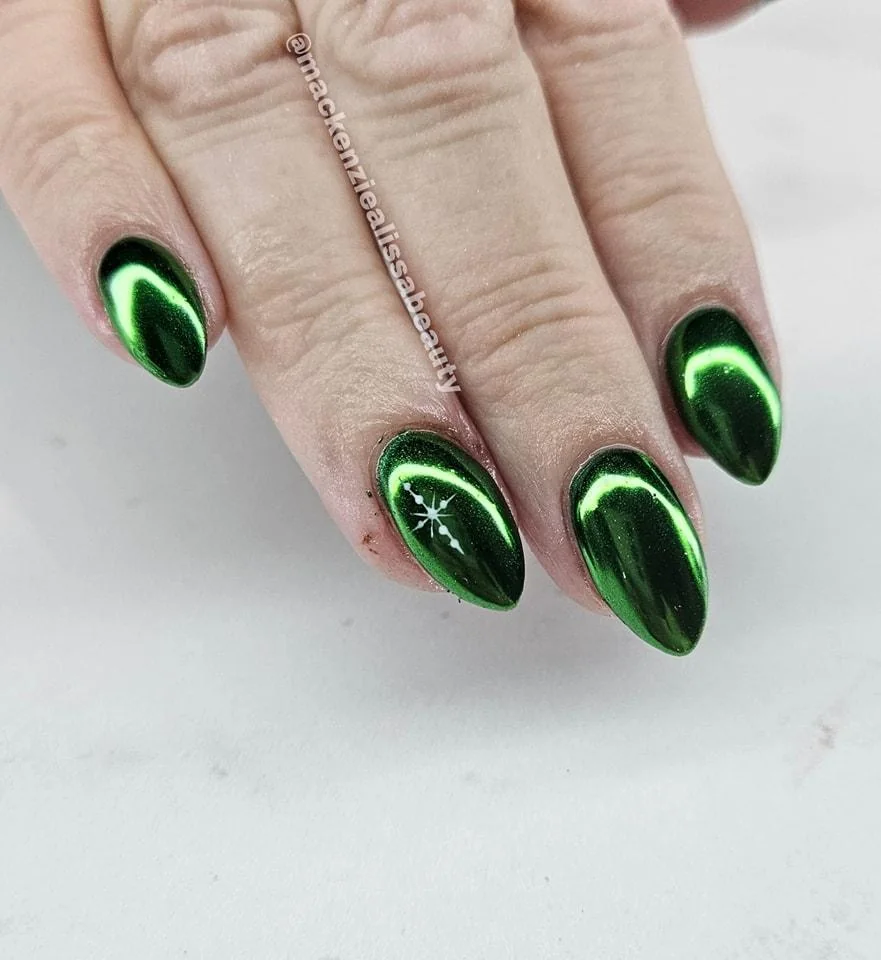
Seal chrome powder right after rubbing it on, so it stays bright. Chrome needs a perfectly smooth base, because every bump shows through the mirror shine. Use a soft applicator, and keep the star to one nail. Plain chrome suits a single accent best. Handle nails gently for a day, because chrome can mark before the seal fully sets. Top coat locks the shine in place.
Dotted Wreath and Tree on Dark Emerald Glitter
Dark emerald glitter covers two short oval nails, with a dense sparkle. Nude nails beside them carry a dotted wreath in green and white, topped with a silver bow. Another nude nail shows a dotted tree in green and white, topped with a silver star. Length ends right at the fingertip, with a rounded oval curve. Dots sit in a neat ring, and the tree dots stack in rows.
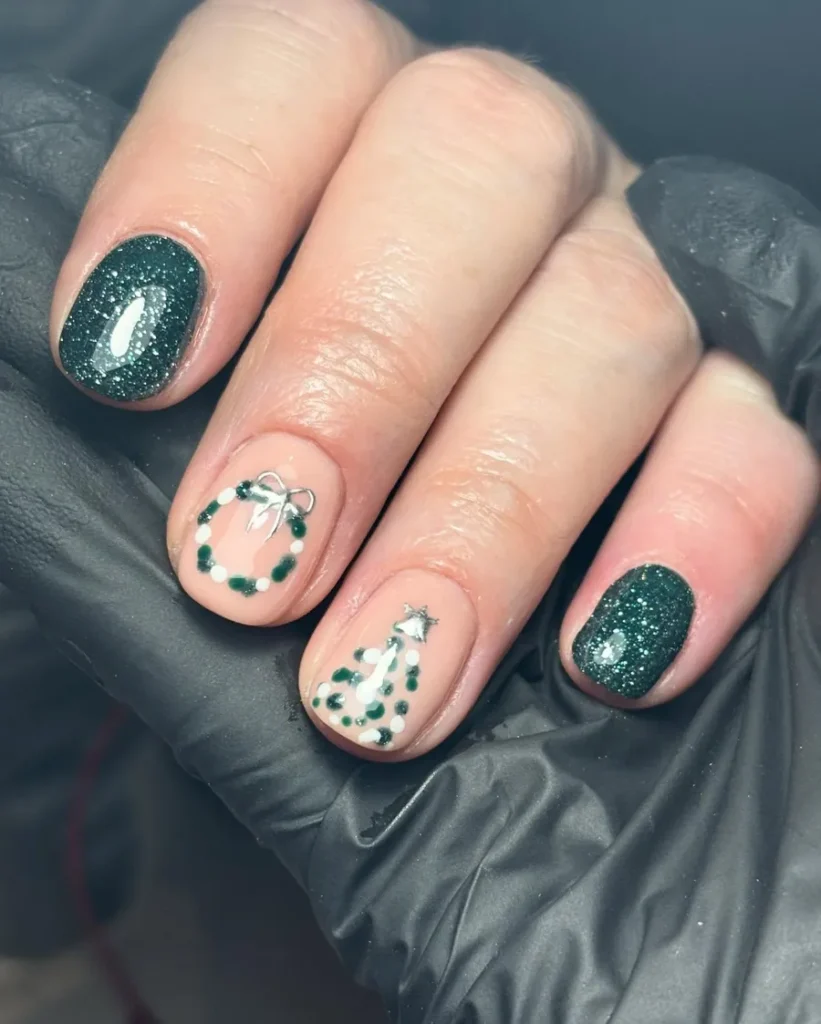
Place dots with a dotting tool for even size and spacing. Green and white dots need a dry base, so let the glitter set first. Draw the silver bow with a fine brush, and keep the lines thin. Short oval nails suit small art well. Round shape gives each motif room. Seal with top coat, and fix a smudged dot with a tiny brush.
Dark Green Cat-Eye With Silver Glitter French Tips
Silver glitter French tips top long square nails in dark green cat-eye. French tips mean colour on only the free edge. One nail carries a white snowflake. Silver tips sparkle against the dark base. Length ends well past the fingertip, with straight sides and sharp square corners. Light runs in a soft band down each dark nail, and silver tips catch it first.
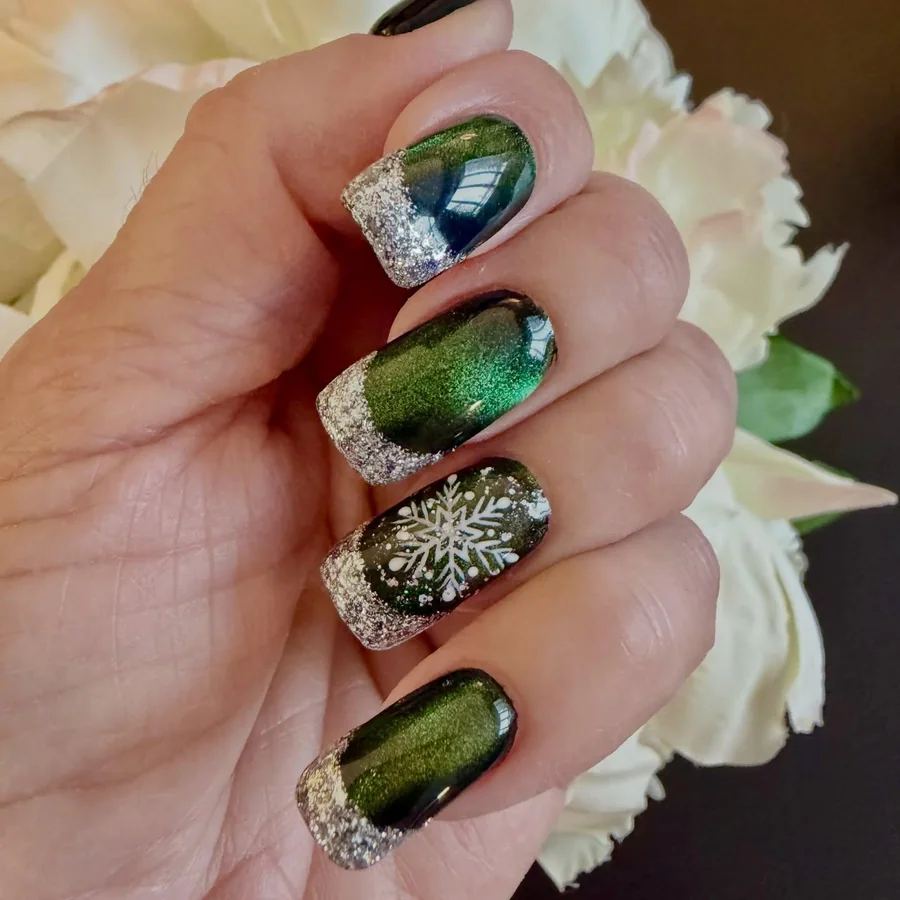
Magnet shapes the cat-eye band before curing, because the band sets once gel hardens. Paint silver tips with a thin brush, and keep the smile line even across all nails. Long square nails can catch on fabric, so file the corners slightly round. Seal the tips with top coat to stop silver glitter from shedding. Check the corners daily, since square edges chip first.
Emerald Chrome With Silver Snowflakes and Starbursts
Chrome covers short oval nails with a mirror-like shine made with fine powder. Silver snowflakes and starbursts sit on the chrome. Two accent nails wear silver glitter. Length ends right at the fingertip, with a rounded oval curve. Chrome reflects light in a bright band, and silver art stays fine on top. Silver glitter adds a soft sparkle beside the mirror finish.
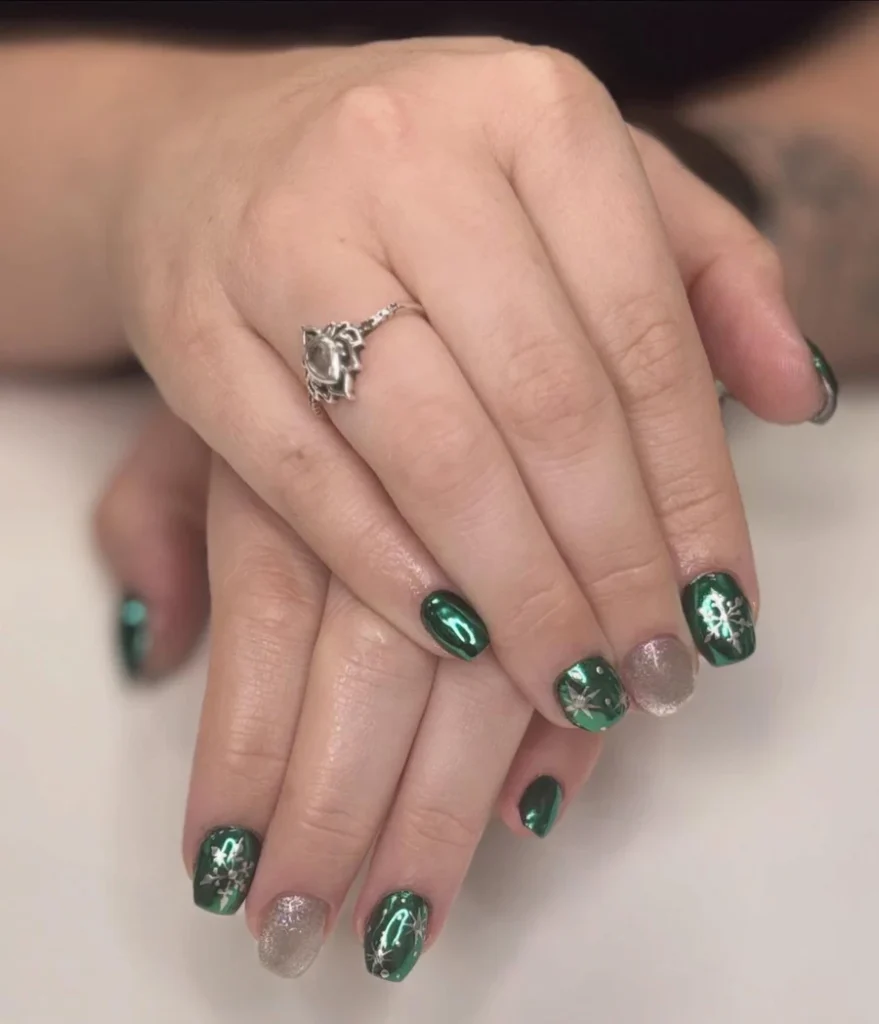
Rub chrome powder over a smooth no-wipe top coat for a clean mirror. Bumps show through the shine, so smooth the base first. Work the powder in with a soft applicator, then seal it fast so it does not dull. Short nails suit chrome well. Mirror finish reads clearly on a small surface. Keep silver glitter to one or two nails, because too much glitter can dull the chrome.
Dark Green Squares With a White Reindeer and Gift Bows
White reindeer silhouette stands on one long square nail in dark green gloss. Snowflakes sit beside the reindeer, and a white gift bow wraps another nail. Tiny white letters spell a short festive greeting on one nail. Length ends well past the fingertip, with straight sides and sharp corners. Gloss gives the green a deep shine, and white art stays bold and clear.
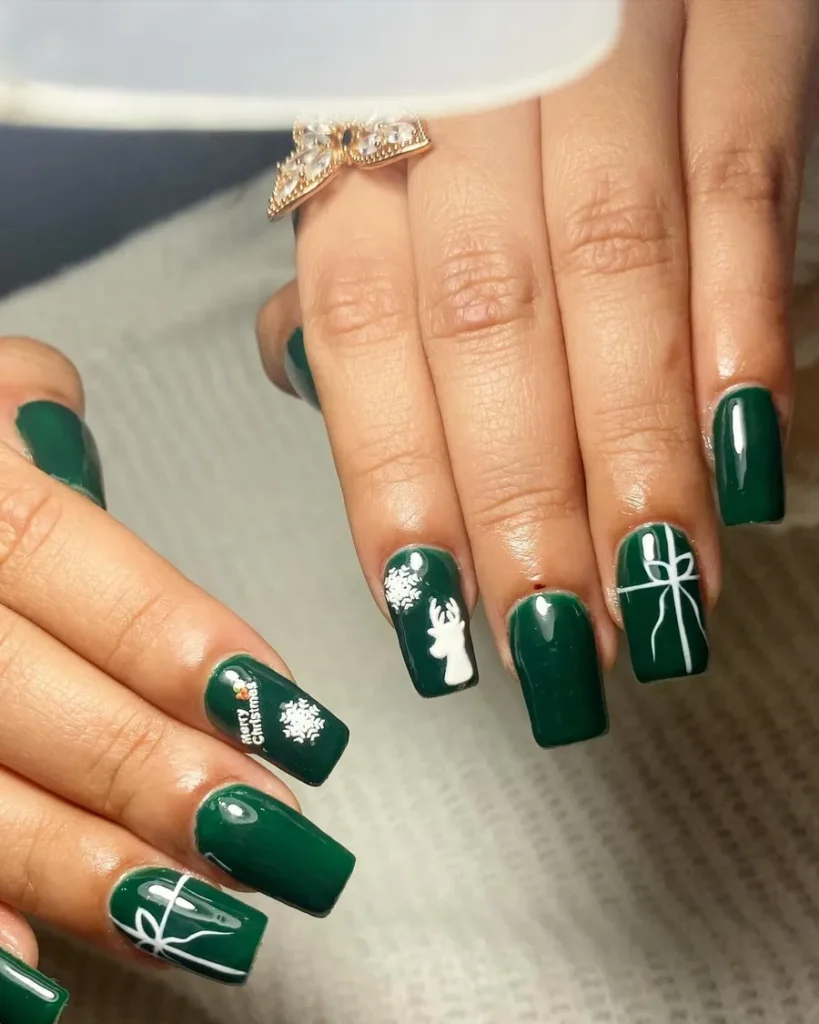
Outline the reindeer with a fine brush in one smooth silhouette. Broken lines can make the shape hard to read, so keep the stroke steady. Keep the bow to one nail, since two bows can crowd the set. Long square nails suit bold art well. Wide surface gives the silhouette room. Seal with top coat, and file any sharp corner smooth before it snags.
Glossy Dark Emerald With One Zigzag Tree Accent
One nude accent nail breaks the dark green on medium almond nails. Green zigzag tree sits on the accent nail, topped with a small star. Emerald nails stay plain, with a high gloss that reflects light. Length ends a short way past the fingertip, with a smooth almond curve. Single tree keeps the set quiet, and nude nail breaks the dark green.
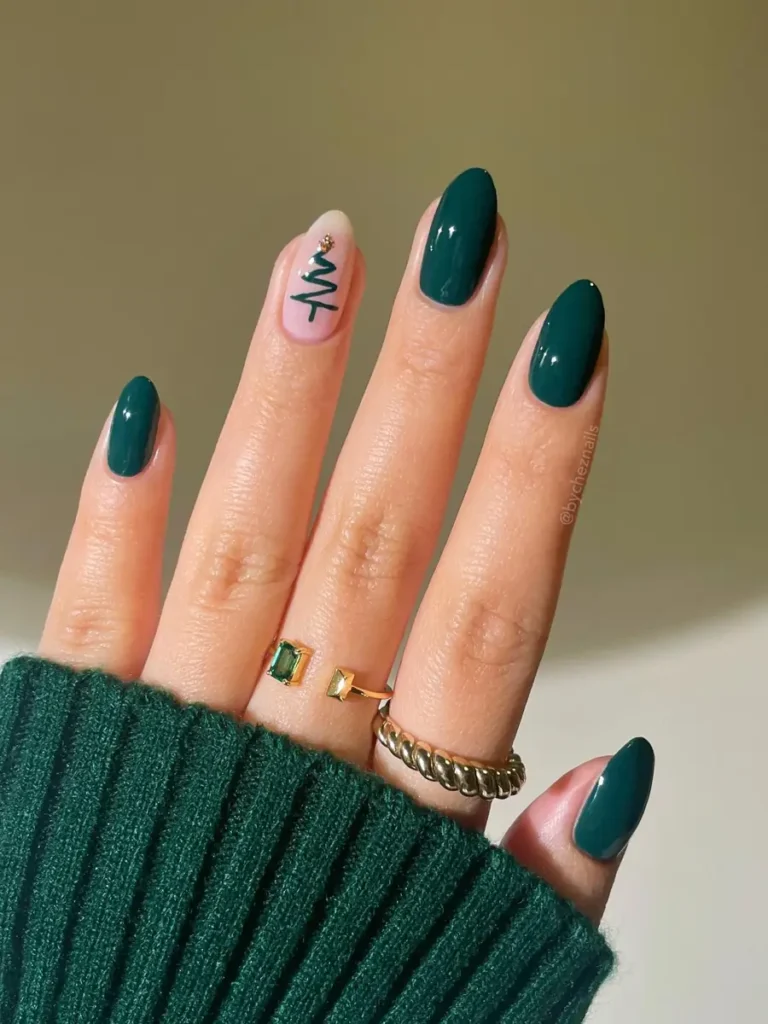
Stroke the tree on with a thin brush in short strokes. Long strokes can wobble on a small nail, so keep each line short. Keep the star tiny, since a large topper can crowd the tree. One accent nail suits dark green well. Nude base gives the eye a rest. Seal with top coat, and cap the free edge to stop chips.
Deep Emerald Squares With Snowflakes and Knit Texture
Snowflakes cover long square nails in deep emerald, with white flakes on several fingers. One snowflake carries a silver rhinestone centre. Sweater-knit texture runs across two nails. Thin white lines edge a few nails. Length ends well past the fingertip, with straight sides and sharp corners. Glitter sits inside the green, and the knit texture adds a soft raised pattern.
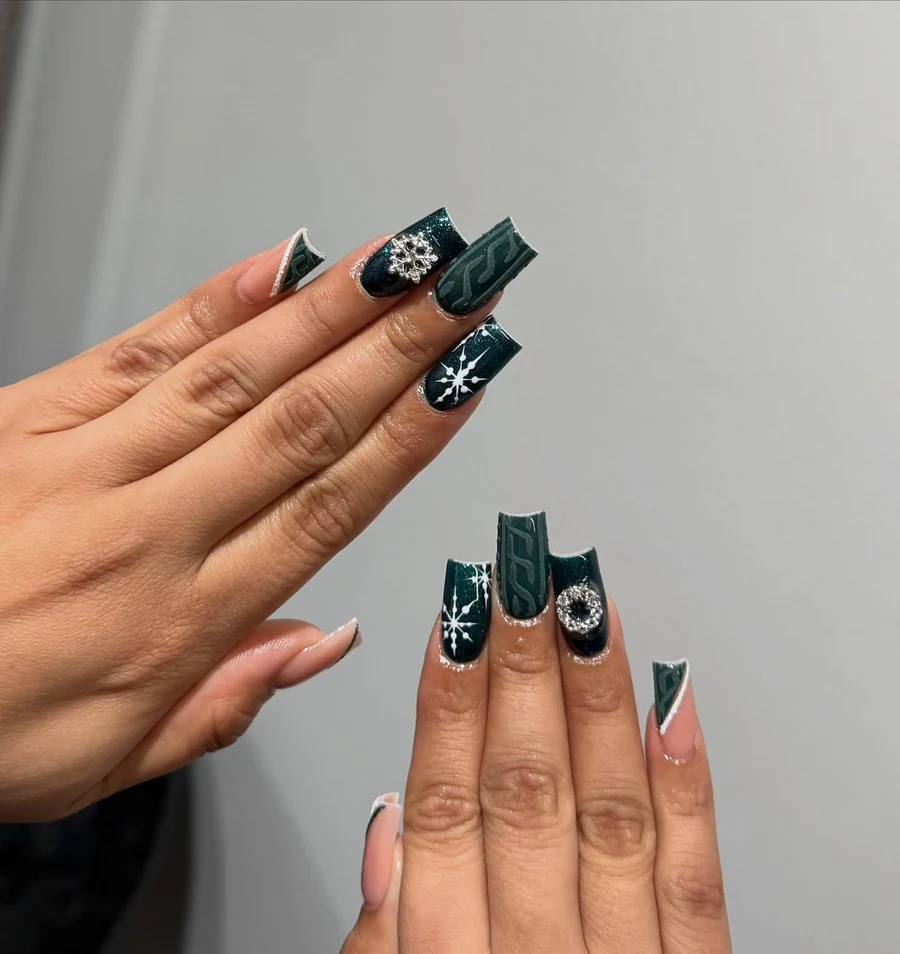
Layer thin gel lines to build the knit texture. Thick lines can cure unevenly, so keep each line light. Place the rhinestone with a drop of gel, then cure it in place so it holds. Long square nails suit raised texture well. Wide surface shows the pattern. Seal the flat nails with top coat, and leave knit lines unsealed for a soft look.
Black Reindeer on Green-Silver Cat-Eye
Reindeer silhouettes in black sit on two long almond nails in green-silver cat-eye. White starbursts sit beside the reindeer. Cat-eye band runs down each nail. Holographic shine shifts between green and silver as the hand turns. Length ends well past the fingertip, with a smooth almond taper. Dark silhouettes stand out against the shifting green, and white stars add small bright points.
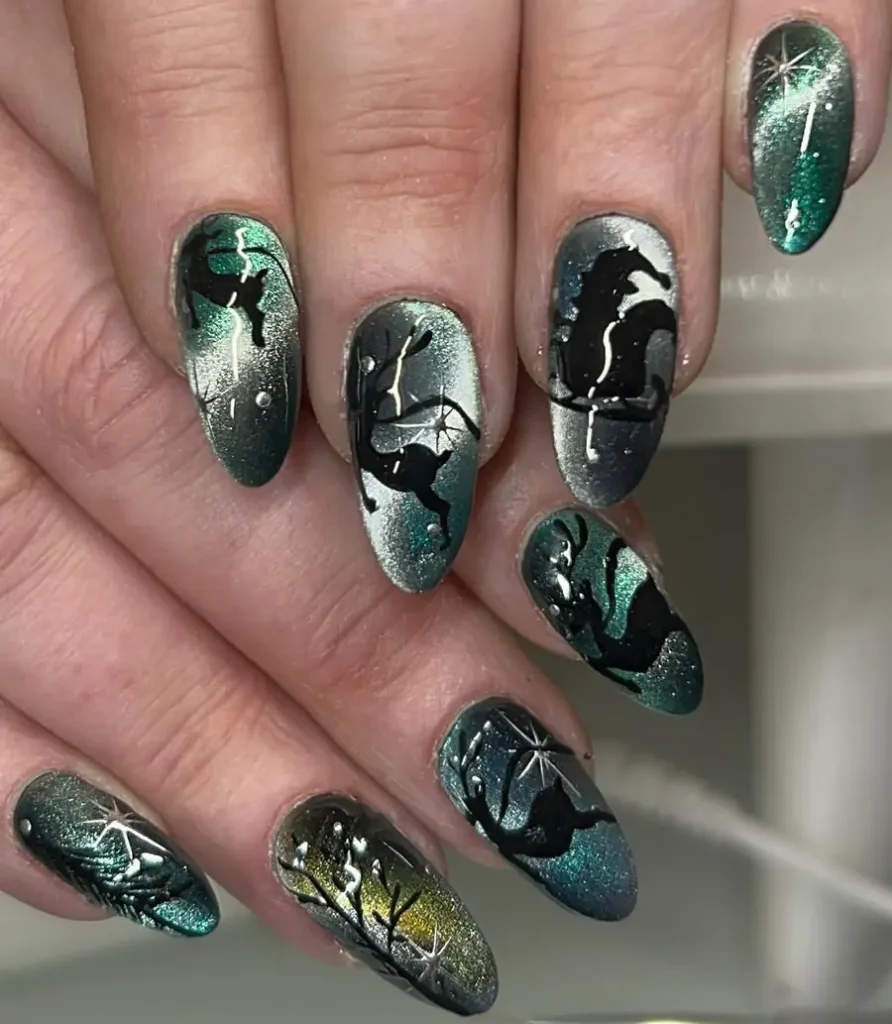
Set the cat-eye band with a magnet first, because the band sets once gel cures. Paint reindeer in solid black with a fine brush. Keep the shape simple so it reads at a glance. Long nails suit silhouette art well. Length gives the shape room. Seal with top coat, and check black edges daily, since dark polish shows chips fast. Ask for two silhouette nails per hand at most.
Dark Green Star Glitter in Close-Up
Holographic stars shift colour as light moves across short oval nails in dark green. Only two nails show in a tight close-up, and each star sits large across the nail. Glitter dust fills the green base, and stars catch light in green and silver. Length ends right at the fingertip, with a rounded oval curve. Close view shows the star edges clearly, with no blur or smudge.
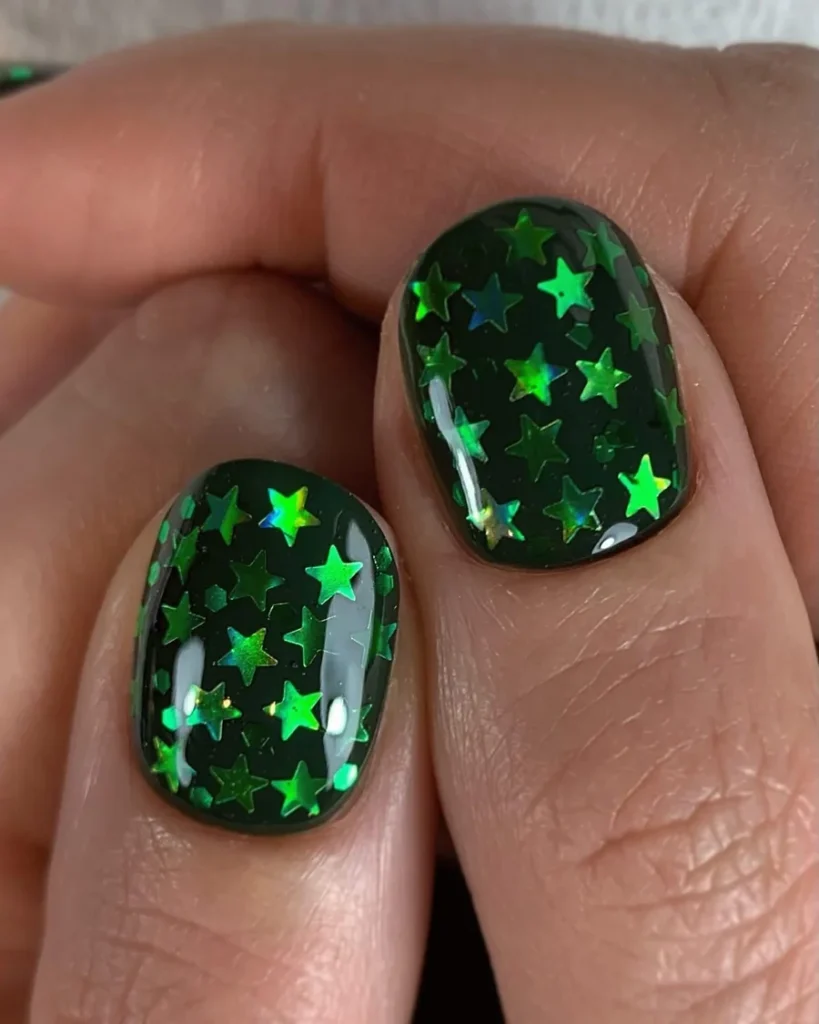
Press stars on while the base stays tacky, because dry polish will not hold them. Keep stars large and few, since many small stars can look busy on a short nail. Short nails suit bold glitter well. Small surface keeps the sparkle neat. Seal with top coat, and add a second coat if stars feel raised. File any rough edge smooth before it snags.
Conclusion
Sage hides chips better than dark green, which makes it forgiving for busy hands. Emerald asks for more care, since gloss and chrome show every bump and scratch. Green Christmas nails also change with the light, so a cat-eye band or glitter fade looks different from morning to evening. Short nails suit velvet and chrome, while long stilettos need builder gel and a slightly blunter tip for daily tasks. Cuticle oil keeps edges tidy between fills. Match the shade to how hard your hands work, and the green polish will stay in good shape.