

Gold can show up as foil, glitter, a thin line, or a tiny charm, and each form changes how the red reads. Some sets use a pale pink or nude base, while others go glossy red with gold swirls, plaid, snowflakes, or bows. Red and Gold Christmas nails span short rounded sets, long almonds, coffin tips, square shapes, and stilettos. Foil needs a tacky layer, builder gel holds charms, and matte red makes thin gold lines pop. Every design is written like a brief, so you can read it out to a tech. A red and gold manicure turns out best when the gold stays neat and the red stays rich.
Deep red nails with raised gold swirls and spheres
Glossy deep red polish covers short rounded nails, and the shine stays even across every nail. Raised gold swirls curl across two nails, with small gold spheres set where the lines meet. Gold rims trace two more nails, which gives the set a framed feel. Short length ends just past the fingertips, so the raised gold stays close to the nail bed. Light catches the gold swirls first, then the red gloss underneath.
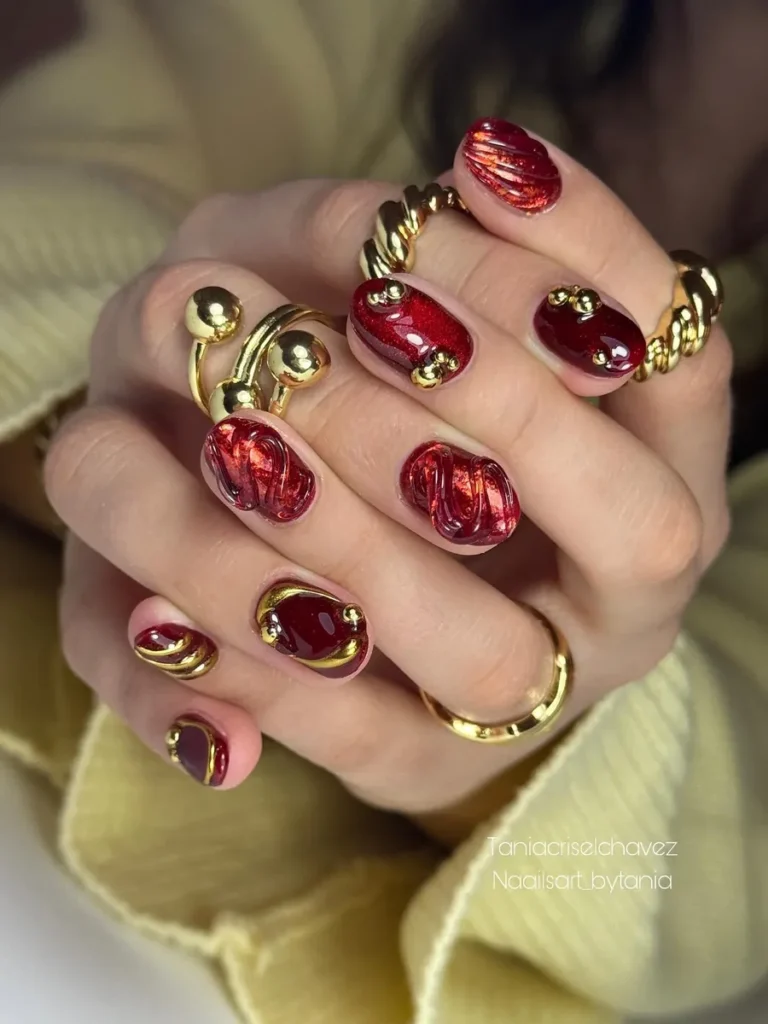
Name raised gold line work on a deep red base, and mention short rounded nails. Thick gel holds raised swirls in place. Thin polish lines flatten under top coat, which is a clear sealing layer. Keep gold on two or three nails only, so the set stays balanced. File the free edge smooth first, which means raised lines sit flat. For extra hold, seal gold with two thin coats and cure each fully.
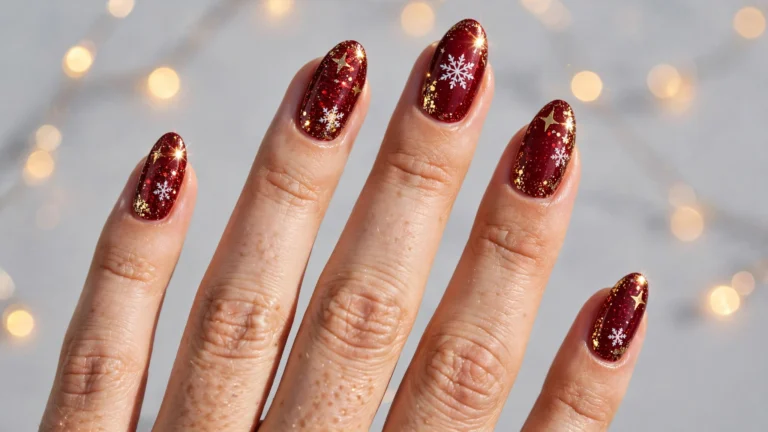
Metallic red nails traced with thin gold lines
Shiny metallic red polish covers long pointed almond nails, and fine glitter runs through the red. Thin gold lines curve across several nails in loose, uneven swirls. One nail carries a small cluster of gold lines near the tip. Length ends well past the fingertips, with sharp points that narrow the whole shape. Glitter in the red shifts as the hand turns, so the gold lines stand out against the sparkle.
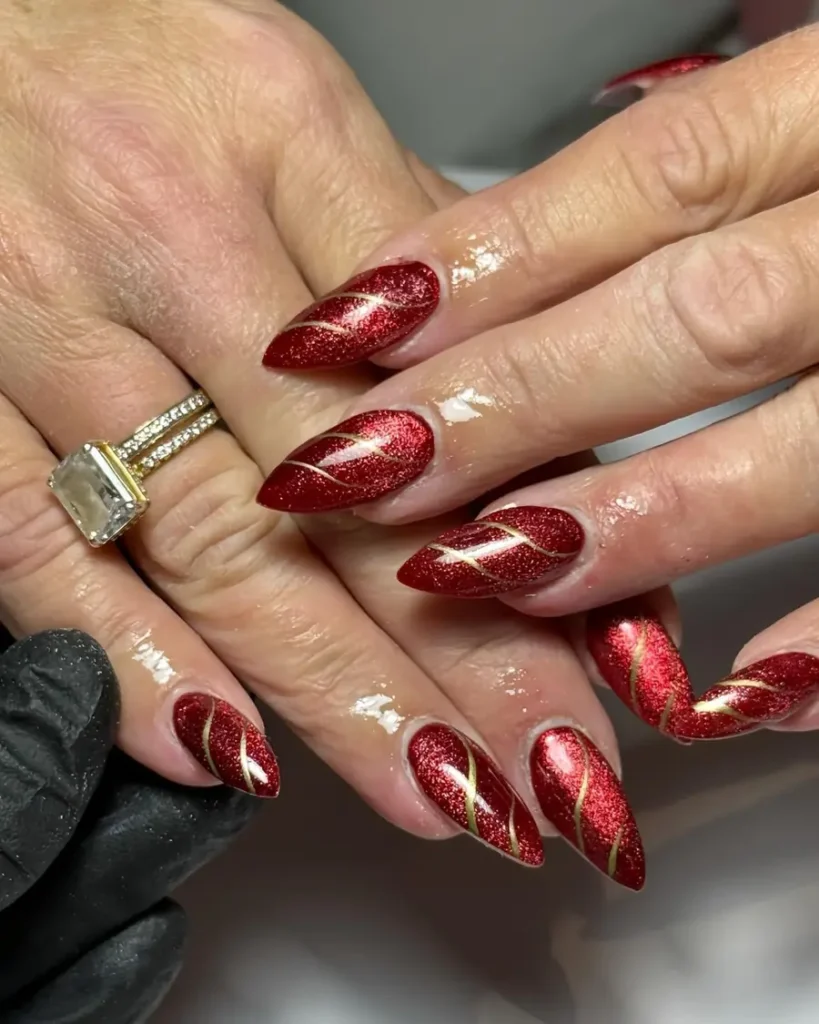
Request metallic red polish with hand-drawn gold lines, and show the curve style wanted. Fine liner brushes make the thinnest lines, because a wide brush floods the design. Let each gold line dry before the next one crosses it, which means the lines stay sharp. Long pointed nails chip at the tips first, so keep the free edge sealed with top coat. For a softer version, ask for fewer lines on the ring finger only.
Red French nails with a gold bow and starburst
Sheer nude polish covers long almond nails, with red tips. Gold French tips edge two nails, with small pearls along them. French tips are colour only on the free edge. One nail shows a red tip with a gold starburst, and another holds a gold bow. Nude polish fills the middle, so red and gold tips lead. Length ends past the fingertips in a soft almond point, and gloss stays high.
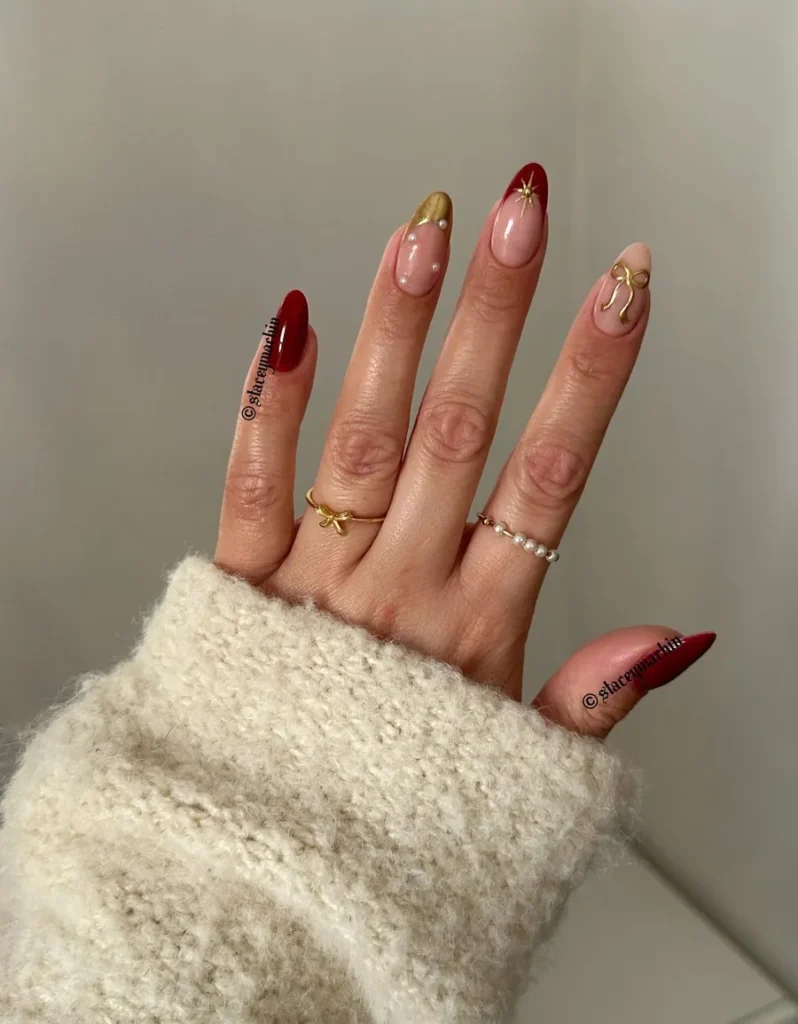
Tell a nail tech to mix red and gold French tips and name the bow as the accent. Gel holds the bow best, because glue alone lifts at the edges in a few days. Keep the bow on one nail per hand, so it stays the clear focal point. Pearls need a thick top coat around the base, which means they catch less on fabric. For upkeep, smooth any lifted edge early and add a fresh seal over it.
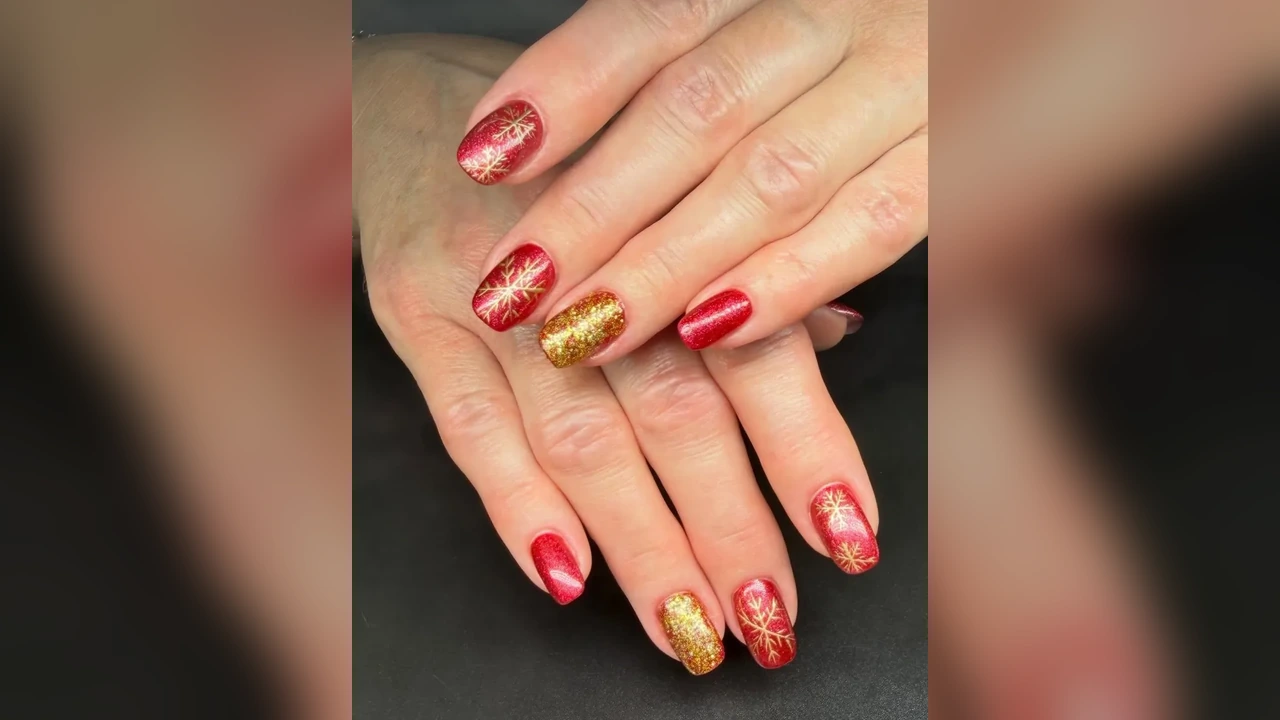
Square red nails with a gold glitter accent and snowflakes
Glossy deep red polish covers square nails, with straight edges and a medium length. Gold glitter fades up from the cuticle on two accent nails, and thins toward the middle. White snowflakes sit on two red nails, with fine lines and small dot centres. One snowflake nail also carries a thin gold curve, which links the glitter accent to the red. Light moves across the glitter first, then settles on the smooth red gloss.
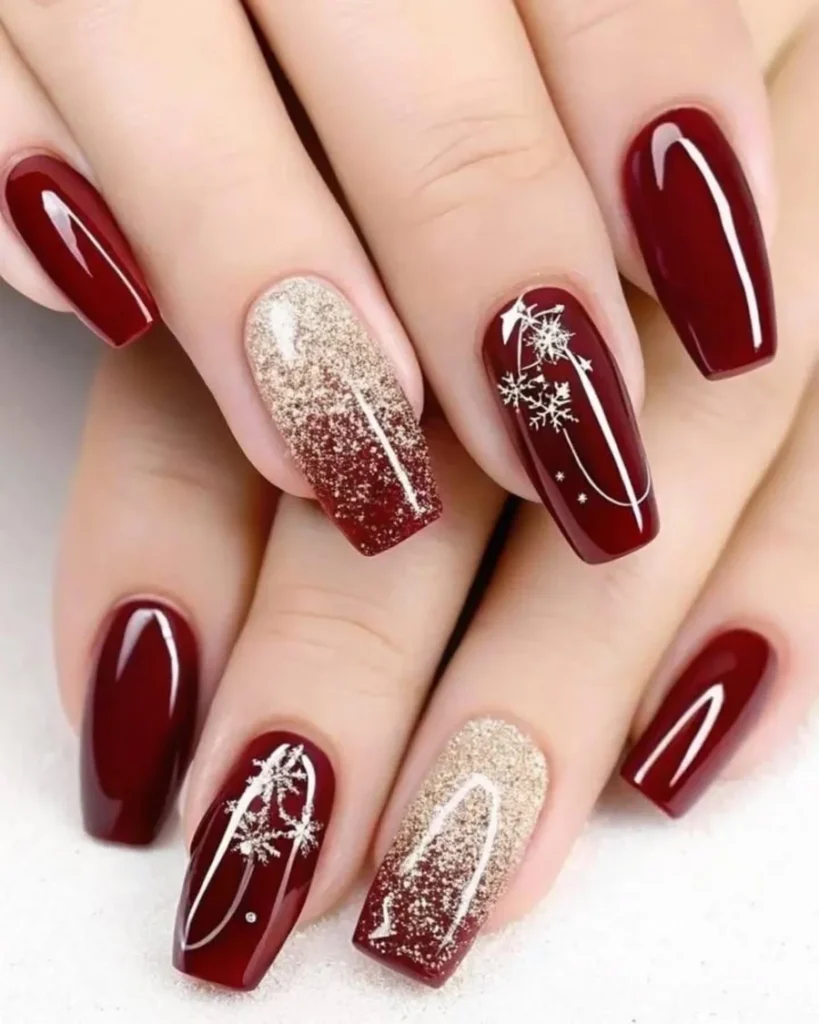
Mention a gold glitter fade on two nails, and snowflakes on two more. Sponges dab glitter on in thin layers, because a brush drags the sparkle into streaks. Paint snowflakes with a fine brush after the red dries, which means the white stays crisp. Square corners wear first, so round them just slightly at the tips. For a change, swap the snowflakes for gold dots and keep the same red base.
Long coffin nails with red tips and gold foil
Pale pink polish covers long coffin nails, with sharp red tips cut at a slant. Gold foil flakes scatter across two nails, and thin gold lines trace the tip edges. One nail carries a white leaf pattern, with red and gold woven through it. Length ends well past the fingertips, with tapered sides narrowing toward flat tips. Gloss sits high on the red, while the foil catches light in small, uneven flashes.
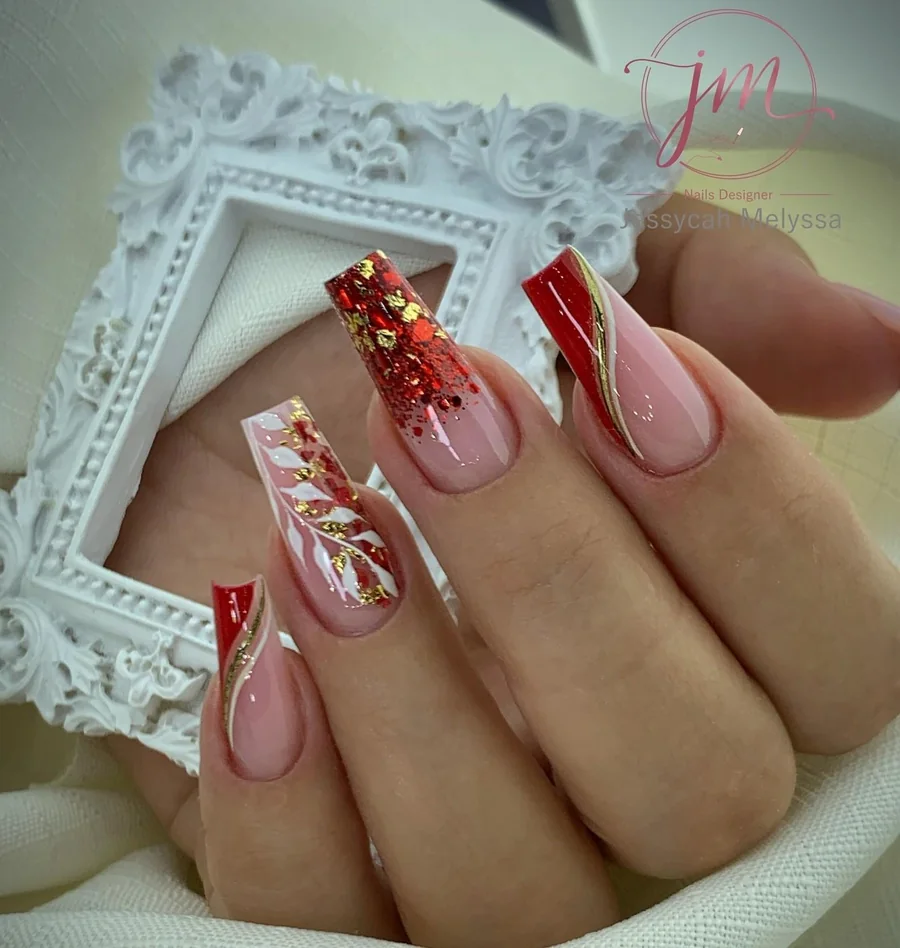
Describe a pink base with slanted red tips, gold foil flakes, and long coffin nails. Place foil on wet polish, because dry polish will not grip the flakes. Press the foil flat with a silicone tool, which means the edges lie smooth under top coat. Long coffin tips catch on pockets, so keep the sides filed and the tips sealed. For a quieter set, use foil on one nail per hand only.
Red French tips edged with fine gold lines
Light nude polish covers almond nails, with deep red tips in a soft wave. Thin gold lines follow each red tip edge, and the gold stays neat. Red glitter dusts the edge of two tips, which adds a faint sparkle. Length ends past the fingertips in a tapered almond shape, and the nude base keeps it light. Gloss runs smooth from cuticle to tip, so the red, gold, and nude meet in clean bands.
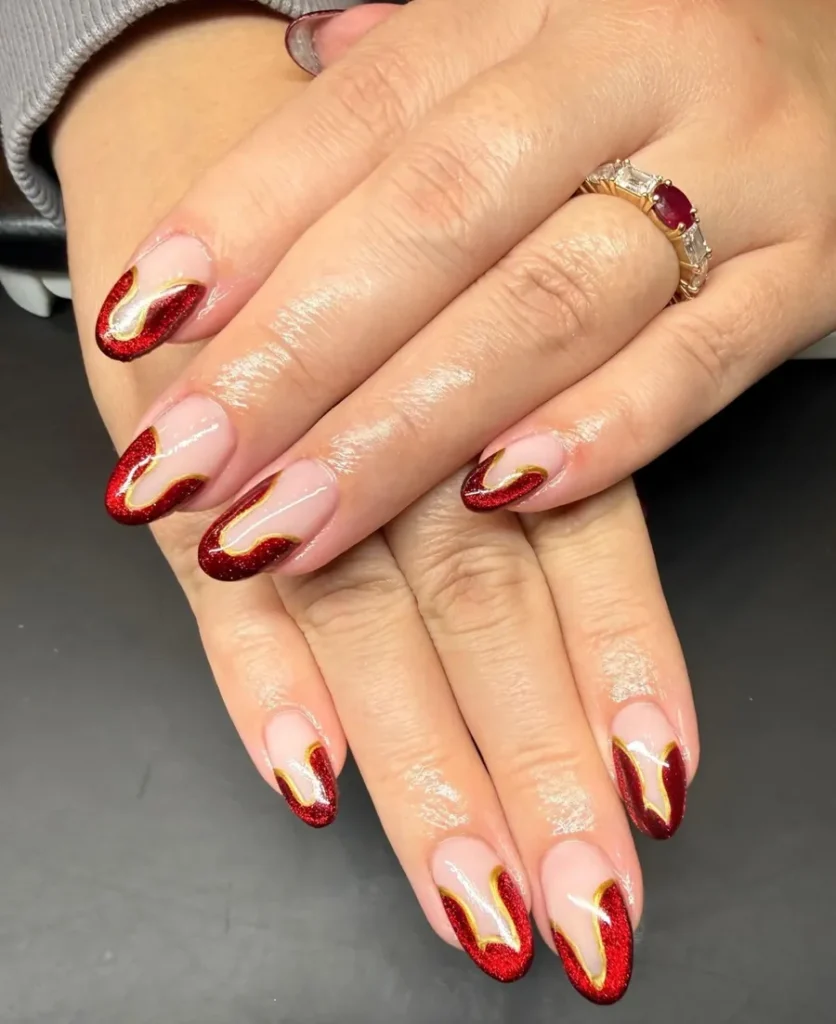
Choose a nude base with wavy red French tips and a thin gold edge line. French tips are colour only on the free edge. Each tip needs a steady brush and a clean smile line. Paint the gold line after the red dries, because wet red bleeds into the gold. Shorten the almond point slightly for daily wear, which means the tips chip less. For extra hold, cap the free edge with top coat at every fill.
Long coffin nails with wavy gold glitter and snowflakes
Rich red polish and nude bases mix across long coffin nails, with gold glitter in wavy bands. White snowflakes sit on two nude nails, with small dots scattered around each flake. Red glitter fills the tips of two nails, while gold glitter edges the wavy bands. Length ends well past the fingertips, with flat tips and tapered sides. Dark red, gold, and nude shift across the set, so no two nails match exactly.
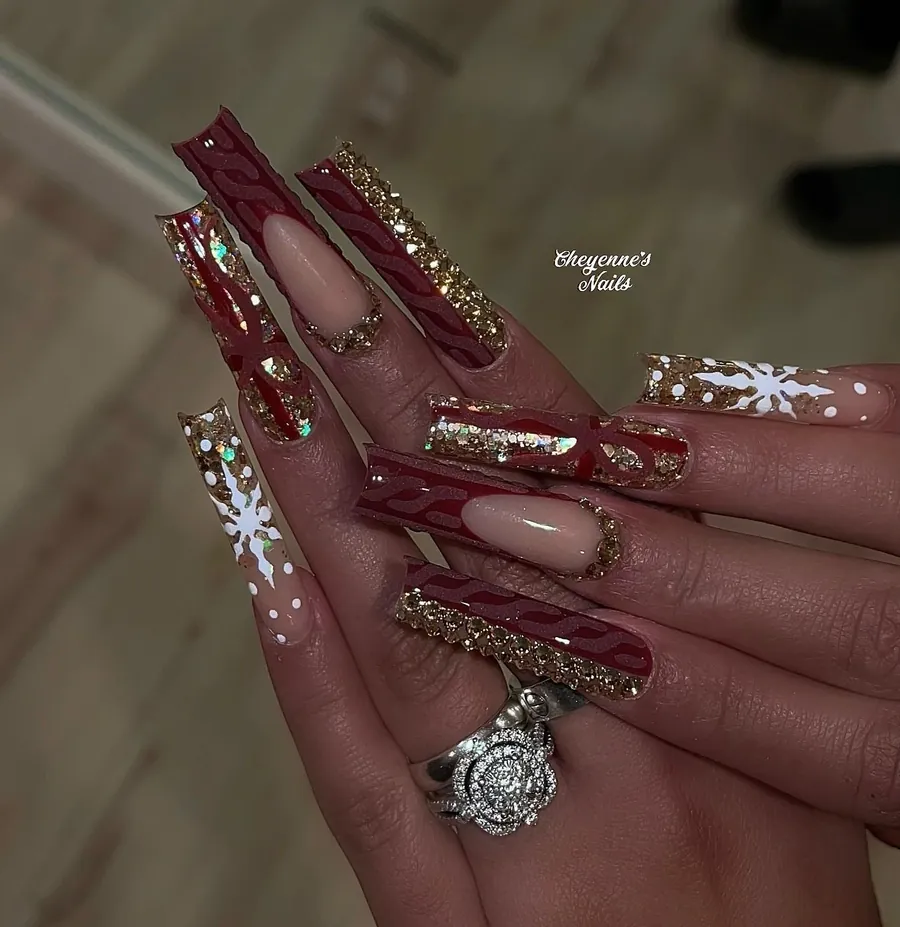
Book a mixed set with wavy gold glitter bands, snowflakes, and red glitter tips. Paint the wavy bands with a liner brush, because a flat brush makes the curves too wide. Add the snowflakes last, which means the white lines stay sharp over the glitter. Coffin tips snag easily, so file the corners smooth and seal the free edge. For a simpler version, keep the waves on two nails and leave the rest solid red.
Burgundy nails with a gold zigzag tree and stars
Deep burgundy polish covers almond nails, with pale pink bases on two accents. One pink nail shows a gold zigzag tree, with a small gold star at the top. Thin red and white stripes cross another nail, and tiny gold stars dot the burgundy nails. Length ends past the fingertips in a soft almond shape, and the gloss stays even. Gold stars catch light first, then the deep burgundy settles into a rich, dark red.
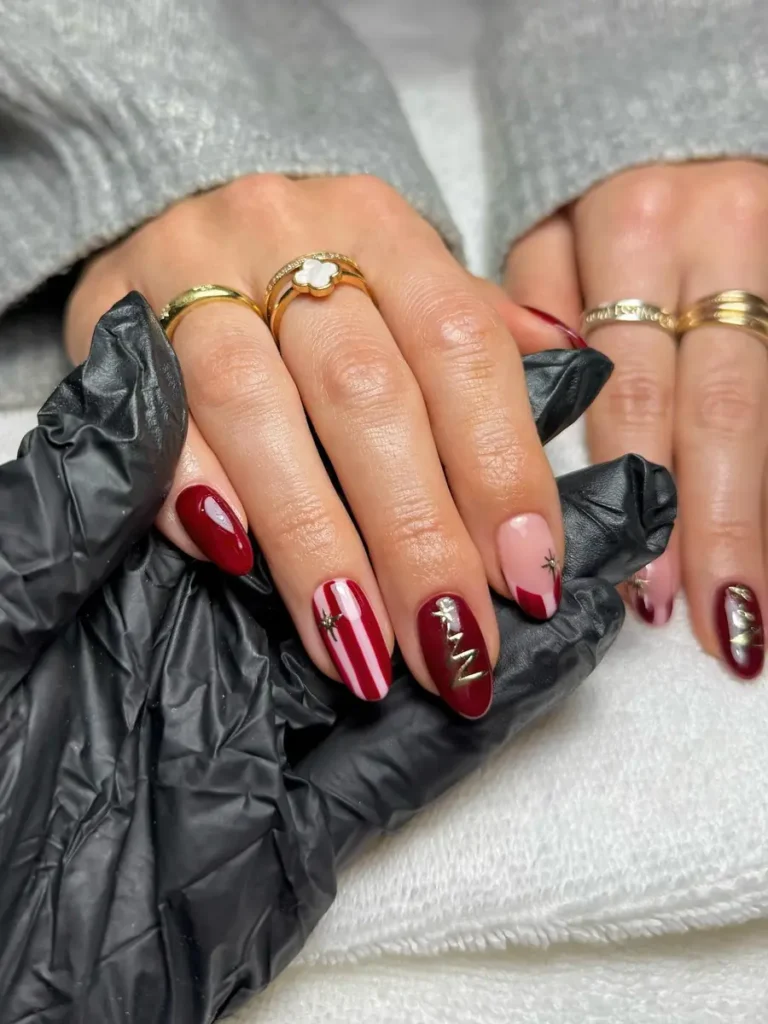
Show a burgundy set with a gold zigzag tree on one accent nail, and gold stars elsewhere. Thin brushes draw the zigzag best, because a thick brush hides the tree shape. Place the star at the tree top last, which means it sits clean on the gold line. Dark burgundy shows chips fast, so keep a matching polish for small touch-ups. For a change, swap the stripes for a plain pink nail and keep the tree.
Long square nails with red French tips and gold stars
Very long square nails carry a pale pink base. Bright red tips cut in a sharp V shape. Small gold star charms sit near the centre of several nails. Red tips run down two nails in long, straight bands, which gives a graphic feel. Length ends far past the fingertips, with flat, straight tips and sharp corners. Pink, red, and gold stay in clear blocks, so each nail reads as a neat, bold shape.
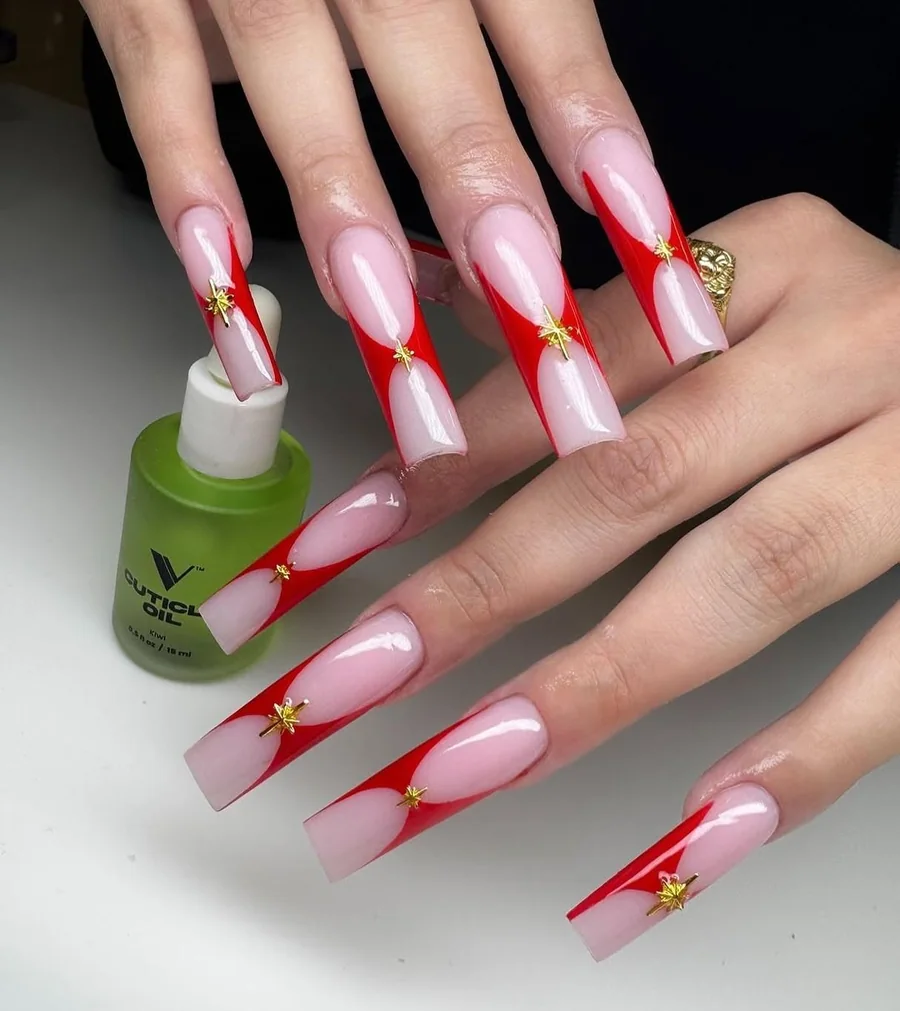
Point out a pink base with sharp red V tips and small gold star charms. Place charms with builder gel, which is a thick gel that adds strength. Polish alone will not hold them. Set each star flat and seal around it, which means it snags less on clothes. Very long square nails need regular filing, so keep the corners from splitting. For a shorter version, keep the same V tips on a medium square length.
Almond nails with red glitter French tips and a gold frame
Pink polish covers long almond nails, with red glitter tips on most nails. One pinky nail shows a thin gold frame, and small gold beads sit near its edge. Another nail stays fully coated in red glitter, which gives the set a single bold block. Length ends past the fingertips in a tapered almond point, and the pink base keeps it soft. Glitter sparkles most at the tips, then fades where the pink base begins.
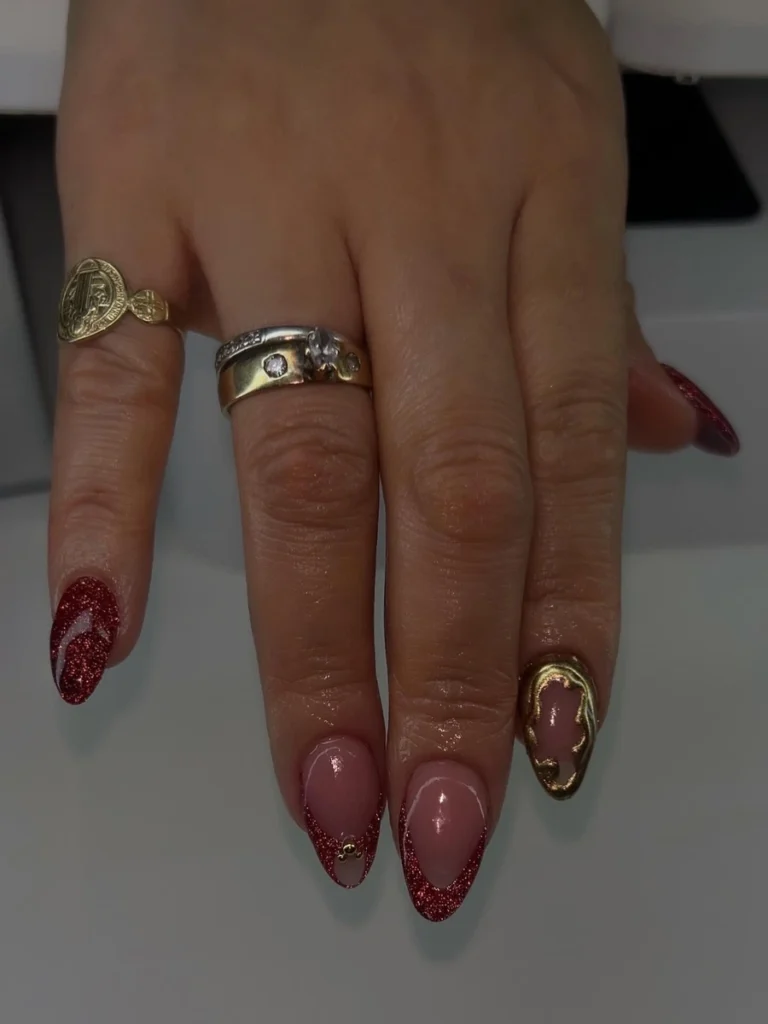
Bring up a pink base with red glitter French tips and one gold-framed accent nail. Sponges blend the glitter fade best, because a brush leaves hard lines at the tip. Set gold beads in wet top coat, which means they sink in and stay level. Glitter tips wear at the edges first, so seal the free edge twice. For a change, swap the gold frame for a plain gold line on the same nail.
Pink nails fading into red glitter tips with gold sparkle
Soft pink polish covers square nails, with red glitter fading in from the tips. Gold glitter dusts two nails near the cuticle, and thins as it moves down. One pink nail shows a small gold glitter patch at the tip. Length ends past the fingertips in a straight square shape, and the fade stays soft. Pink moves into red through an ombre, which is a soft blend from one colour to another.
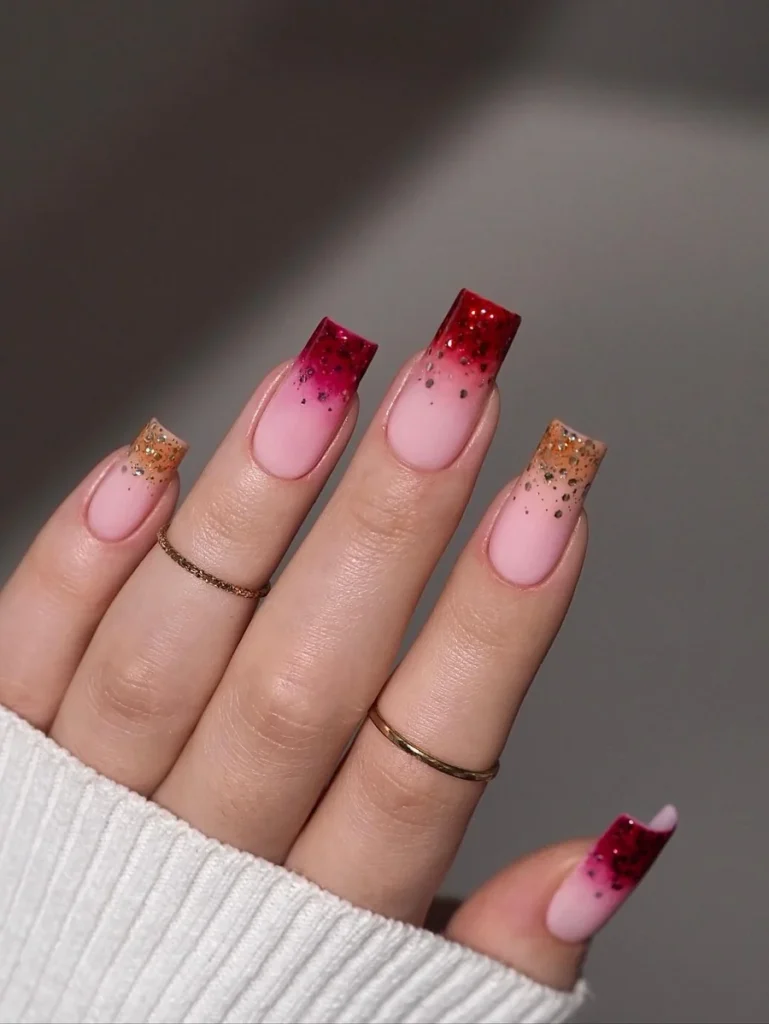
Note a pink-to-red glitter ombre on square nails. Dab glitter on with a sponge in thin layers, because thick layers clump at the tips. Blend the fade while the polish stays wet, which means the colours melt together. Square tips show grow-out at the cuticle, so keep the base colour close to the skin tone. For a shorter version, keep the same fade on a medium length.
Glossy red nails with gold glitter tree accents
Dark red polish covers almond nails, with a medium length and soft points. Two accent nails carry a sheer glitter base, with small gold tree shapes and tiny pearl dots. Gold glitter dusts the tree shapes, which makes them stand out against the pale base. Red nails fill most of the set, while the glitter accents sit on the ring fingers. Light hits the glitter trees first, then the smooth red gloss around them.
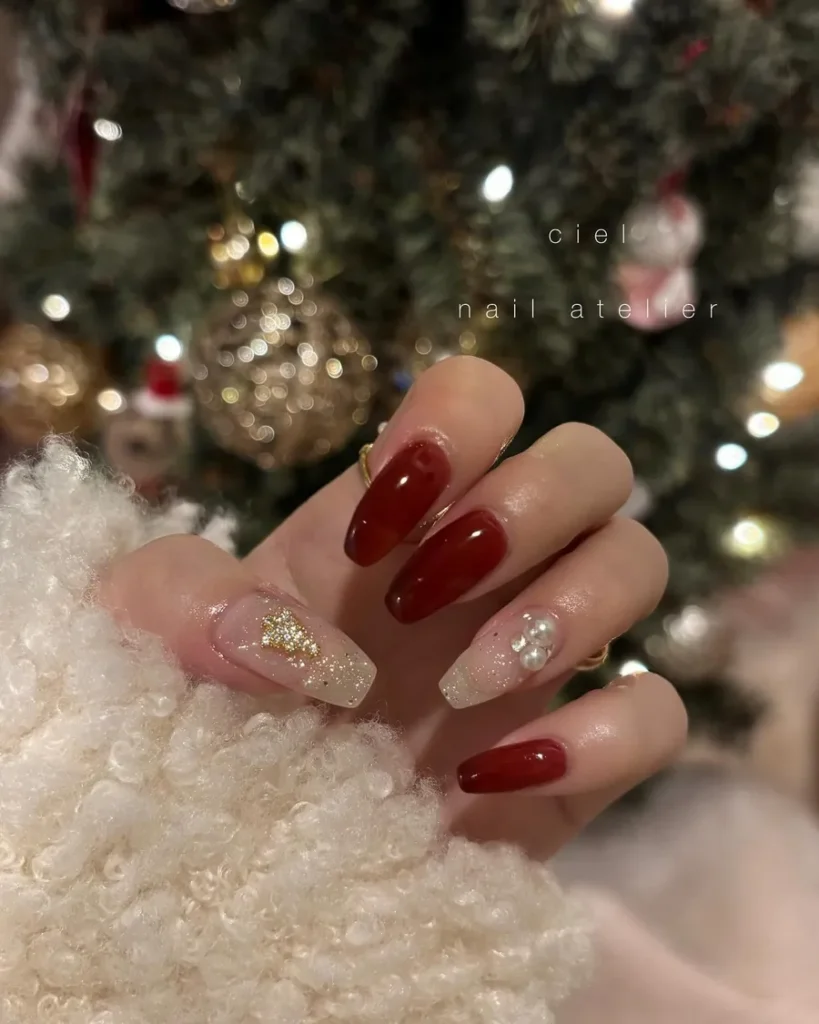
Share a plan for two glitter accent nails with small gold trees. Paint trees with a fine brush on a dry glitter base. Wet glitter shifts under the brush. Add pearl dots with a dotting tool, which means each dot stays round and even. Glitter bases need two top coats, so the surface feels smooth and stays sealed. For a change, swap the trees for gold dots and keep the red nails.
Short almond nails with red tips and tiny gold stars
Pale pink polish covers short almond nails, with deep red tips on several nails. Tiny gold stars sit on the pink nails, with small gold dots near the cuticles. One nail shows a red tip with a gold starburst, and the rest keep stars small. Length ends just past the fingertips, so the short shape keeps the design neat. Pink, red, and gold stay in small blocks, which gives the set a light, tidy feel.
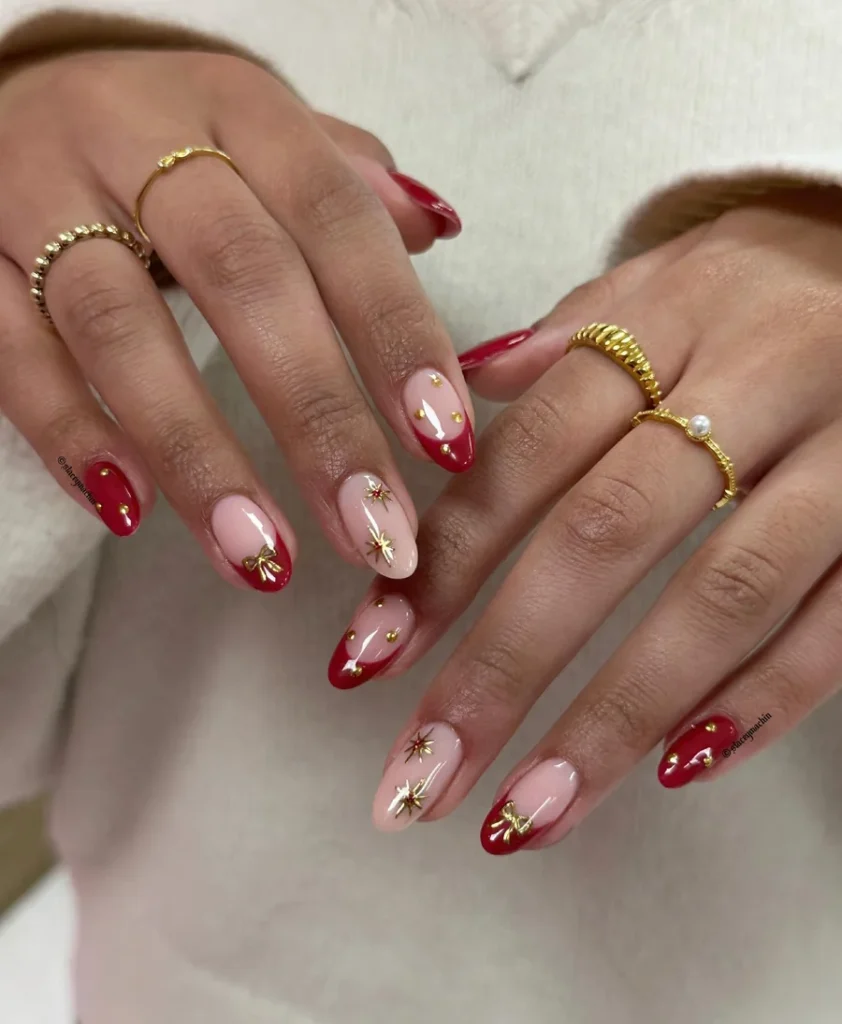
List a pink base with red tips and tiny gold stars on short almond nails. Place stars with tweezers, because fingers push them out of line. Seal each star with top coat, which means the edges stay flat and catch less. Short nails show chips at the tips fast, so cap the free edge at each coat. For a change, use gold dots only and skip the stars.
Almond nails with gold glitter, plaid lines and a bow charm
Solid red, gold glitter, and pale pink bases mix across long almond nails. Red plaid lines cross one pink nail, with thin gold lines running through the checks. Another pink nail holds a small silver bow charm, and gold glitter fills the accent nail. Length ends past the fingertips in a tapered almond shape, and the gloss stays high. Red, gold, and pink shift across the nails, so each hand shows a different mix.

Give a mixed red and gold set with one plaid nail and one bow charm as the brief. Paint plaid with thin straight lines, because wide lines hide the check pattern. Set the bow charm with builder gel, which is a thick gel that adds strength. Seal around it well. Plaid lines need a dry base, which means the gold stays straight and clean. For a simpler set, keep the plaid on one nail and leave the rest solid.
Short red nails with gold starbursts and striped accents
Burgundy polish covers short oval nails, with a high gloss on most nails. Gold starbursts sit on two nails, drawn with fine lines that spread from a small centre. Thin burgundy and pink stripes cross two more nails, with tiny gold stars at the ends. Length ends just past the fingertips, so the short shape keeps the art close to the nail. Gold lines shine first, then the dark red gloss settles behind them.
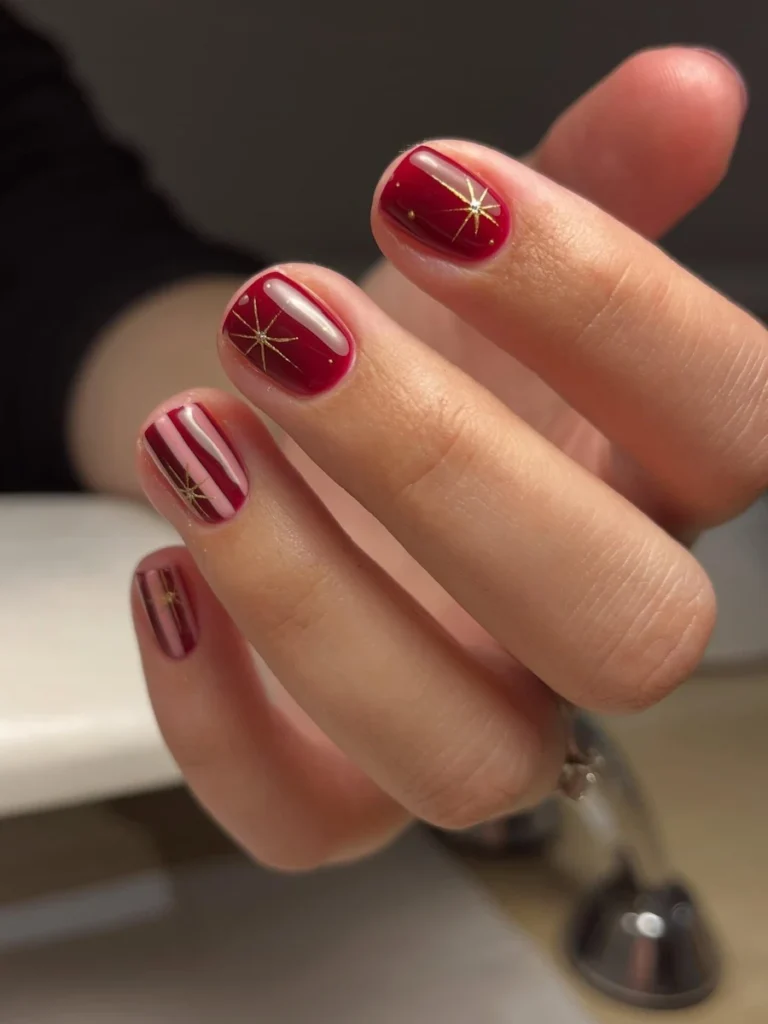
State the brief as short burgundy nails with gold starbursts and two striped accent nails. Draw starbursts with a liner brush, because a dotting tool makes the lines too thick. Keep the stripes thin and even, which means the pattern stays neat on a short nail. Short nails grow out fast at the cuticle, so book a fill after two weeks. For a change, swap the stripes for plain gold dots.
Nude nails with red glitter French tips and gold stars
Clear nude polish covers almond nails, with dark red glitter tips on every nail. Gold starbursts sit on several nails, with tiny dots scattered around each star. Red glitter covers the tips in a dense band, and the nude base keeps the middle clear. Length ends past the fingertips in a soft almond point, and the gloss stays even. Stars catch light first, then the red glitter tips glow against the nude base.
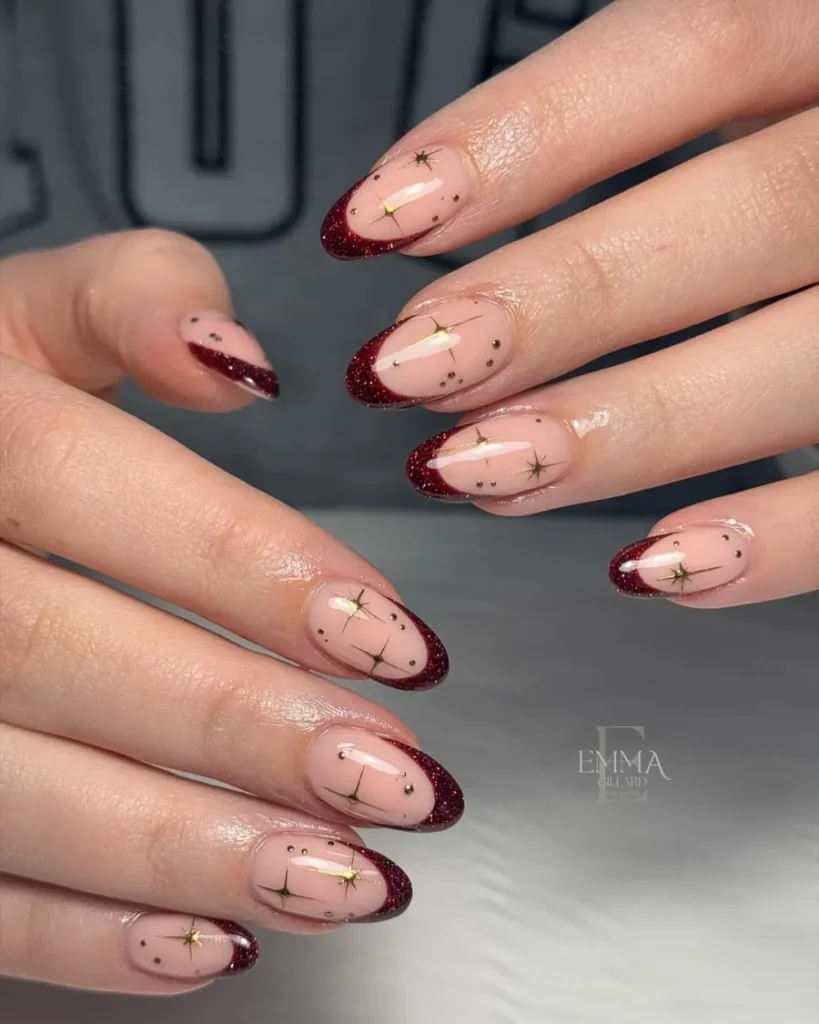
Offer a nude base with red glitter French tips and gold starbursts as the brief. Paint the starbursts after the glitter dries, because wet glitter drags under the brush. Use a fine brush for the star lines, which means each point stays sharp. Glitter tips need a thick top coat, so the surface feels smooth to the touch. For a shorter version, keep the same tips on a medium almond length.
Matte red stiletto nails with gold snowflake lines
Red polish in a matte finish covers long stiletto nails, with sharp points and a flat finish. Thin gold lines curve across several nails, and a gold snowflake sits on one nail. One nail carries a red tip with a gold line, while the rest stay solid matte red. Length ends well past the fingertips, and the points narrow the whole shape. Matte red absorbs light, so gold lines stand out in thin, bright strokes.
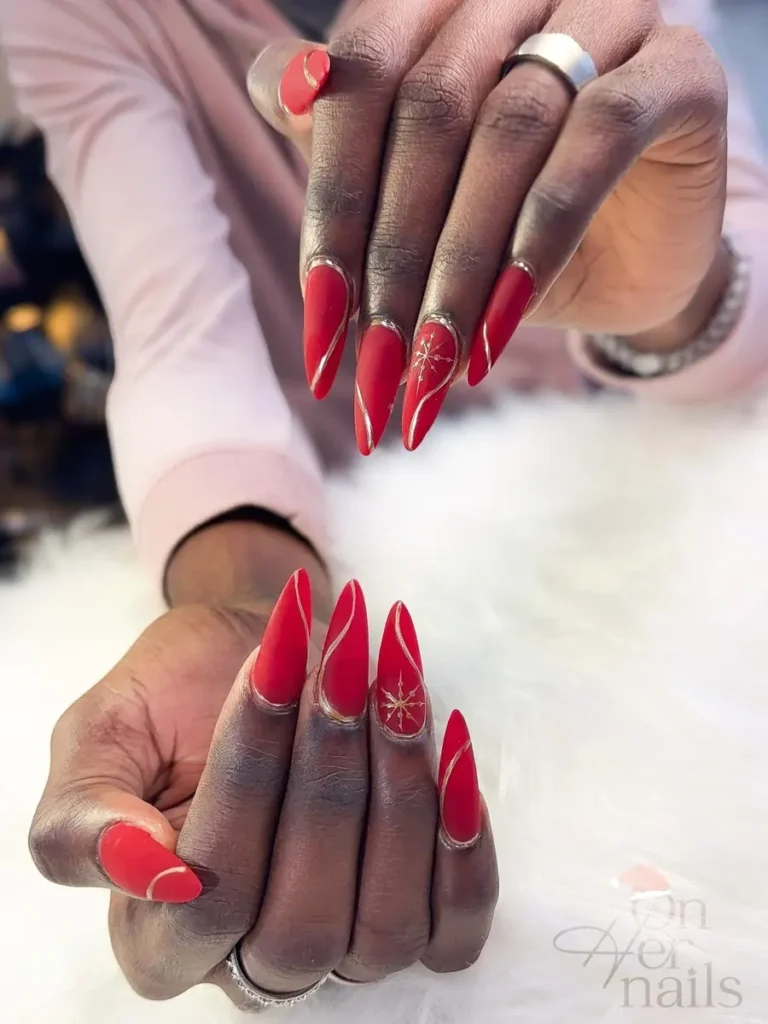
Explain the brief as matte red stiletto nails with thin gold lines and one gold snowflake. Apply a matte top coat last, because a glossy coat over the gold hides the flat finish. Paint gold lines on dry matte polish, which means the lines stay crisp and bright. Stiletto points chip first, so keep the tips sealed and avoid prying with them. For a softer look, use the same lines on a shorter almond shape.
Red glitter stiletto nails with a gold bead accent
Dense red glitter covers very long stiletto nails, with a sharp point on each nail. One nail holds a small gold sphere near the cuticle, and the rest stay plain glitter. Red glitter covers every nail from base to tip in a thick, sparkling finish. Length ends far past the fingertips, and the points give the set a bold, narrow shape. Light scatters across the glitter first, then the gold sphere catches one bright flash.
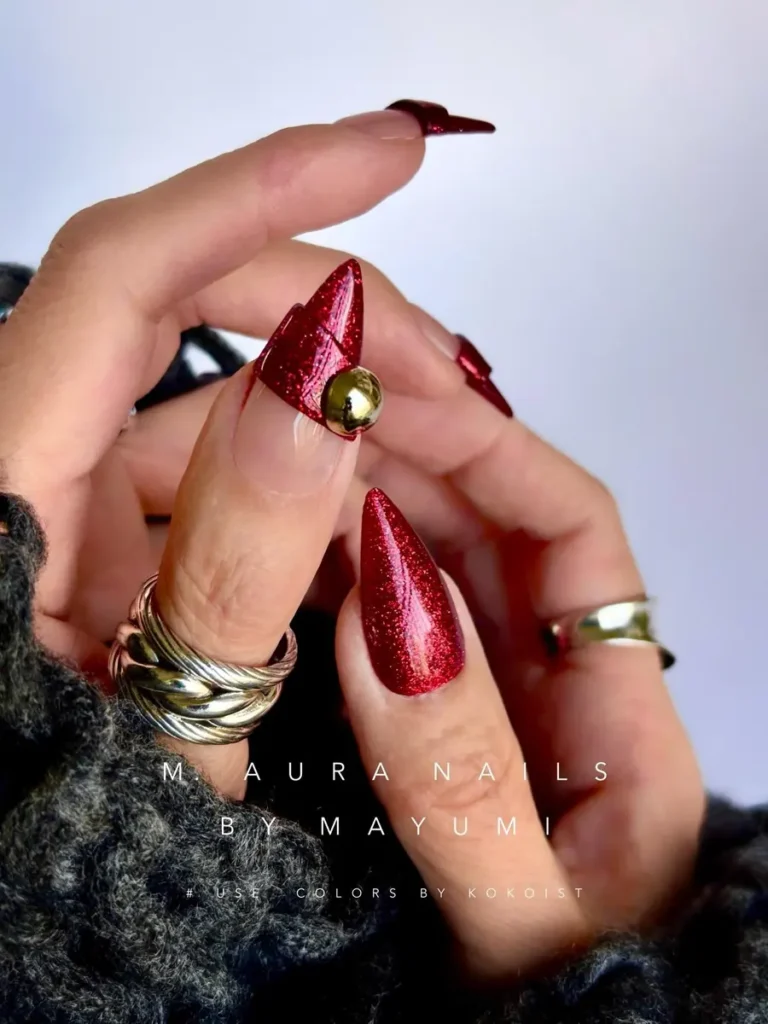
Suggest very long red glitter stiletto nails with one gold sphere accent. Set the sphere in builder gel, which is a thick gel that adds strength. Polish will not hold it. File the stiletto points smooth, which means they snag less on fabric. Glitter polish needs two top coats, so the surface stays smooth and the sparkle lasts. For daily wear, ask for the same glitter on a shorter stiletto length.
Coffin nails in red and gold glitter with snowflake lines
Long coffin nails mix solid red polish with dense gold glitter in one set. Gold snowflake lines run across two red nails, with small rhinestones at the cuticle. Three nails carry full gold glitter, and the sparkle stays dense from base to tip. Length ends past the fingertips in a tapered coffin shape, with flat tips. Red and gold trade places across the set, so the eye moves from solid red to full glitter.
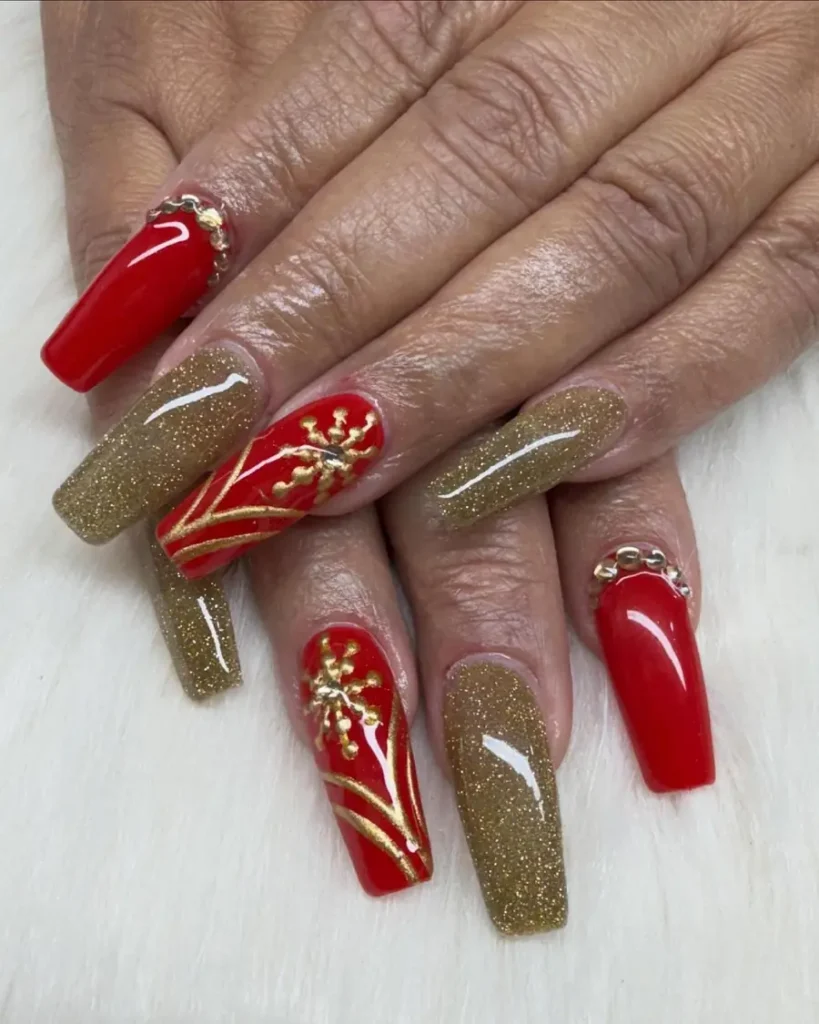
Outline a mix of solid red nails, full gold glitter nails, and gold snowflakes. Paint snowflakes on dry red polish, because wet red smears under a fine brush. Place rhinestones at the cuticle with gel, which means they stay put through daily wear. Full glitter nails need a thick top coat, so the surface feels smooth. For a change, keep the snowflakes on one nail per hand only.
Short red nails with a gold holographic glitter accent
Glitter polish covers short square nails, with a medium-short length. One accent nail per hand carries dense gold holographic glitter, and the sparkle shifts in the light. White starburst dots sit on two red nails, with small dots scattered around each star. Length ends just past the fingertips, so the short square shape keeps the set neat. Red glitter and gold glitter sit side by side, which gives the set a bright, mixed finish.
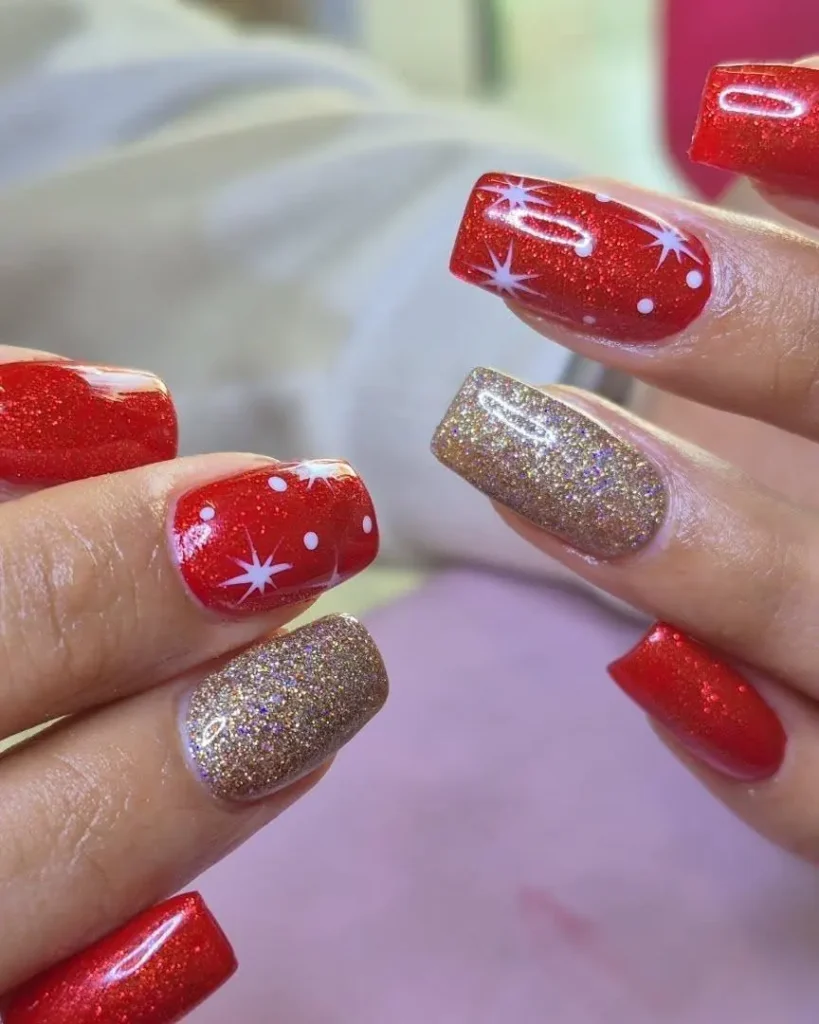
Flag short red glitter nails with one gold holographic glitter accent per hand. Apply the gold glitter in two thin coats, because one thick coat clumps at the edges. Paint the starbursts after the red dries, which means the white stays crisp. Short square corners chip first, so round them slightly at each fill. For a change, swap the starbursts for plain gold dots.
Red glitter nails with a gold glitter accent and snowflakes
Bright red glitter covers medium oval nails, with a dense sparkle on most nails. One accent nail per hand carries full gold glitter, and the gold stays bright against the red. Gold snowflakes sit on two red nails, drawn with fine lines and small dot centres. Length ends past the fingertips in a soft oval shape, and the gloss stays high. Red and gold glitter trade places, so the set feels bright from every angle.
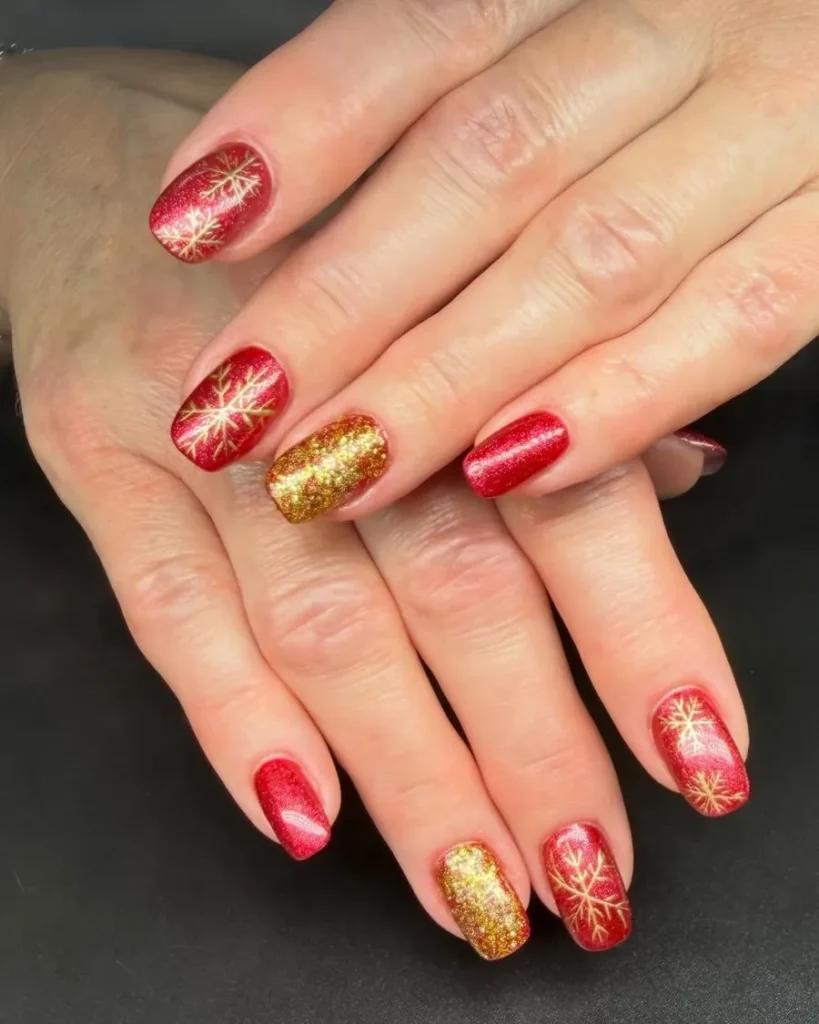
Spell out red glitter nails with one full gold glitter accent and gold snowflakes. Use a sponge for the glitter base, because a brush leaves streaks in dense glitter. Draw snowflakes with a liner brush, which means each line stays thin and even. Gold glitter needs two top coats, so the surface stays smooth and sealed. For upkeep, add a fresh top coat after a week to keep the shine.
Nude nails with crimson tips and thin gold foil lines
Sheer polish covers almond nails, with crimson tips on every nail. Thin gold foil lines separate red tips from the nude base, and stay neat. One nail shows a small gold foil swirl near the tip, and another holds a gold bow shape. Length ends past the fingertips in a soft almond point, and the nude base keeps it light. Gold foil catches light in small flashes, then crimson tips settle into a rich red.
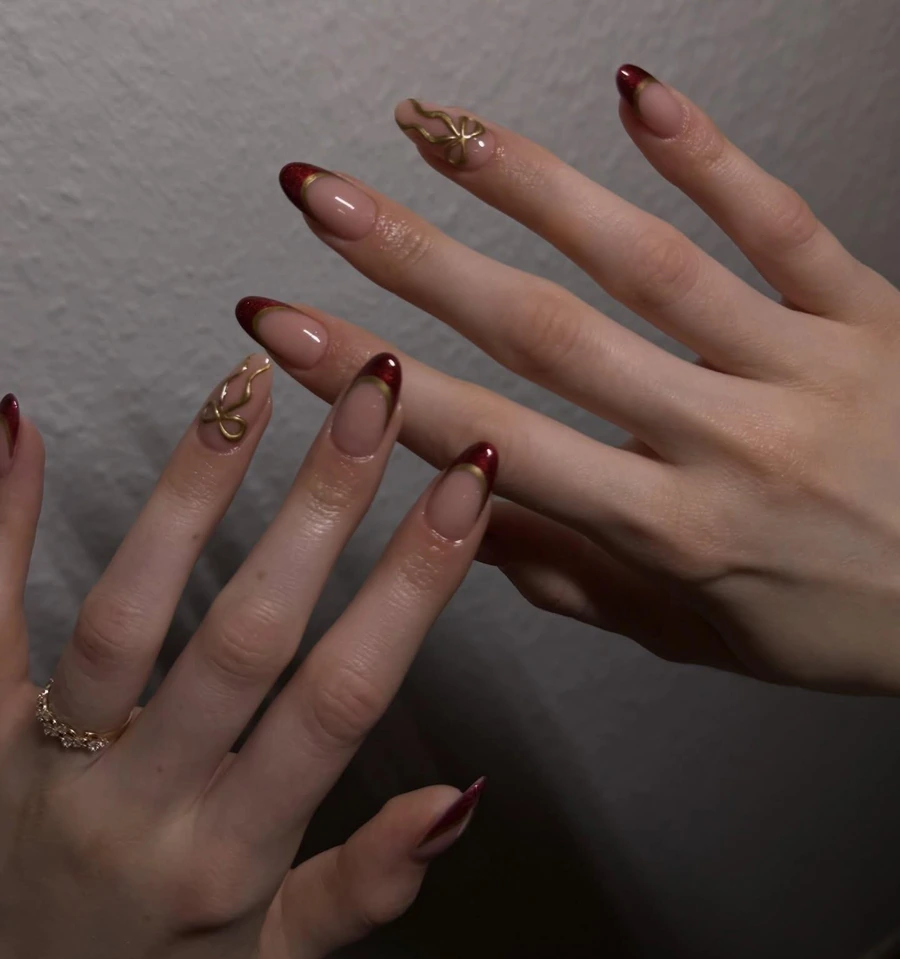
Set out a nude base with crimson tips and thin gold foil lines. Place foil on a tacky layer, because fully dry polish will not grip it. Press the foil flat with a silicone tool, which means the edges lie smooth. Crimson tips show wear at the free edge, so seal the edge with top coat. For a change, use the foil lines on two nails only.
Deep red glitter nails with gold foil line work
Red glitter polish covers almond nails, with a sheer pink base on two accents. Gold foil lines trace the edges of the pink nails, and red glitter fills the tips. One nail carries a full red glitter coat, while the rest mix pink and gold. Length ends past the fingertips in a tapered almond shape, and the gloss stays high. Gold foil lines shine first, then the red glitter settles behind them.
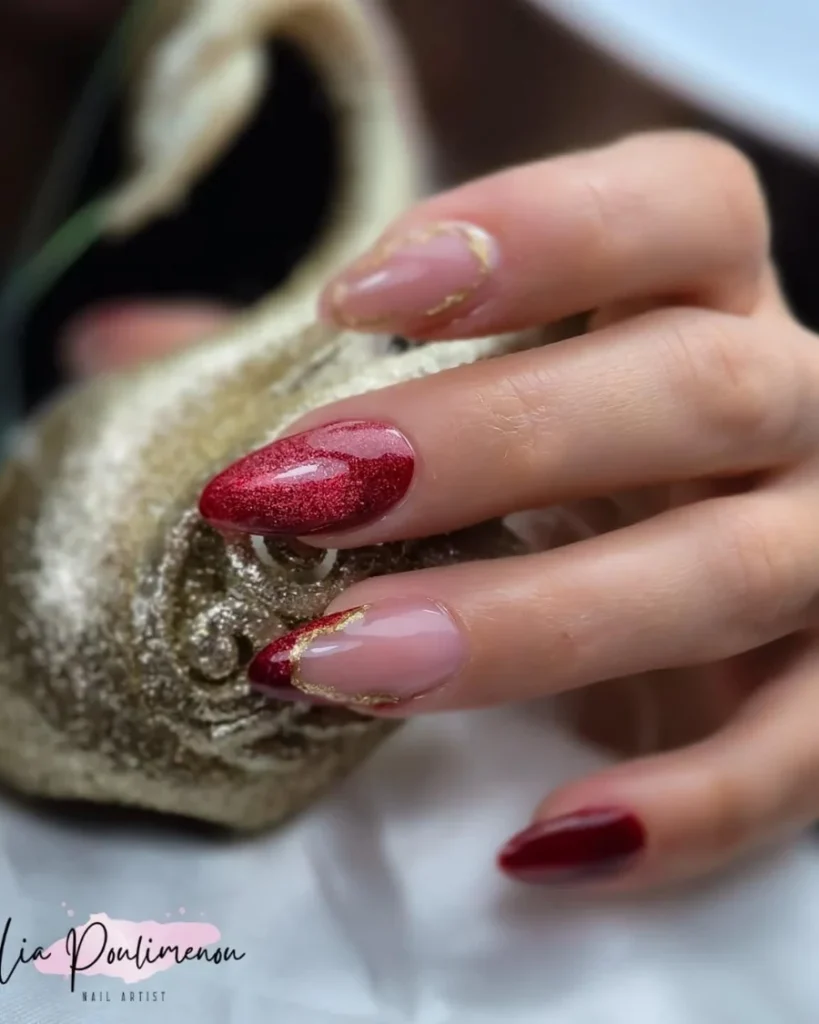
Cover deep red glitter nails with gold foil lines on two pink accent nails. Paint the foil lines with a liner brush, because a wide brush makes them too thick. Let the pink base dry fully, which means the foil lines stay straight. Glitter tips wear first, so cap the free edge with top coat at every coat. For a shorter version, keep the same design on a medium almond length.
Almond nails in red glitter with a small gold bow charm
Gold glitter and solid red glitter mix across long almond nails in one set. One red nail holds a small gold bow charm, with a clear gem at its centre. Gold glitter fills two nails fully, while red glitter covers the rest. Length ends past the fingertips in a tapered almond shape, and the gloss stays high. Red and gold glitter sit side by side, so the bow charm stands out on the red.
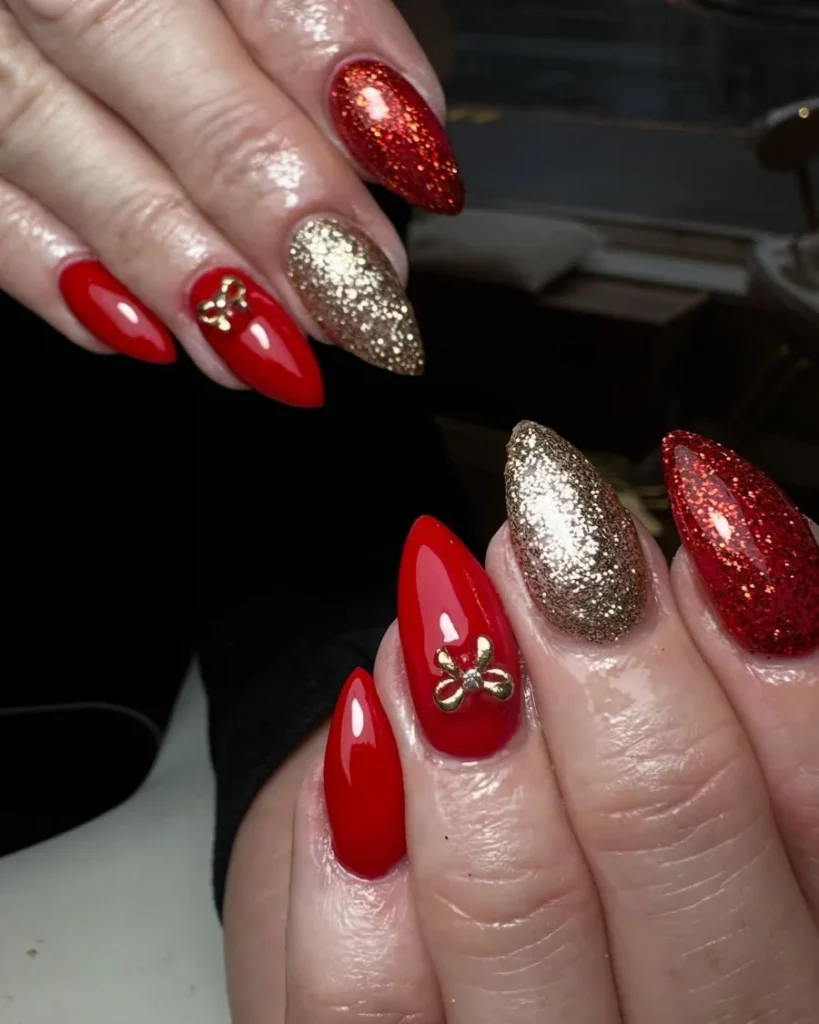
Run through a mixed red and gold glitter set with one small gold bow charm. Set the charm with builder gel, which is a thick gel that adds strength. Seal around the base well. Keep the charm on the ring finger, which means it catches less during daily tasks. Glitter nails need a thick top coat, so the surface feels smooth. For a change, swap the bow for a gold star charm.
Metallic red almond nails with a nude bow accent
Shine runs through deep red polish on almond nails, with a nude base on two accents. Each nude nail shows a hand-drawn bow, made with thin red lines and a gold gem. Gold glitter lines edge red French tips, which links the set together. Length ends past the fingertips in a soft almond point, and red shines throughout. Red, nude, and gold stay in clear blocks, so bows read as the main detail.
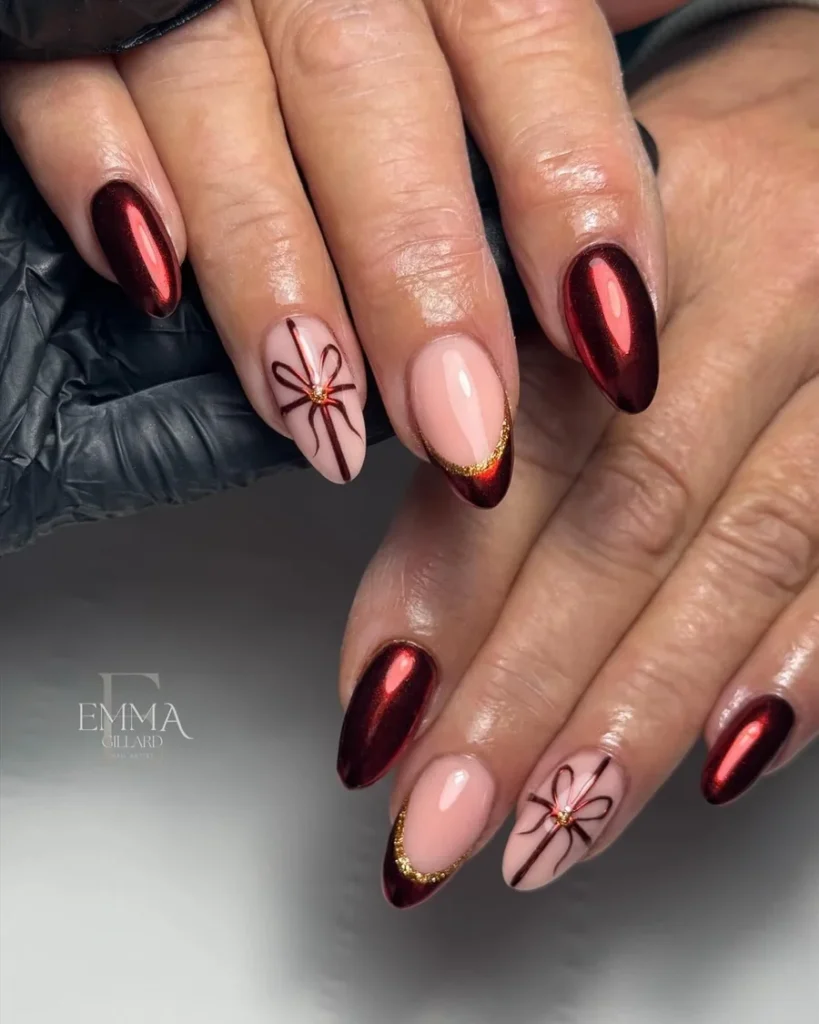
Pick metallic red nails with two nude accent nails and hand-drawn bows. Draw the bow with a fine brush on a dry nude base, because wet polish smears the lines. Place the gold gem at the bow centre with gel, which means it stays put. Metallic polish shows brush lines, so apply it in thin, even coats. For a change, keep the bows on one nail per hand only.
Conclusion
Gold is a small detail that works hard, so it deserves a proper anchor. Foil grips tacky polish, charms need builder gel and a seal around the base, and thin lines need a dry ground. Red and Gold Christmas Nails also show their age at the cuticle, so a fill after two weeks keeps the shape clean. Keep gold on two or three nails for a balanced foil manicure, and the red will look richer beside it. Settle the finish first, since matte and gloss make the same gold look completely different.