

Small festive details can transform a plain manicure into something special without complicated techniques. Red glitter, burgundy polish, forest green, and blush pink bring seasonal colour, while tiny bows, scattered dots, simple stars, and candy-cane stripes add personality. Christmas nails easy enough for beginners focus on achievable patterns, straightforward colour combinations, and designs that do not require professional nail art skills. Gold accents and subtle chrome introduce extra shine, while nude and sheer pink bases keep the overall look balanced. From easy Christmas nail designs to simple holiday manicures, the styles range from glossy solid colours to delicate plaid and French tips.
1. Nude Pink Nails with Metallic Star Decals
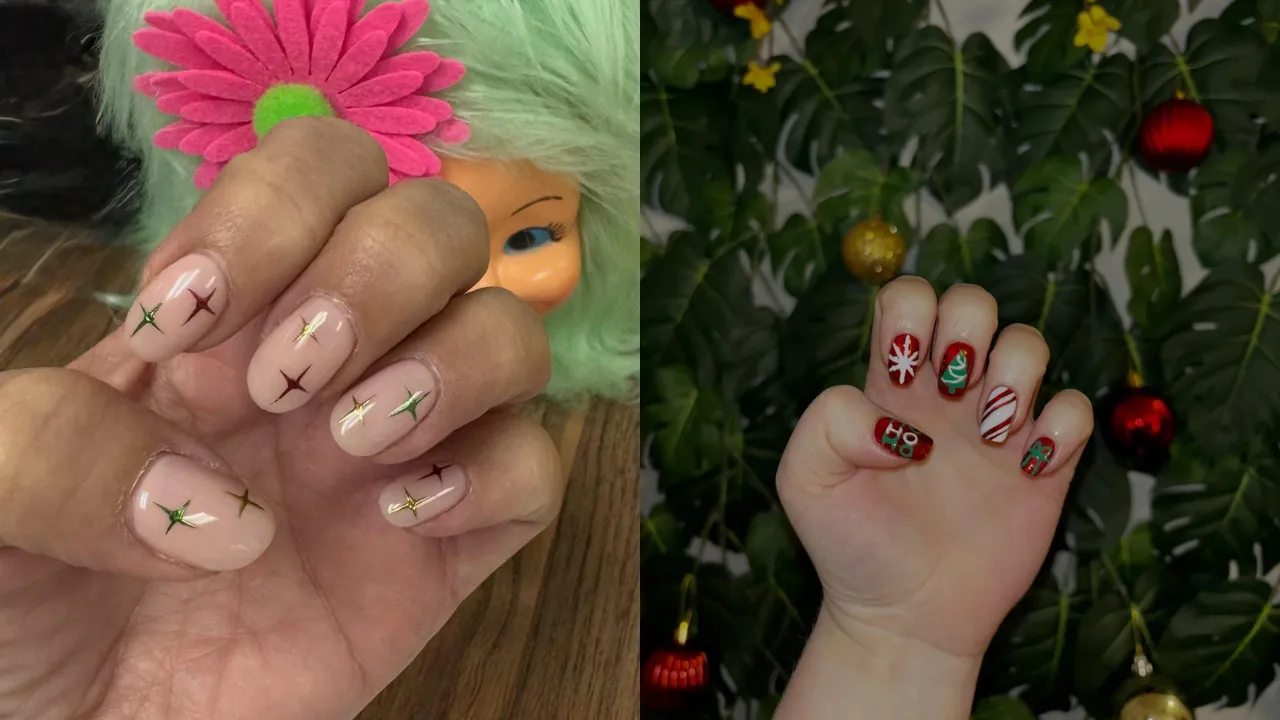
Pale nude pink covers each nail in a soft, glossy coat. Two small four-pointed star decals, ready-made stickers, sit on every nail in green, gold, and dark red. Gold stars catch light first, while green and red stars add color between them. Gloss runs from cuticle to tip, so the pale base stays bright under indoor light. Stars vary in placement, and no two nails share the same pairing.
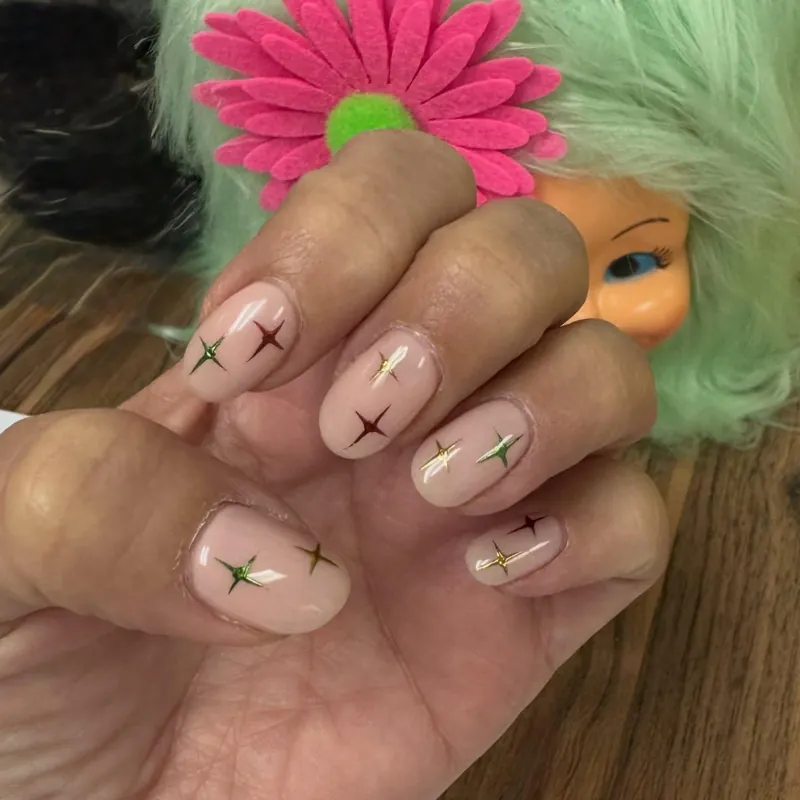
Press two decals onto each nail after the base dries, then smooth each one flat. Mix the three metallic shades across the set, keeping two stars per nail. Seal the decals with a clear top coat, because loose edges lift fast. Space the stars unevenly, so the pattern reads casual rather than matched. Carry spare decals and a dot of top coat, since one can slide off.
2. Red Glitter Nails with Snowflake Tree and Bow
Rich red glitter covers each nail in a dense, sparkling coat. White snowflake arms spread wide on one nail, crisp against the red. Green tree rises on the next nail, topped with a small gold point. Red and white stripes slant across one nail like a candy cane. Green bow curls on another nail, neat and small. White and green letters also spell HO HO on the thumb, bold and playful.
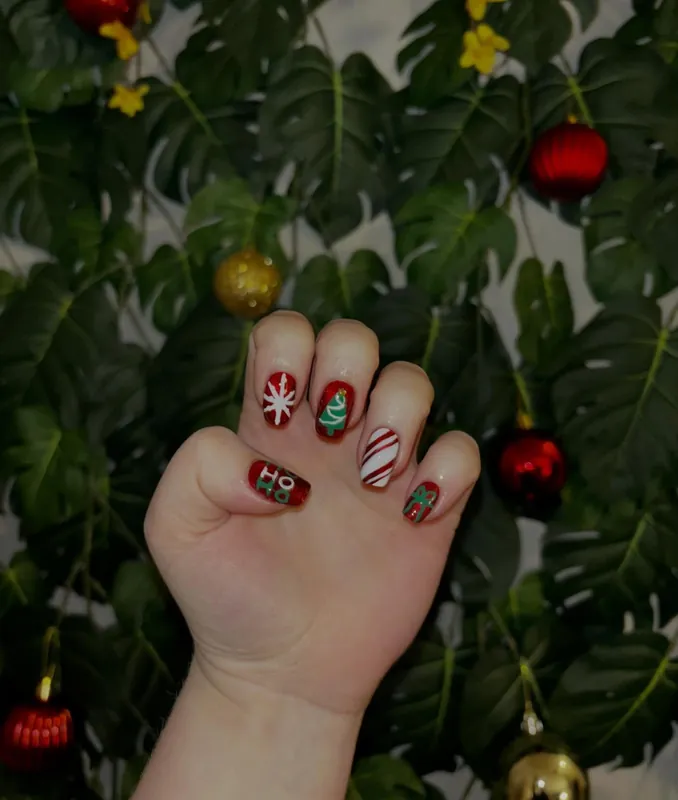
Paint two thin coats of the red glitter first, then let each dry fully. Draw the tree with a thin brush, working from the tip down in small strokes. Stripe the candy nail with tape guides, so the bands stay even. Add the bow and letters last, because wet lines smudge under a brush. Seal everything with a clear top coat, and cap the free edge twice.
3. Pink Nails with Snowflakes Reindeer and Candy Stripes
Soft pink covers each nail in a smooth, glossy coat. White glitter snowflakes dust two nails, fine and sparkling against the pink. Brown and white stripes wind across one nail in a candy-cane slant. Reindeer face sits on another nail, with two black dot eyes, a brown nose, and thin antlers. Pink and white share the set, so the look stays sweet and calm.

Draw the stripes first with a striping brush, keeping the bands even. Dot the eyes and nose with a dotting tool, then add the antlers in fine lines. Stamp or paint the flakes after the base dries, because wet polish smears. Keep the reindeer face small, so it fits one nail without crowding. Seal the set twice with a clear top coat, and cap the free edge.
4. Glossy Red Nails with Scattered Gold Dots
Bright red covers each nail in a deep, glossy coat. Small gold dots scatter across the red, uneven, playful, and light. Dots cluster near some tips, while other nails hold just one or two. Gloss shines in a sharp line down each nail, so the red reads rich. Red and gold share the set, and the dots keep it bright and festive.
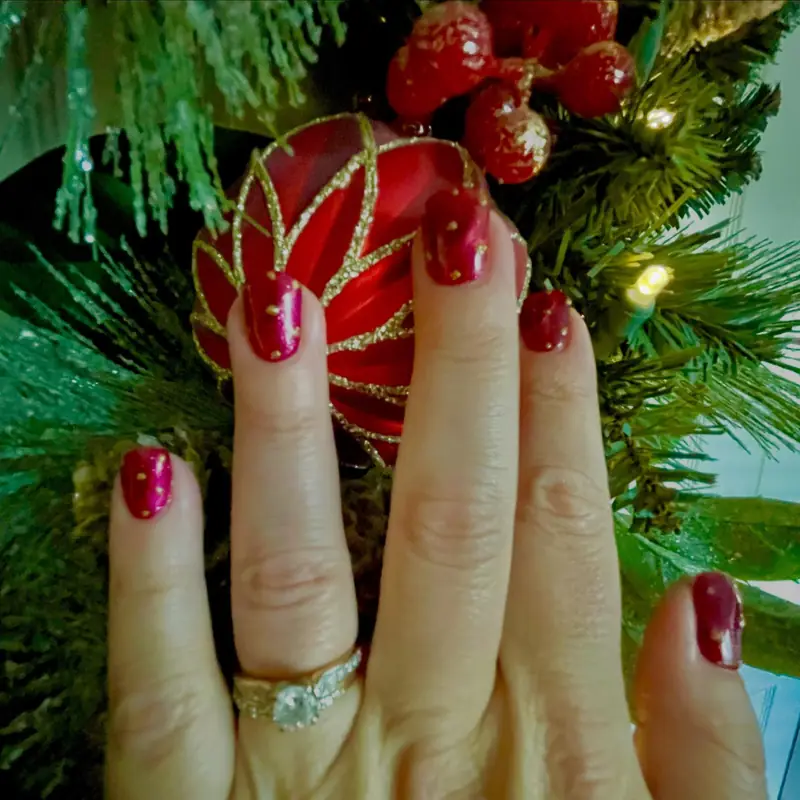
Layer two thin coats of the bright shade, then let each dry fully. Dip a dotting tool in gold polish and press small dots onto the surface. Vary the spacing between dots, so no two nails match exactly. Seal with a clear top coat, because dots lift fast without cover. Wipe stray dots off the skin right away, and clean the brush after.
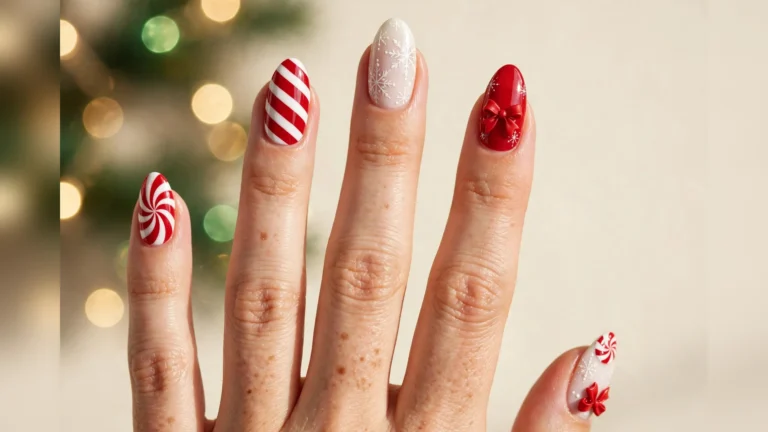
5. Candy Swirls Bows and Wreaths on Nude
Sheer nude pink forms a soft, pale base on every nail. Candy-cane swirls twist around the tips in red and white bands. Red bow outlines loop on two nails, thin and neat against the nude. Green wreath rings one nail, with a small red bow tied at its base. Solid bright red nails carry raised dots, so the set keeps a textured edge.

Start with two thin coats of the sheer base, then let each dry fully. Paint the swirls with a striping brush, curving each line around the tip. Draw the bows with the same brush, keeping the loops loose and even. Ring the wreath nail in green, and dot a red bow at its center. Seal the set twice, because bumps catch on fabric without cover.
6. Red French Tips with Gold Dots on Nude
Pale nude pink covers each nail in a sheer, glossy coat. Bright red tips cap every nail with a clean, curved edge. Tiny gold dots line the smile line, small and evenly spaced. Red tips glow against the nude base, so the contrast reads sharp. Gloss runs from cuticle to tip, and the gold dots catch light as hands move.

Shape the red tips with a striping brush, following the curve of each nail. Paint the nude base first in two thin coats, then let each dry fully. Set the gold dots with a dotting tool, spacing them in a neat arc. Clean stray marks with a flat brush dipped in remover before sealing. Seal the tips twice, since dark shades chip first at the free edge.
7. Dotted Borders Wreath and Bows on Nude
Nude pink forms a soft, pale base on every nail. Solid bright red covers one nail in a glossy, bold coat. Green wreath shape sits on one nail, with a small red bow below it. Red bow outline loops on another nail, thin and neat over the nude. Tiny red and white dots ring the edges of two nails, so the set feels playful.
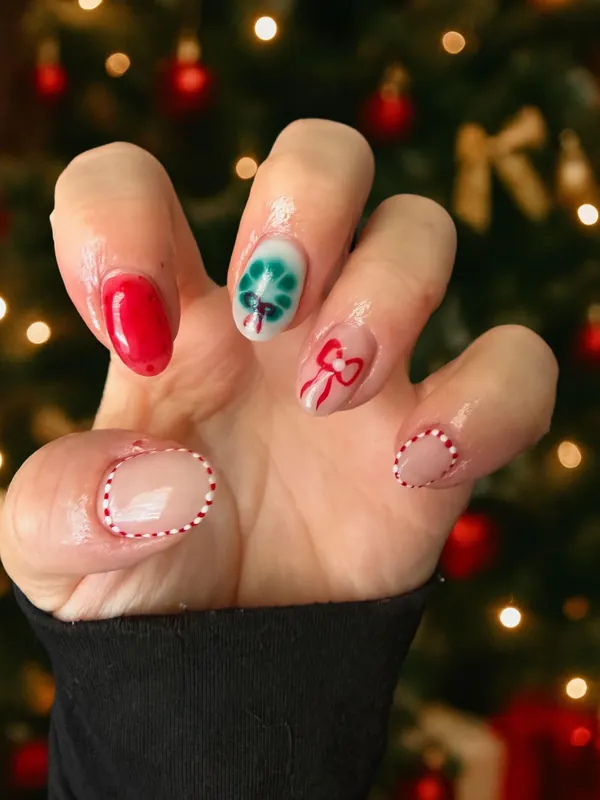
Trace the borders with a dotting tool, alternating red and white dots. Paint the solid nail first, then add the wreath in green. Draw the bow outline with a thin brush, keeping each loop loose. Keep the wreath small, so it fits one nail without crowding. Lock the look in with two clear top coats, and cap the free edge.
8. Deep Red Nails, Gold Lines, Stars and Bow
Rich deep red covers each nail in a glossy coat. Thin gold lines curve across the red in arcs, loops, and soft bends. Gold glitter fills one nail, with red stars and small dots scattered over it. Bow outline in gold ties one nail like a gift, neat and fine. Red and gold share the set, so the shine stays warm and bright.
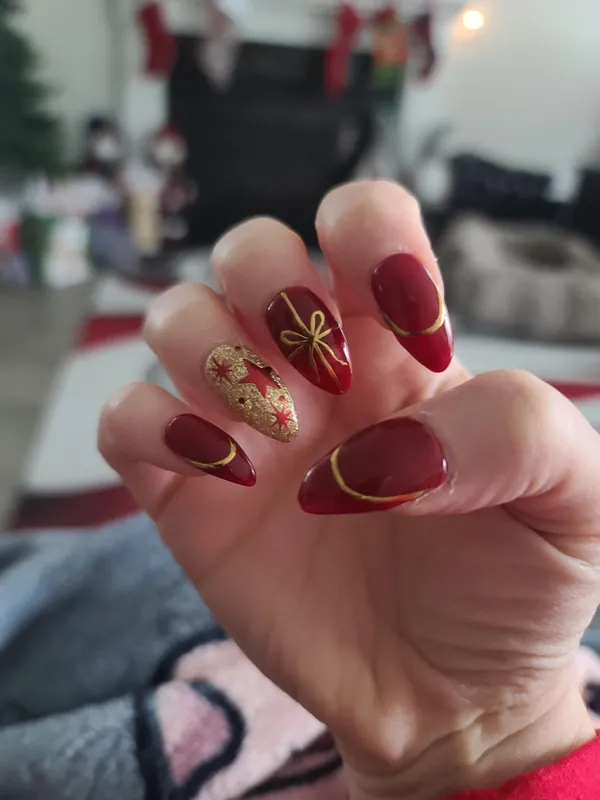
Paint two thin coats of the deep shade, then let each dry fully. Draw the arcs with a striping brush, keeping the lines light and even. Pack glitter onto the accent nail with a flat brush, pressing it in firmly. Add the bow with a thin brush, and set the stars with tweezers. Seal the set twice, because glitter edges catch on fabric without cover.
9. Pale Pink Nails, Lights, Bow and French Tips
Light pink covers each nail in a soft, glossy coat. Black wire curves down one nail, with red and green bulbs hanging from it. Red and green bow loops on another nail, with a small gem at its center. French tips in red and green cap two nails, edged in the opposite color. Red-green starburst spreads on the thumb, so the set stays lively.

Draw the wire first with a thin brush, keeping the line wavy and loose. Dot the bulbs along the wire with a dotting tool, alternating the two colors. Paint the bow with two loops, then set one gem at its center. Shape the French tips with tape, so the edge stays crisp and neat. Seal the set twice, because raised gems snag on fabric without cover.
10. Nude Nails with Tiny Tree Reindeer and Snowflake
Sheer nude forms a pale, glossy base on every nail. Tiny green tree stands on one nail, with red dots as ornaments. Santa-hat tip caps one nail in red and white, neat and small. Candy cane, reindeer face, pudding with holly, and white snowflake fill the other nails. Two nails stay plain nude, so the tiny motifs stand out more.
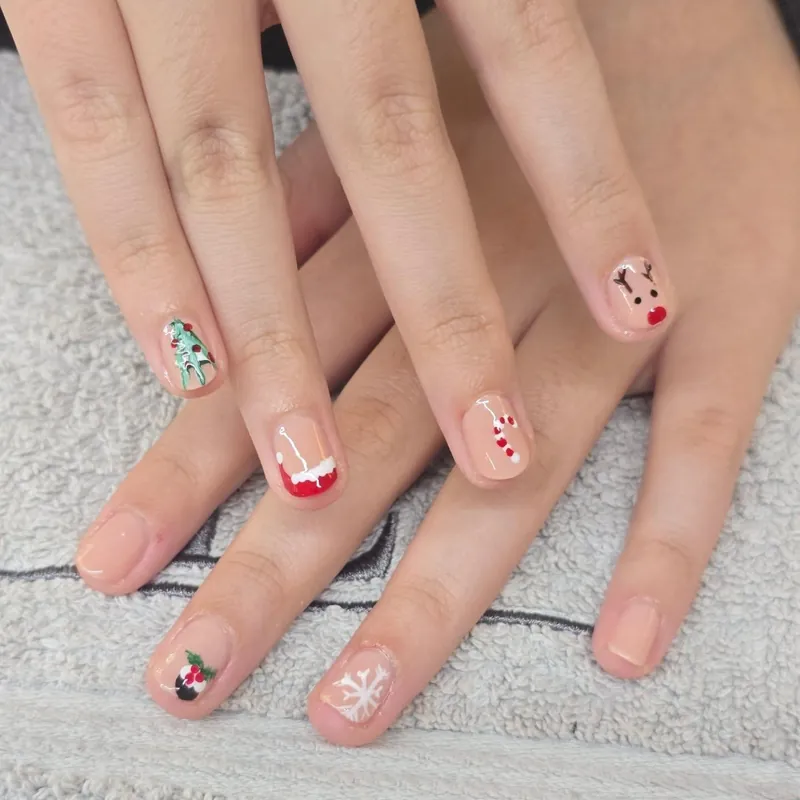
Sketch each motif in pencil-thin lines first, then fill the shapes with color. Paint the tree before the other motifs, because it sits behind them. Dot the ornaments with a dotting tool, spacing them unevenly for a natural look. Keep the reindeer face simple, with two dot eyes and a red nose. Seal the flat nails only, since top coat can blur small painted lines.
11. Dark Green Nails, Polka Dots and White Bow
Very dark green covers three nails in a deep, glossy coat. Green reads almost black here, with just a hint of pine at the edges. Nude nail holds white polka dots, even and neatly spaced. White bow loops on another nude nail, thin and neat against the pale base. Dark and pale share the set, so the dots and bow stand out.
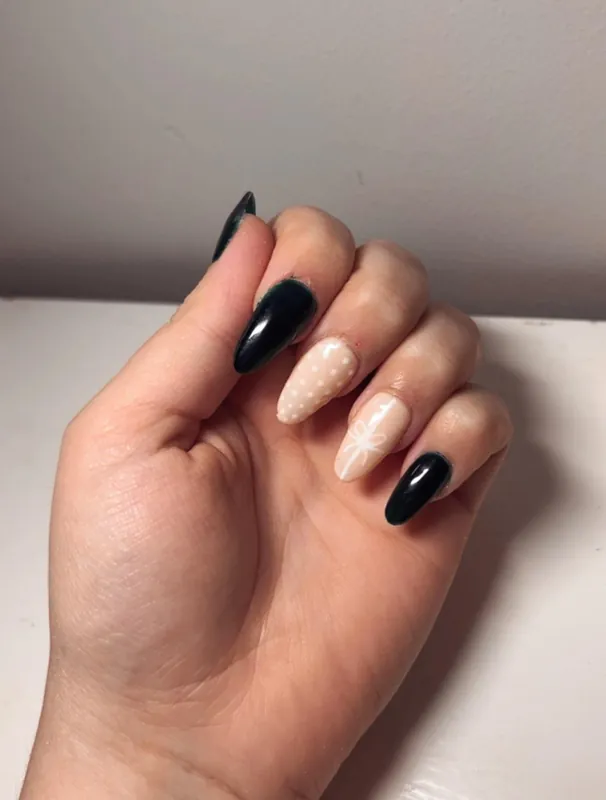
Lay down two thin coats of the dark shade, then let each dry fully. Dot the polka pattern with a dotting tool, keeping the dots even. Draw the bow with a thin brush, starting with two loops and tails. Swap the bow to another finger when the set needs balance. Seal with a glossy top coat, because dark shades show chips fast.
12. Glossy Bright Red Nails in One Solid Color
Bright red covers every nail in one solid, even coat. Color runs deep and warm, with a wet, mirror-like shine from cuticle to tip. No pattern breaks the surface, so the red itself carries the design. Light slides down each nail in a sharp, bright, glossy line. Red reads bold beside pale skin, and the gloss keeps it rich and lively.
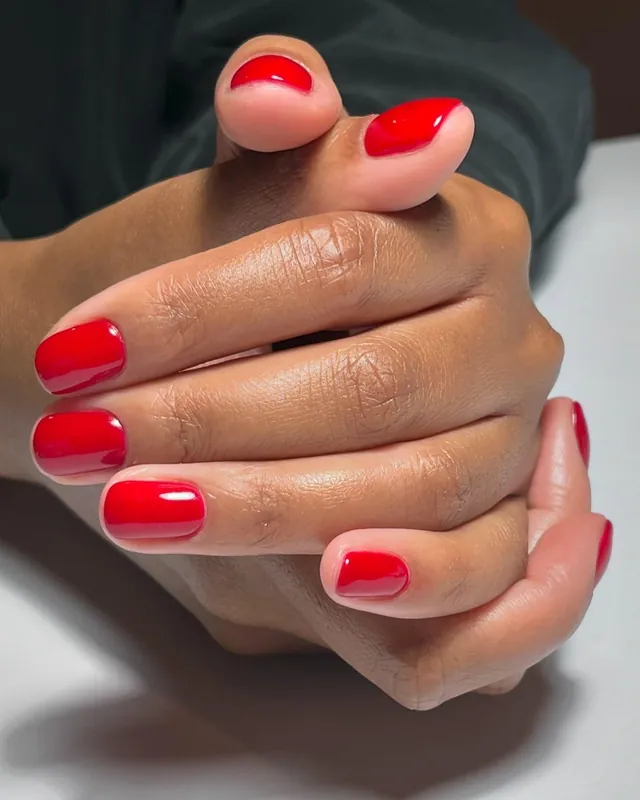
Work in thin coats only, because thick layers show streaks on dark shades. Cap the free edge with each coat, then seal the tips twice. Clean the skin around each nail right away, so the edges stay sharp. Buff the surface lightly before the last coat, since bumps show more on red. Wear gloves for rough tasks, and touch up the tips when wear appears.
13. Snowflake Accents on Glossy Red Nails
Crimson red covers every nail in one glossy, even coat. Shine coats each nail in a wet, bright, mirror-like gloss. Ring fingers carry a single white snowflake each, with fine branching arms and tiny dots. White stands sharp against the red, so the snowflakes read clearly at a glance. Other nails stay plain red, and the dark wood beneath the hands makes the color glow stronger.
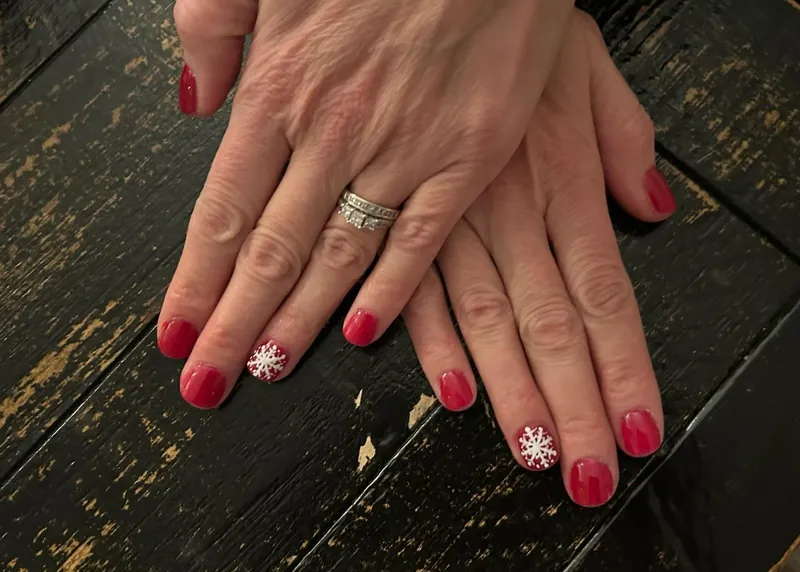
Begin with two thin coats of red, letting one dry before the next. Sketch the snowflake on the ring finger using a thin brush, drawing six arms from one center dot. Keep the arms light and even, so the shape stays crisp. Add tiny dots between the arms for a frosty finish. Seal the set with a glossy top coat, and cap the free edge twice.
14. Red and Green Polka Dots with Tiny Trees
Cherry red nails carry white polka dots, even and neatly spaced. Deep green nails hold the same white dots on a rich, dark base. Pale pink nails show tiny trees in red and green, with dots scattered around them. Trees stand in red, green, and white, small and simple on the pink. Red, green, and white share the set, so the dots tie it together.
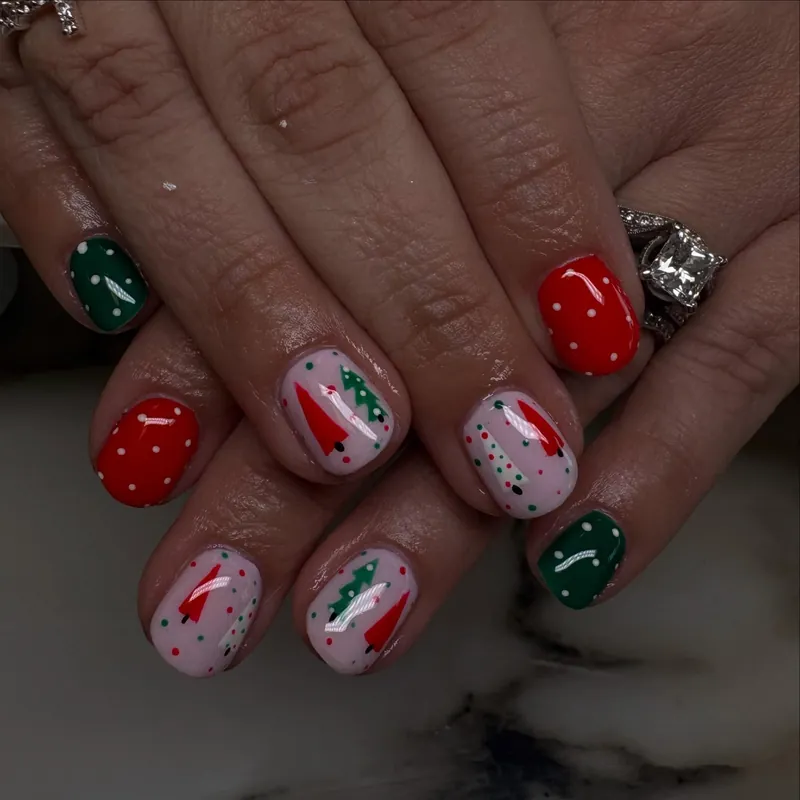
Dot the red and green nails first, then add white dots with a dotting tool. Paint the tiny trees with a thin brush, starting with a trunk and branches. Keep the trees small, so they fit one nail without crowding. Mix the dot colors across the set, and vary the spacing on each nail. Finish with two clear top coats, and cap the free edge twice.
15. Sheer Nude Nails with Confetti Glitter Tips
Clear nude polish washes each nail in a sheer, pale, glossy glow. Red, green, and white confetti glitter gathers thick at the tips. Hexagon and circle glitter pieces catch light, with white dots scattered between them. Glitter fades toward the cuticle, so the base stays calm and clear. Tips hold the densest color, and the shine reads bright and playful.
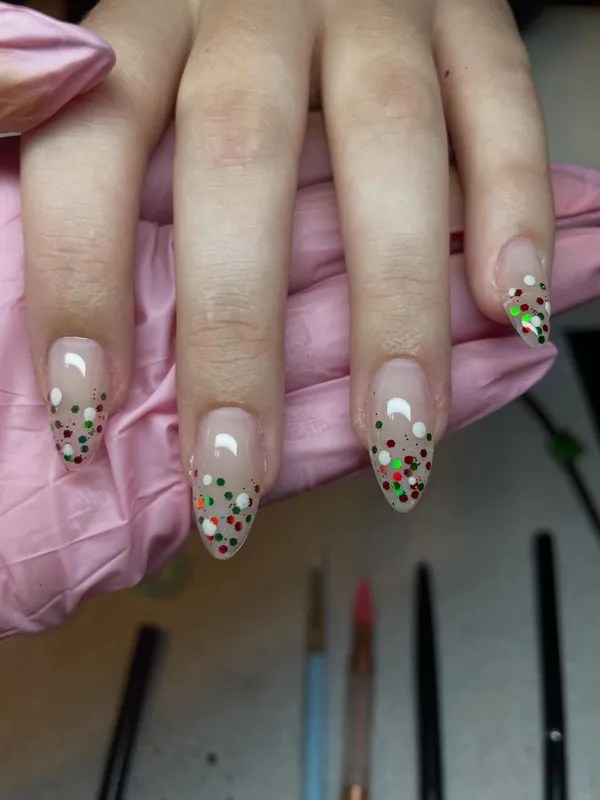
Dust glitter over a sheer base in thin layers, then let each layer dry. Press the pieces flat with a fingertip, because grains can stand up. Add extra glitter at the tips, so the gradient looks dense there. Clean the cuticle line with a small brush, keeping the edges neat. Seal with two coats of top coat, since glitter needs a smooth cover.
16. Skittle Nails in Nude Pink Red and Magenta
Each nail wears a different shade, from nude beige to deep magenta, in one set. Soft pink, bright red, and pale nude sit beside the deep magenta. Holographic glitter flakes cover every nail, flashing gold, pink, and silver. Flakes vary in size, so some nails sparkle more than others. Gloss seals the flakes, and the colors shift with every move of the hands.

Mix and match shades, a different shade on each nail, for this skittle set. Paint two thin coats of each shade, then let each dry fully. Top with a glitter coat while the color stays tacky, so flakes hold. Keep the flakes flat with a fingertip, because raised bits snag on fabric. Swap one shade for a solid glitter nail when the set needs more shine.
17. Pink White Nails, Trees, Bows and Plaid
Blush pink covers most nails in a glossy, even coat. Green tree stands on one pink nail, with a red star on top. Red bow loops on another pink nail, thin and neat. White nails hold red and green dots, plus a red and green plaid grid. Santa-hat tip in white and red caps one nail, so the set stays festive.
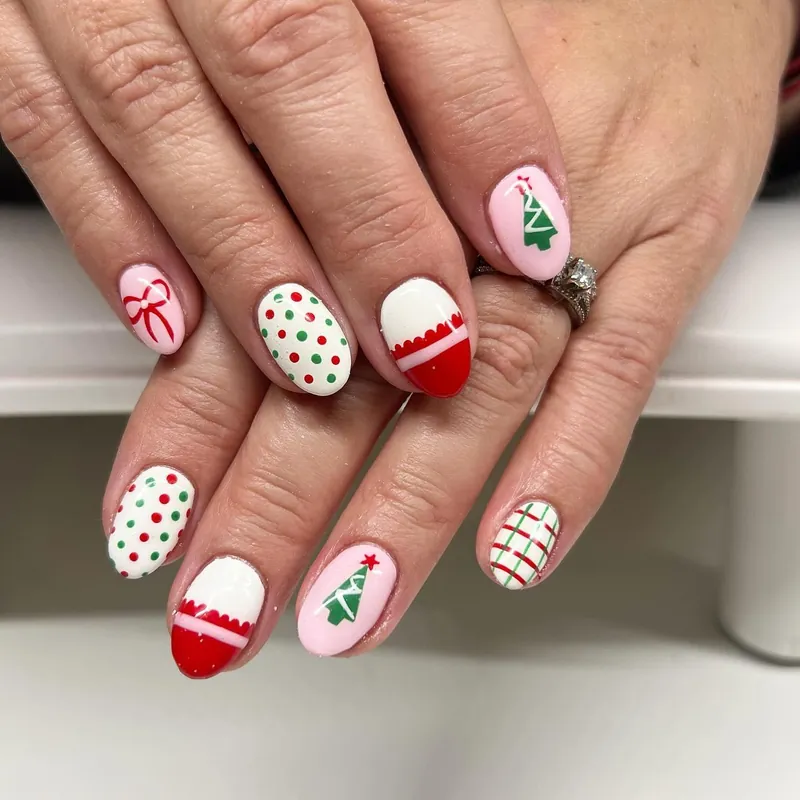
Map the plaid first with thin lines, then fill the squares with color. Paint the tree before the star, because the star sits on top. Dot the polka pattern with a dotting tool, spacing the dots evenly. Draw the bow with the same brush, keeping the loops loose and small. Seal the set twice, since tiny details wear fast without cover.
18. Soft Pink Nails with Stripes and Gold Glitter
Rosy pink covers most nails in a smooth, glossy, even coat. Diagonal white stripes cross one nail, with fine gold glitter between them. Gold glitter fills one nail in a dense, sparkling, even coat. Pink and gold share the set, so the shine stays soft, warm, and calm. Stripes stay crisp against the pink, and the gold glitter catches light.
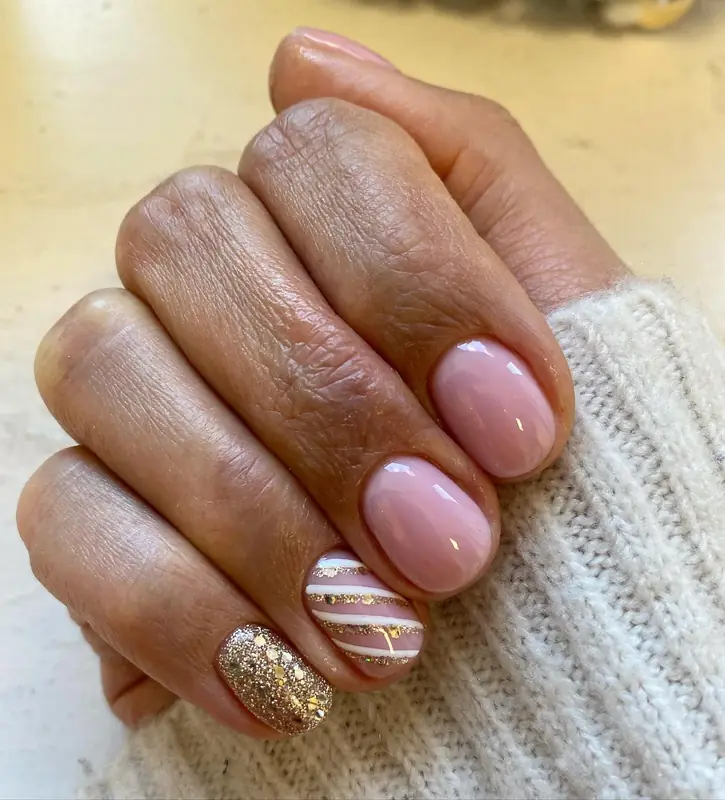
Stripe the accent nail with tape guides, so the bands stay even. Paint the pink base first in two thin coats, then let each dry fully. Pack gold glitter onto the accent nail with a flat brush, pressing it in. Pull the tape while the polish stays wet, because lines blur fast. Top the stripes with two clear coats, and cap the free edge.
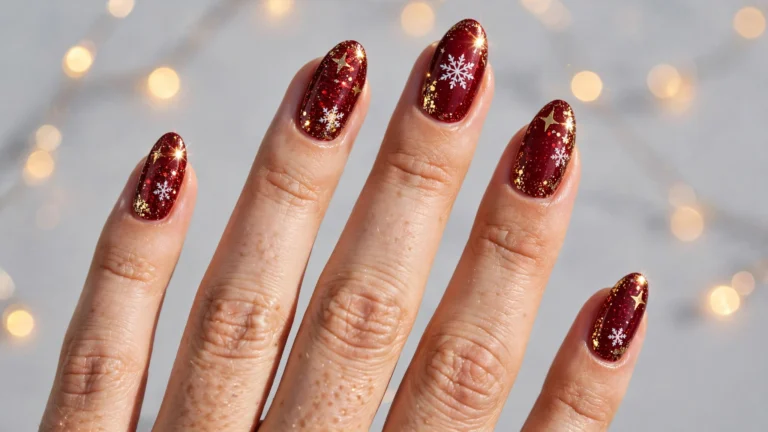
19. Burgundy Nails with Gold Glitter Gradient Tips
Deep burgundy covers each nail in a rich, glossy coat. Gold glitter fades up from the tips, dense at the edge and thin near the base. Glitter catches light as hands move, so the burgundy glows warm. Gradient shifts from dark wine at the cuticle to bright gold at the tip. Burgundy and gold share the set, and the fade keeps it calm.
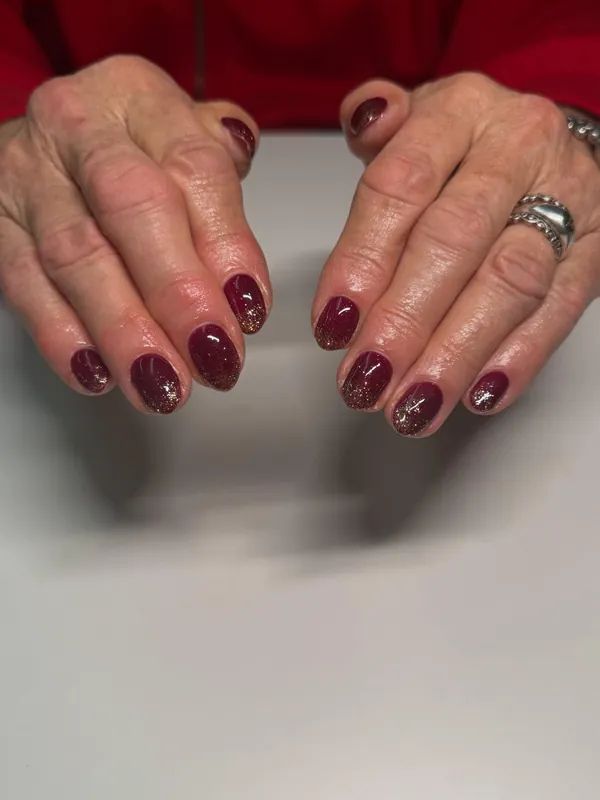
Sponge gold glitter onto the tips, dabbing more near the edge. Paint two thin coats of the deep shade first, then let each dry fully. Repeat the dabbing until the fade looks even, because thin layers build best. Swap the sponge often, since a dry sponge leaves patchy color. Seal with a glossy top coat, and cap the free edge to fight chips.
20. Crimson Glitter Nails with Gold Leaf Sprigs
Dense red glitter covers each nail in a rich, sparkling coat. Gold leaf sprigs spread across two nails, thin and branching. Leaf veins catch light, while the red glitter glows beneath them. Sprigs sit near the cuticle on one nail and near the tip on the other. Red and gold share the set, so the leaves read warm and bright.
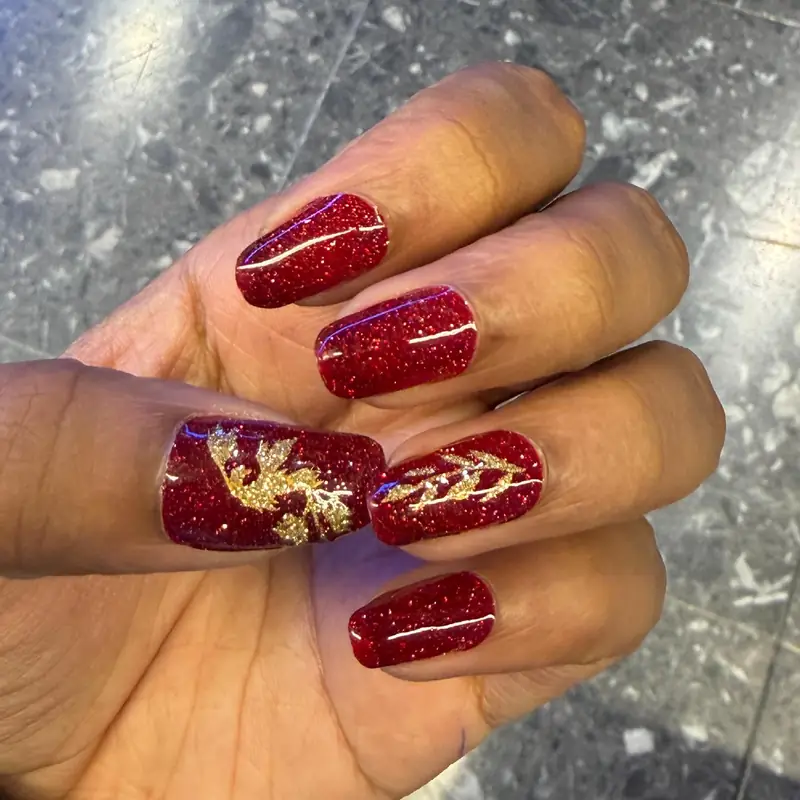
Layer two thin coats of the red glitter, then let each dry fully. Paint the sprigs with a thin brush, working from a stem outward. Press gold foil bits onto wet polish for the leaves, and smooth them flat. Keep the sprigs small, so they fit one nail without crowding. Seal the set twice, because foil edges lift fast without cover.
21. White Stars Glitter Tree and Red Tips
Nude pink forms a soft, pale, glossy base on every nail. White star sparkles dot several nails, four-pointed, crisp, bright, and neat. Gold glitter tree rises on one nail, with white swirls curling around it. Multicolor glitter fills one nail, dense, bright, shifting, and bold under light. Deep red French tip caps one nail, so the set stays balanced and calm.
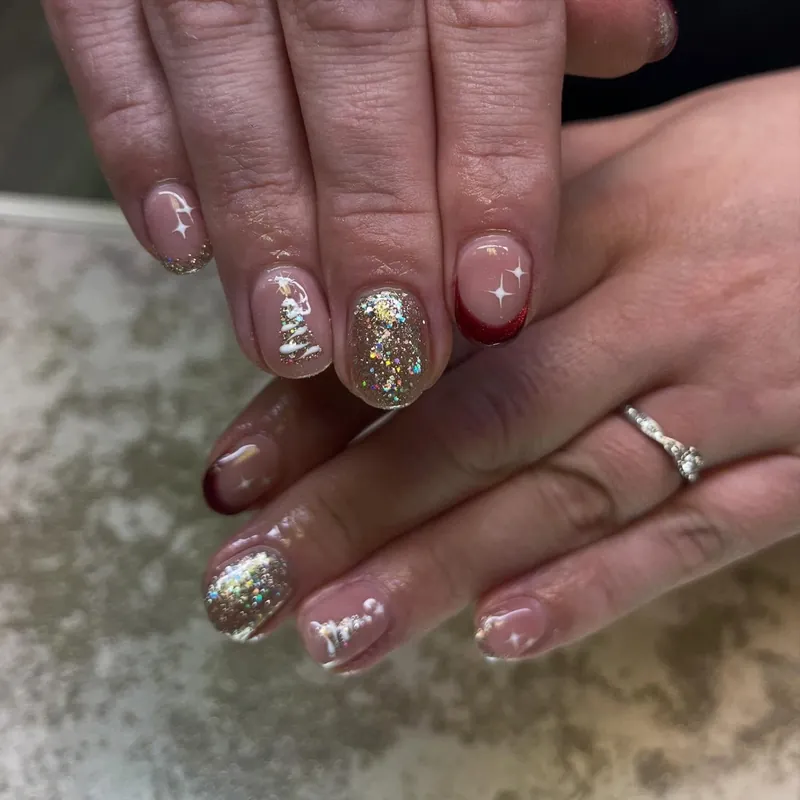
Scatter the stars with a dotting tool, spacing them unevenly. Paint the tree with a thin brush, then wrap white swirls around it. Pack glitter onto the accent nail with a flat brush, pressing it in. Shape the red tip with tape, so the edge stays crisp and neat. Seal the set twice, since glitter edges snag on fabric without cover.
22. Gold Bows and Starbursts on Red Glitter
Bold red glitter covers some nails in a dense, sparkling, even coat. Nude nails hold gold bows, thin and neat against the pale base. Gold starbursts spread on two nails, with red glitter tips below them. Bows loop in gold lines, with small red centers at their knots. Red and gold share the set, so the bows stand out most.
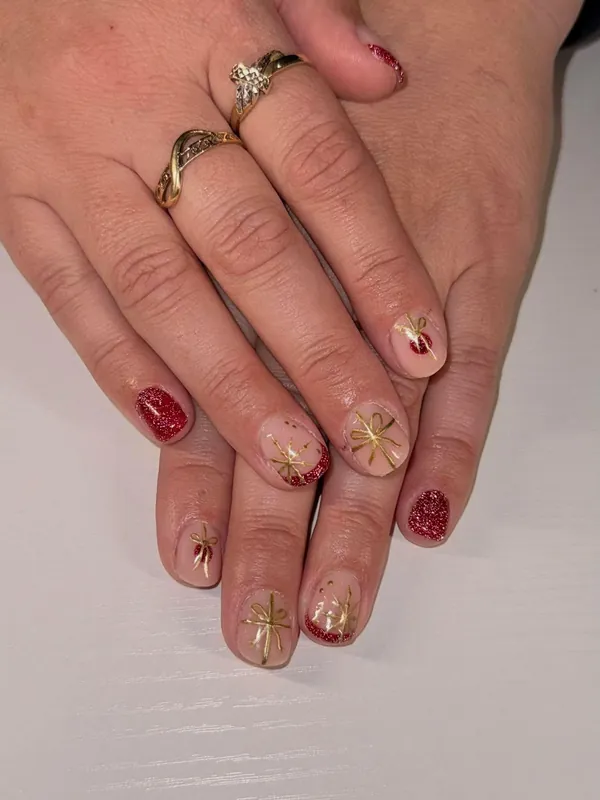
Place the gold bows with a thin brush, keeping each loop loose. Paint the red glitter nails first, then let each dry fully. Draw the starbursts from a center point, so the arms stay even. Add red glitter to the tips last, because wet glitter smears fast. Top the set with two clear coats, and cap the free edge twice.
23. Deep Red Nails with White Speckled Nude Accents
Dark red covers most nails in a deep, glossy coat. Sheer nude nails hold white speckles, scattered like fresh snow on glass. Speckles vary in size, with larger dots near the tips and smaller ones below. Red and nude share the set, so the speckles read bright and clean. Gloss runs from cuticle to tip, and the deep red stays rich.
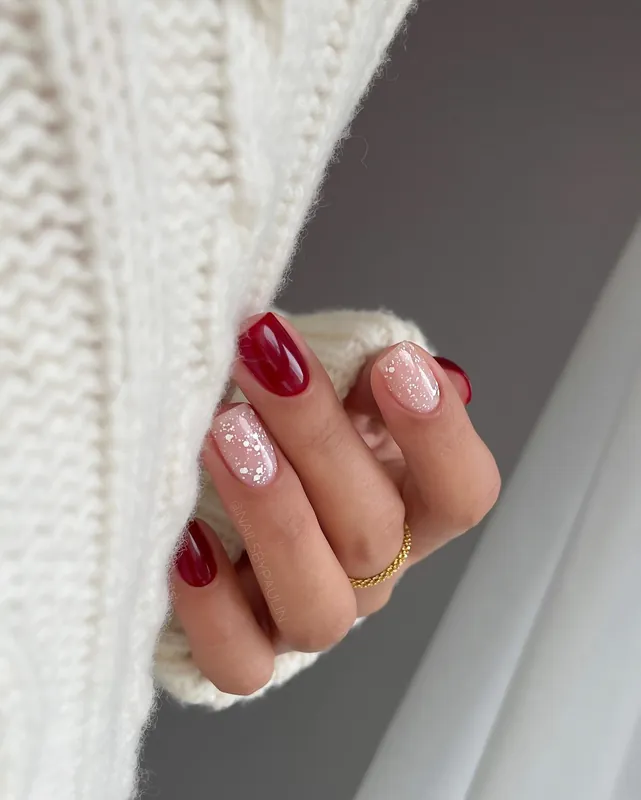
Alternate the dark nails with nude ones, keeping the balance even. Paint two thin coats of the dark shade first, then let each dry fully. Flick white polish from a brush for the speckles, so they land unevenly. Practice the flick on paper first, since drops can land too large. Seal the nails with two clear top coats, and cap the free edge.
24. Bright Red Nails with Gold Glitter Ring Fingers
Cherry red covers most nails in a bright, glossy, even coat. Gold glitter fills the ring fingers in a dense, sparkling, even coat. Glitter shifts between gold and silver as hands move in warm light. Red and gold share the set, so the glitter accent nails stand out most. Gloss runs from cuticle to tip, and the bright red stays vivid.
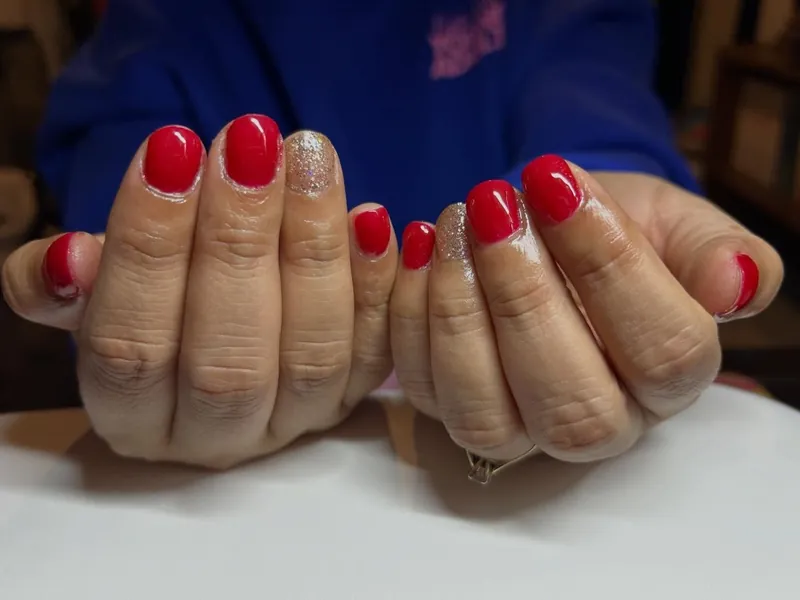
Coat the red nails first in two thin coats, then let each dry fully. Pack glitter onto the accent nails with a flat brush, pressing it in. Swap the accent to another finger when the set needs balance. Keep the glitter flat with a fingertip, because raised bits snag on fabric. Seal with two top coats, since glitter needs a smooth cover.
25. Green and Red Dotted Nails with White Bows
Red nails carry gold dots, even and neatly spaced. Green nails hold the same gold dots on a deep, rich base. Nude nail wears a red and green dotted border, with two white bows inside. Red glitter fills one nail, dense and sparkling from base to tip. Gold, red, and green share the set, so the dots tie it together.
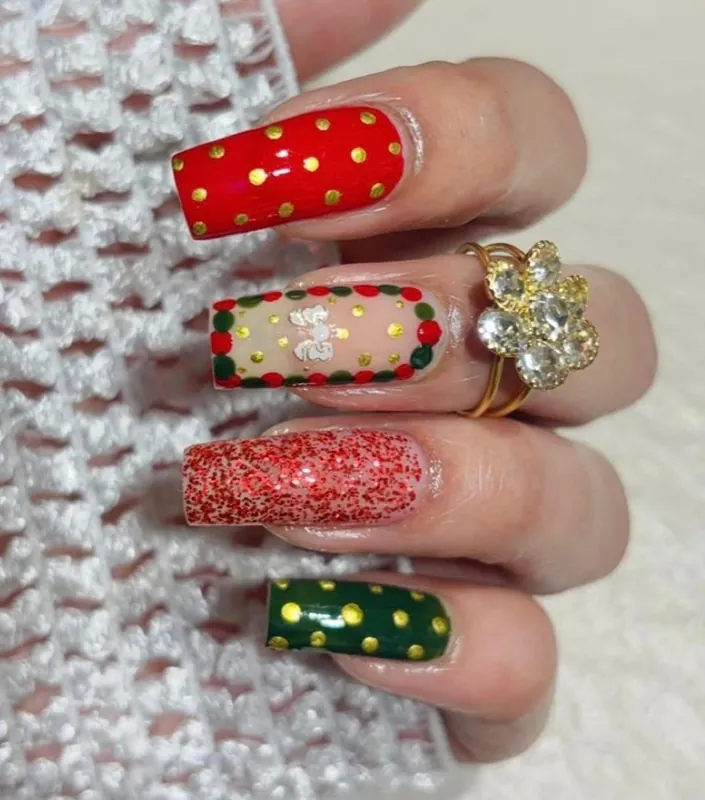
Build the dotted border first, then fill the dots with a dotting tool. Paint the solid nails in red and green, keeping the coats thin. Draw the white bows with a thin brush, starting with two loops. Add the red glitter nail last, because glitter needs a sealed base. Seal the set twice, and cap the free edge to fight chips.
Conclusion
A polished holiday manicure does not depend on intricate artwork or expensive salon products. Red and green accents, delicate gold touches, and glossy finishes bring seasonal character to even the simplest sets. Christmas nails easy enough for beginners make it easier to enjoy creative nail art with basic techniques and manageable details. Simple Christmas nail designs also leave plenty of room to experiment with colours, textures, and small decorative patterns. Finish with a durable top coat to protect the artwork and maintain a smooth shine throughout the holiday season.